こんにちは。Tomoyuki(@tomoyuki65)です。
最近またWeb系開発について興味が湧いたので、最近のトレンドなども含めて色々と調べています。
特に新しいテキストエディタが登場していたり、数年前は情報が少なかったDockerなどの技術情報がめちゃめちゃ得られやすくなっていたり、知らないうちに進歩していてちょっと感動しました。
そんな中、良質なポートフォリオ(Webアプリケーション)制作に向けて、まずは『Docker+Nginx+Puma+Rails+PostgreSQL』による開発環境の構築方法について調べたので、この記事ではそれらをまとめておきます。
※自分で調べて得られた情報をもとにまとめていますが、細かい部分で間違っている箇所もあると思うので、参考程度にご利用下さい。また、現状で理解した部分まで記載していますが、理解が深まり次第、随時情報の追加や更新を行う予定です。
目次
Docker+Nginx+Puma+Rails+PostgreSQLで開発環境構築方法まとめ
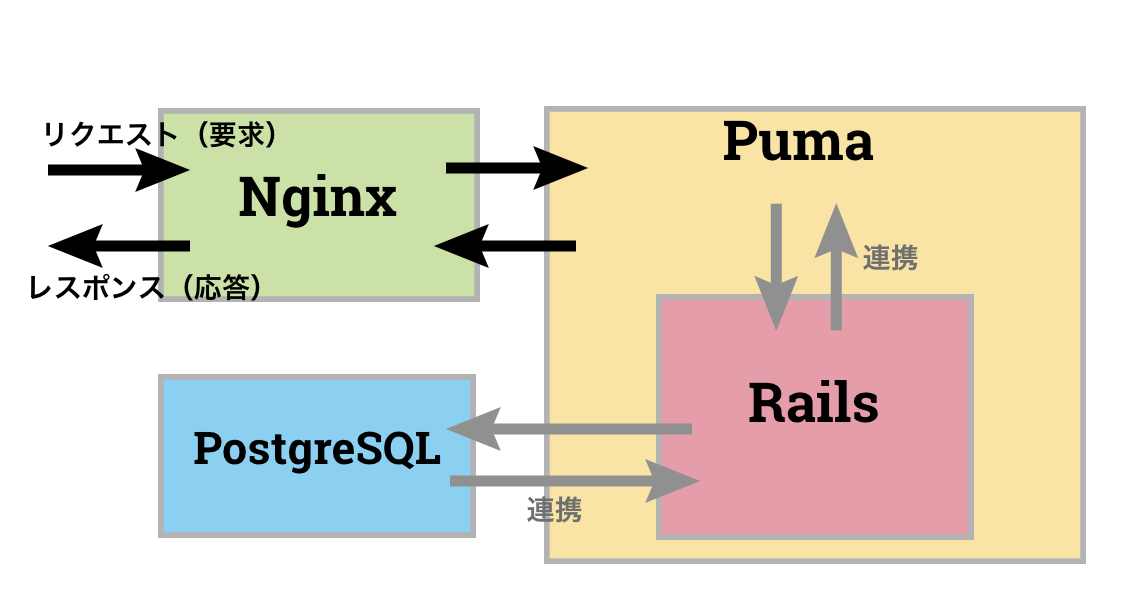
現在はDockerによって開発環境や本番環境の構築が楽になっていることや、初心者の方がまず最初にWebアプリケーションを作るなら無料で利用できるPaaSの「Heroku」を利用することを想定し、今回は『Docker+Nginx+Puma+Rails+PostgreSQL』による開発環境の構築方法について調べました。
各種アーキテクチャについては上図のようなものを想定し、WebサーバーはNginx、アプリケーションサーバーはPuma、アプリケーションフレームワークはRuby on Rails、DBはPostgreSQL(これはHerokuで使いやすいため)になります。
ファイル構成
dnprp-app ---- README.md(メモ用)
           |-- Dockerfile
           |-- docker-compose.yml
           |-- nginx ---- Dockerfile
                      |-- nginx.conf
           |-- environments ---- db.env
           |-- src ---- Gemfile
                    |-- Gemfile.lock
ファイル構成については上記の通り、まず作業用のディレクトリとして”dnprp-app”というフォルダを作成し、その中に各種ファイルやフォルダなどを作成することとします。
$ mkdir dnprp-app
$ cd dnprp-app
$ touch README.md
$ touch Dockerfile
$ touch docker-compose.yml
$ mkdir nginx
$ mkdir environments
$ mkdir src
$ cd nginx
$ touch Dockerfile
$ touch nginx.conf
$ cd ..
$ cd environments
$ touch db.env
$ cd ..
$ cd src
$ touch Gemefile
$ touch Gemefile.lock
$ cd ..
Macのターミナルで各種ファイルやディレクトリを作成するコマンドの実行例は上記の通りです。
各種ファイルの中身
作成した各種ファイルの中身については、下記記載の通りに記述します。
# 2022年5月26日時点の最新安定版
FROM ruby:3.1.2

# railsコンソール中で日本語入力するための設定
ENV LANG C.UTF-8

# RUN apt-get update -qq && apt-get install -y build-essential libpq-dev nodejs
# /var/lib/apt/lists配下のキャッシュを削除し容量を小さくする
RUN apt-get update -qq && \
    apt-get install -y build-essential \
                       libpq-dev \
                       nodejs \
    && rm -rf /var/lib/apt/lists/*

# 作業ディレクトリの設定
RUN mkdir /dnprp-app
ENV APP_ROOT /dnprp-app
WORKDIR $APP_ROOT

# gemfileを追加する
ADD ./src/Gemfile $APP_ROOT/Gemfile
ADD ./src/Gemfile.lock $APP_ROOT/Gemfile.lock

# gemfileのinstall
RUN bundle install
ADD ./src $APP_ROOT

# puma.sockを配置するディレクトリを作成
RUN mkdir -p tmp/sockets
# 2022年5月26日時点の最新版
FROM nginx:1.21.6

# インクルード用のディレクトリ内を削除
RUN rm -f /etc/nginx/conf.d/*

# Nginxの設定ファイルをコンテナにコピー
ADD nginx.conf /etc/nginx/conf.d/dnprp-app.conf

# ビルド完了後にNginxを起動
CMD /usr/sbin/nginx -g 'daemon off;' -c /etc/nginx/nginx.conf
# postgresqlの場合
POSTGRES_USER=ユーザー名(任意の名前を設定)
POSTGRES_PASSWORD=パスワード(任意のパスワードを設定)
PostgreSQL用のユーザー名とパスワードは任意の値を設定して下さい。ここで設定したユーザー名とパスワードについては、後述のdatabase.yml修正時に利用します。
※例:POSTGRES_USER=postgres、POSTGRES_PASSWORD=pass25db05、など
# プロキシ先の指定
# Nginxが受け取ったリクエストをバックエンドのpumaに送信
upstream dnprp-app {
  # ソケット通信したいのでpuma.sockを指定
  server unix:///dnprp-app/tmp/sockets/puma.sock;
}

server {
  listen 80;
  # ドメインもしくはIPを指定
  #server_name example.com [or 192.168.xx.xx [or localhost]];
  server_name localhost

  access_log /var/log/nginx/access.log;
  error_log  /var/log/nginx/error.log;

  # ドキュメントルートの指定
  root /dnprp-app/public;

  client_max_body_size 100m;
  error_page 404             /404.html;
  error_page 505 502 503 504 /500.html;
  try_files  $uri/index.html $uri @dnprp-app;
  keepalive_timeout 5;

  # リバースプロキシ関連の設定
  location @dnprp-app {
    proxy_set_header X-Real-IP $remote_addr;
    proxy_set_header X-Forwarded-For $proxy_add_x_forwarded_for;
    proxy_set_header Host $http_host;
    proxy_pass http://dnprp-app;
  }
}
※このファイルの設定において、リクエストをWebサーバーのNginxで受け取り、それをアプリケーションサーバーのPumaに渡している。ただし、細かい詳細は調査中。(難しいね!)
source 'https://rubygems.org'
# 2022年5月26日時点の最新版
gem 'rails', '7.0.3'
GemfileはRailsアプリケーションに関するファイル(インストールしたいgemを記述する)になっています。また、Gemfile.lockの中身は空でOKです。
version: '3'
services:
  # アプリケーションに関する記述
  app:
    build:
      # contextは読み込むDockerfileの場所を指定
      context: .
    env_file:
      - ./environments/db.env
    command: bundle exec puma -C config/puma.rb
    volumes:
      # ローカルのフォルダ「src」にマウント
      - ./src:/dnprp-app
      # コンテナの中身を保存しておくために作成したボリュームでマウント
      - public-data:/dnprp-app/public
      - tmp-data:/dnprp-app/tmp
      - log-data:/dnprp-app/log
    # db起動後にappを起動させる設定(依存関係)
    depends_on:
      - db
  # DBに関する記述(PostgreSQLの場合)
  db:
    # 2022年5月26日時点の最新版
    image: postgres:14.3
    env_file:
      - ./environments/db.env
    # コンテナの中身を保存しておくために作成したボリュームでマウント
    volumes:
      - db-data:/var/lib/postgresql/data
  # Webサーバーに関する記述
  web:
    build:
      # contextは読み込むDockerfileの場所を指定
      context: ./nginx
    volumes:
      # コンテナの中身を保存しておくために作成したボリュームでマウント
      - public-data:/dnprp-app/public
      - tmp-data:/dnprp-app/tmp
    ports:
      - 80:80
    # app起動後にwebを起動させる設定(依存関係)
    depends_on:
      - app
# Dockerコンテナの中身を保存しておくための領域を設定
volumes:
  public-data:
  tmp-data:
  log-data:
  db-data:
Railsアプリケーションの生成と編集
$ docker-compose run --rm app rails new . --force --database=postgresql --skip-bundle
各種ファイルの準備完了後、上記のコマンドを実行してRailsアプリケーションを生成します。
Railsアプリケーションの各種ファイルはDockerコンテナ内に生成されますが、docker-compose.ymlで設定したようにローカルのフォルダ「src」にマウントしてあるため、ローカルにあるフォルダ「src」内から中身を参照できるようになっています。
次はRailsアプリケーションのファイルである「puma.rb」と「database.yml」の中身を修正しますが、それらはフォルダ「config」内にあります。(/src/configを参照)
# 最初に全てコメントアウト
=begin
# Puma can serve each request in a thread from an internal thread pool.
# The `threads` method setting takes two numbers: a minimum and maximum.
# Any libraries that use thread pools should be configured to match
# the maximum value specified for Puma. Default is set to 5 threads for minimum
# and maximum; this matches the default thread size of Active Record.
#
max_threads_count = ENV.fetch("RAILS_MAX_THREADS") { 5 }
min_threads_count = ENV.fetch("RAILS_MIN_THREADS") { max_threads_count }
threads min_threads_count, max_threads_count

# Specifies the `worker_timeout` threshold that Puma will use to wait before
# terminating a worker in development environments.
#
worker_timeout 3600 if ENV.fetch("RAILS_ENV", "development") == "development"

# Specifies the `port` that Puma will listen on to receive requests; default is 3000.
#
port ENV.fetch("PORT") { 3000 }

# Specifies the `environment` that Puma will run in.
#
environment ENV.fetch("RAILS_ENV") { "development" }

# Specifies the `pidfile` that Puma will use.
pidfile ENV.fetch("PIDFILE") { "tmp/pids/server.pid" }

# Specifies the number of `workers` to boot in clustered mode.
# Workers are forked web server processes. If using threads and workers together
# the concurrency of the application would be max `threads` * `workers`.
# Workers do not work on JRuby or Windows (both of which do not support
# processes).
#
# workers ENV.fetch("WEB_CONCURRENCY") { 2 }

# Use the `preload_app!` method when specifying a `workers` number.
# This directive tells Puma to first boot the application and load code
# before forking the application. This takes advantage of Copy On Write
# process behavior so workers use less memory.
#
# preload_app!

# Allow puma to be restarted by `bin/rails restart` command.
plugin :tmp_restart
=end
# 以下を追加
threads_count = ENV.fetch("RAILS_MAX_THREADS") { 5 }.to_i
threads threads_count, threads_count
port        ENV.fetch("PORT") { 3000 }
environment ENV.fetch("RAILS_ENV") { "development" }
plugin :tmp_restart

app_root = File.expand_path("../..", __FILE__)
bind "unix://#{app_root}/tmp/sockets/puma.sock"

stdout_redirect "#{app_root}/log/puma.stdout.log", "#{app_root}/log/puma.stderr.log", true
puma.rbを開いて中身を一旦全てコメントアウト(=begin、=endで囲む)し、上記のコメント「# 以下を追加」から下の部分のコードを追加します。
※これはアプリケーションサーバーの設定になりますが、詳細は調査中(難しいね!)
# PostgreSQL. Versions 9.3 and up are supported.
#
# Install the pg driver:
#   gem install pg
# On macOS with Homebrew:
#   gem install pg -- --with-pg-config=/usr/local/bin/pg_config
# On macOS with MacPorts:
#   gem install pg -- --with-pg-config=/opt/local/lib/postgresql84/bin/pg_config
# On Windows:
#   gem install pg
#       Choose the win32 build.
#       Install PostgreSQL and put its /bin directory on your path.
#
# Configure Using Gemfile
# gem "pg"
#
default: &default
  adapter: postgresql
  encoding: unicode
  # For details on connection pooling, see Rails configuration guide
  # https://guides.rubyonrails.org/configuring.html#database-pooling
  pool: <%= ENV.fetch("RAILS_MAX_THREADS") { 5 } %>
  # 以下を追加
  # db.envで設定したユーザー名とパスワードを設定する
  username: <%= ENV.fetch('POSTGRES_USER') { 'ユーザー名' } %>
  password: <%= ENV.fetch('POSTGRES_PASSWORD') { 'パスワード' } %>
  host: db

development:
  <<: *default
  database: dnprp_app_development

  # The specified database role being used to connect to postgres.
  # To create additional roles in postgres see `$ createuser --help`.
  # When left blank, postgres will use the default role. This is
  # the same name as the operating system user running Rails.
  #username: dnprp_app

  # The password associated with the postgres role (username).
  #password:

  # Connect on a TCP socket. Omitted by default since the client uses a
  # domain socket that doesn't need configuration. Windows does not have
  # domain sockets, so uncomment these lines.
  #host: localhost

  # The TCP port the server listens on. Defaults to 5432.
  # If your server runs on a different port number, change accordingly.
  #port: 5432

  # Schema search path. The server defaults to $user,public
  #schema_search_path: myapp,sharedapp,public

  # Minimum log levels, in increasing order:
  #   debug5, debug4, debug3, debug2, debug1,
  #   log, notice, warning, error, fatal, and panic
  # Defaults to warning.
  #min_messages: notice

# Warning: The database defined as "test" will be erased and
# re-generated from your development database when you run "rake".
# Do not set this db to the same as development or production.
test:
  <<: *default
  database: dnprp_app_test

# As with config/credentials.yml, you never want to store sensitive information,
# like your database password, in your source code. If your source code is
# ever seen by anyone, they now have access to your database.
#
# Instead, provide the password or a full connection URL as an environment
# variable when you boot the app. For example:
#
#   DATABASE_URL="postgres://myuser:mypass@localhost/somedatabase"
#
# If the connection URL is provided in the special DATABASE_URL environment
# variable, Rails will automatically merge its configuration values on top of
# the values provided in this file. Alternatively, you can specify a connection
# URL environment variable explicitly:
#
#   production:
#     url: <%= ENV["MY_APP_DATABASE_URL"] %>
#
# Read https://guides.rubyonrails.org/configuring.html#configuring-a-database
# for a full overview on how database connection configuration can be specified.
#
production:
  <<: *default
  database: dnprp_app_production
  username: dnprp_app
  password: <%= ENV["DNPRP_APP_DATABASE_PASSWORD"] %>
database.ymlを開いて「default: &default」の設定に上記のコメント「# 以下に追加」の部分を追記します。尚、ユーザー名とパスワードはdb.envで設定した値に変更して下さい。
※これはDBの設定になりますが、詳細は調査中(難しいね!)
イメージのビルドとコンテナの起動
$ docker-compose build
各種ファイルを修正後、上記のコマンドでDockerコンテナのイメージを作成します。
$ docker images
上記のコマンドで作成したイメージを確認できますが、REPOSITORYに「dnprp-app-web」と「dnprp-app-app」が作成されているのがわかります。
$ docker-compose up -d
そして上記コマンドにて、Dockerコンテナを立ち上げます。(オプションに「-d」を指定すると、デーモンとしてバックグラウンドで起動します。)
$ docker-compose ps
そして上記コマンドにて、コンテナが起動しているかを確認できますが、「dnprp-app_app_1」、「dnprp-app_db_1」、「dnprp-app_web_1」のStateが「Up」になっていれば起動していることになります。

DBの作成とRailsアプリケーションの表示確認
$ docker-compose exec app rails db:create
Dockerコンテナ起動後、上記のrailsコマンドを実行してDBを作成します。これで今回ご紹介する開発環境の構築は完了です。
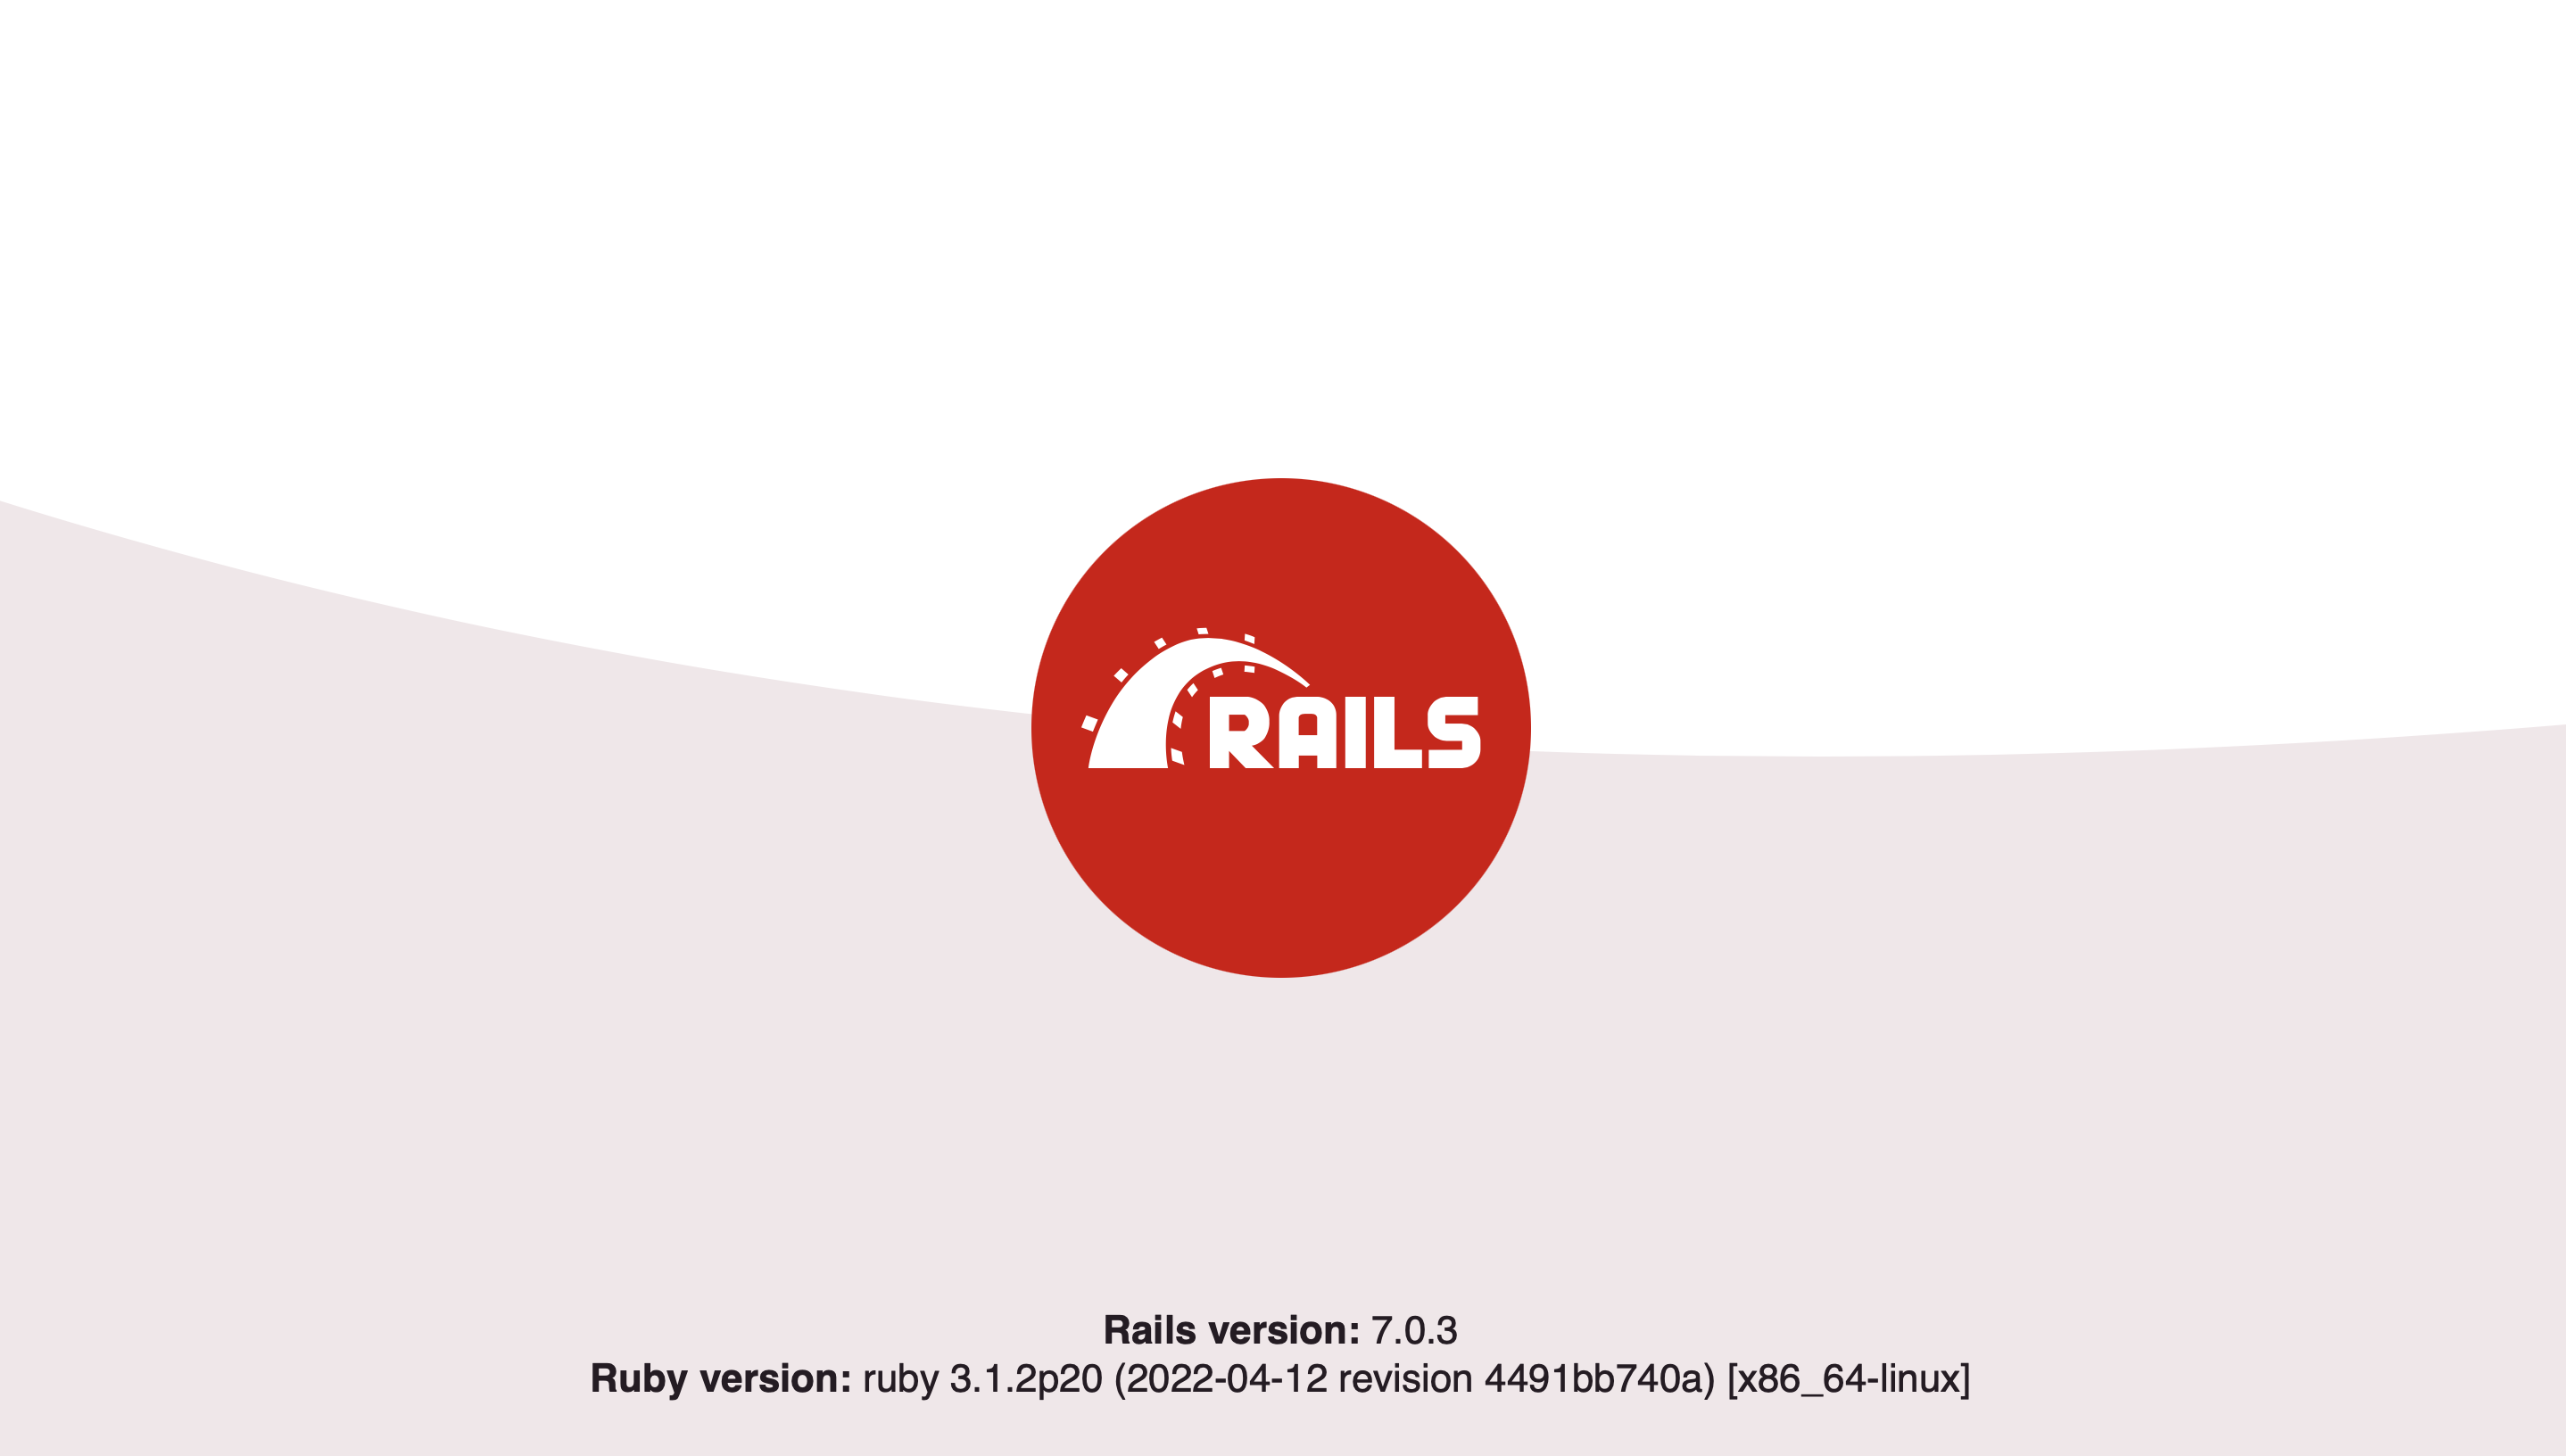
Dockerコンテナ起動中にブラウザで「http://localhost」を確認し、Ruby on Railsの画面が表示されていればOKです。
Dockerコンテナの停止と再起動
$ docker-compose stop
最後に、開発作業を中断、終了するような場合は、上記コマンドにて起動しているDockerコンテナを停止させましょう。
$ docker-compose start
また、作業を再開する場合は上記コマンドにてDockerコンテナを再び起動できます。
最後に
今回は『Docker+Nginx+Puma+Rails+PostgreSQL』による開発環境の構築方法についてまとめました。
各種ファイルの細かい内容についてはまだまだ調査中ですが、今回ご紹介した方法でRuby on Railsの開発環境を構築できます。
これから良質なポートフォリオ(Webアプリケーション)を作る第一歩を踏み出す方は、ぜひ参考にしてみて下さい。
合わせて読みたい👇
Tomoyuki
最新記事 by Tomoyuki (全て見る)
- PythonのDjangoで管理画面を開発する方法まとめ - 2025年12月24日
- PythonのFastAPIでDDD(ドメイン駆動設計)構成のバックエンドAPIを開発する方法まとめ - 2025年12月6日
- ITエンジニア採用は難しい!?現役Web系エンジニア視点における問題点と解決策まとめ - 2025年9月15日






コメントを残す