

こんにちは。Tomoyuki(@tomoyuki65)です。
私が最初に学び始めたフレームワークとしてはRailsですが、その後の実務ではLaravel(PHP)を使ってきました。
そんな私が久しぶりにRailsを触ってみたいと思ったのと、合わせてRailsの最小構成からAPIを開発する方法を試したかったので、やってみることにしました。
そこでこの記事では、私が久しぶりに試したRails7の最小構成でバックエンドAPIを開発する方法についてまとめておきます。
Railsの関連記事👇
目次
Rails7で最小構成からバックエンドAPIを開発する方法まとめ
まず以下のコマンドを実行し、各種ファイルを作成します。
$ mkdir rails_sample
$ cd rails_sample
$ mkdir api
$ cd api
$ touch Gemfile
$ touch Gemfile.lock
$ touch .env
$ touch compose.yml
$ mkdir docker
$ cd docker
$ mkdir local
$ cd local
$ touch Dockerfile
$ cd ../..
source "https://rubygems.org"
gem "rails"
※railsのバージョンを指定していないため、最新版がインストールされます
RAILS_ENV=development
BUNDLER_VERSION=2.5.10
LANG=C.UTF-8
TZ=Asia/Tokyo
PORT=3010
services:
  api:
    container_name: rails-s-api
    build:
      context: .
      dockerfile: ./docker/local/Dockerfile
      args:
        - RAILS_ENV=${RAILS_ENV}
        - BUNDLER_VERSION=${BUNDLER_VERSION}
        - LANG=${LANG}
        - TZ=${TZ}
        - PORT=${PORT}
    volumes:
      - .:/api
    ports:
      - 3010:${PORT}
    env_file:
      - ./.env
    command: bundle exec puma -C "config/puma.rb"
※環境変数は「.env」で設定し、それを「args:」からDockerfile内へ流しています
## ビルドステージ
# 2024年5月時点の最新安定版Rubyの軽量版「alpine」
FROM ruby:3.3.1-alpine AS builder

# 環境変数
ARG RAILS_ENV
ARG BUNDLER_VERSION
ARG LANG
ARG TZ
ARG PORT

# インストール可能なパッケージ一覧の更新
RUN apk update && \
    apk upgrade && \
    # パッケージのインストール(ビルド時のみ使う)
    apk add --virtual build-packs --no-cache \
            alpine-sdk \
            build-base \
            curl-dev \
            mysql-dev \
            tzdata

# 作業ディレクトリの指定
WORKDIR /app

# ローカルにあるGemfileとGemfile.lockを
# コンテナ内のディレクトリにコピー
COPY Gemfile /app/Gemfile
COPY Gemfile.lock /app/Gemfile.lock

# bundlerのバージョンを固定する
RUN gem install bundler -v $BUNDLER_VERSION
RUN bundle -v

# bunlde installを実行する
RUN bundle install --jobs=4

# build-packsを削除
RUN apk del build-packs


## マルチステージビルド
# 2024年5月時点の最新安定版Rubyの軽量版「alpine」
FROM ruby:3.3.1-alpine

# 環境変数
ARG RAILS_ENV
ARG BUNDLER_VERSION
ARG LANG
ARG TZ
ARG PORT

# インストール可能なパッケージ一覧の更新
RUN apk update && \
    apk upgrade && \
    # パッケージのインストール(--no-cacheでキャッシュ削除)
    apk add --no-cache \
            bash \
            mysql-dev \
            tzdata \
            gvim \
            # rails newでgitを使用する(ファイル作成後は不要)
            git \
            # M系チップMacの場合に「gcompat」が必要
            gcompat

# 作業ディレクトリの指定
WORKDIR /api

# ビルドステージからファイルをコピー
COPY --from=builder /usr/local/bundle /usr/local/bundle
COPY . /api

# サーバー起動
EXPOSE 3010
CMD ["bundle", "exec", "puma", "-C", "config/puma.rb"]
※Dockerfileではマルチステージビルドで構築し、コンテナサイズの軽量化を図っています。
次に以下のコマンドを実行し、コンテナのビルドおよびRailsファイルの作成を行います。(ファイル作成時に.gitignoreは作成されて欲しいのでgit関連はスキップしていませんが、apiディレクトリ直下に.gitファイルは不要なので最後のコマンドで削除しています。)
$ docker compose build --no-cache
$ docker compose run --rm api rails new . -f -T -d mysql --api \
$ --skip-action-mailer --skip-action-mailbox --skip-action-text \
$ --skip-active-job --skip-active-storage --skip-action-cable \
$ --skip-asset-pipeline --skip-javascript --skip-hotwire --skip-jbuilder
$ rm -r .git
※rails newコマンドのオプションについて、「-f」はファイルを上書き、「-T」はテストコード関連をスキップ、「-d mysql」はDBにMySQLを指定、「–api」はAPIモード(そのままだとCookieやCORS設定などが使えないので注意)、それ以降の–skip〜も不要なものをスキップ。尚、オプションを「-f -T -d mysql –api –minimal」にしてもほぼ同じ結果になりますが、この場合は「bootsnap」もスキップされます。
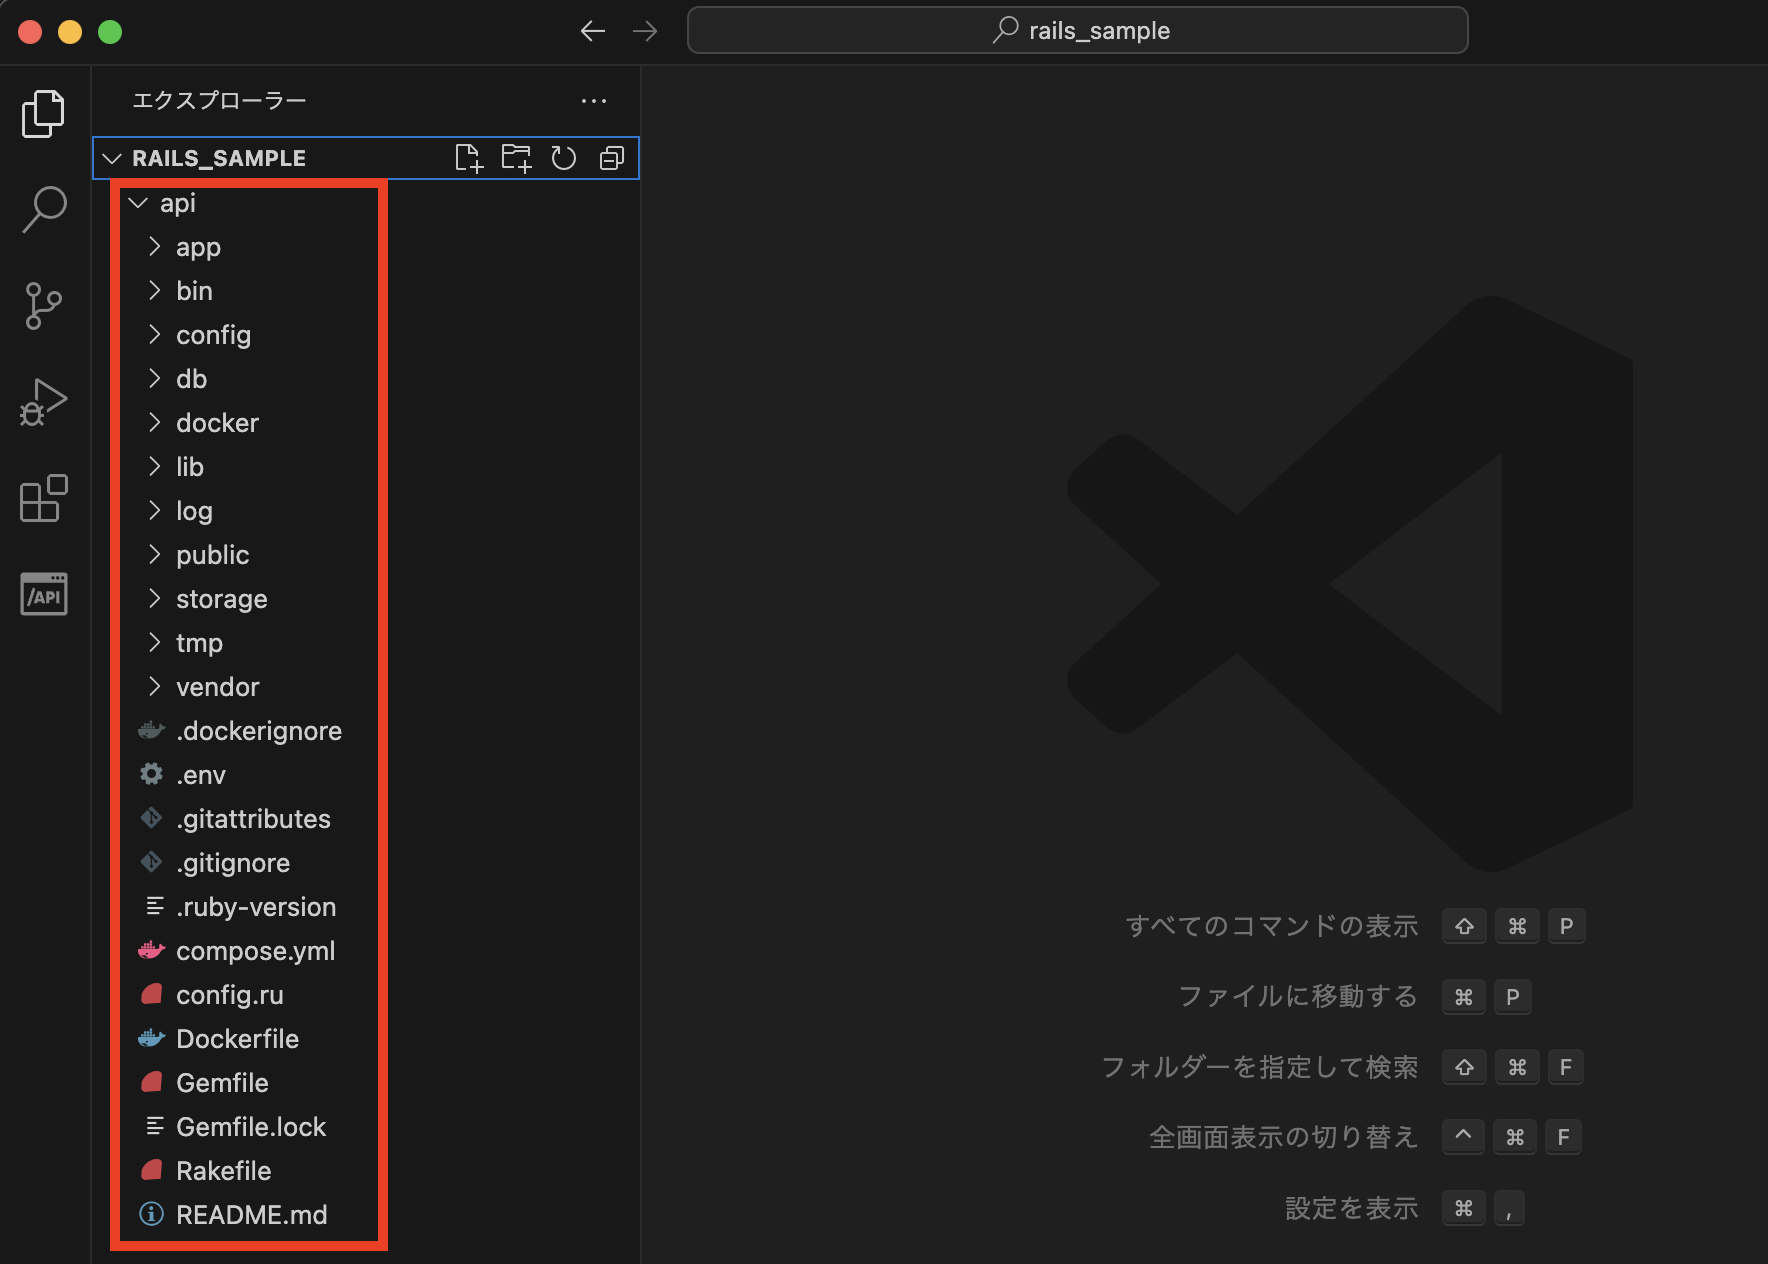
成功すると以下のようにRailsの各種ファイルが作成されます。
次に一旦DBのMySQLの設定はスキップしたいため、一時的なDB設定として使えるnulldbのgem「activerecord-nulldb-adapter」をインストールします。
以下のようにファイル「api/Gemfile」の「group :development, :test do」の部分に「gem ‘activerecord-nulldb-adapter’」を追記します。
・・

group :development, :test do
  # See https://guides.rubyonrails.org/debugging_rails_applications.html#debugging-with-the-debug-gem
  gem "debug", platforms: %i[ mri windows ]

  # 一時的なDB設定用にnulldbのgemを追加
  gem "activerecord-nulldb-adapter"
end

・・
次に「api/config/database.yml」を以下のように修正します。
・・

default: &default
  # 一時的なDB設定としてnulldbを指定
  # adapter: mysql2
  adapter: nulldb
  encoding: utf8mb4
  pool: <%= ENV.fetch("RAILS_MAX_THREADS") { 5 } %>
  username: root
  password:
  host: localhost

・・
次にコンテナを再ビルドし、コンテナを起動します。
$ docker compose build --no-cache
$ docker compose up -d
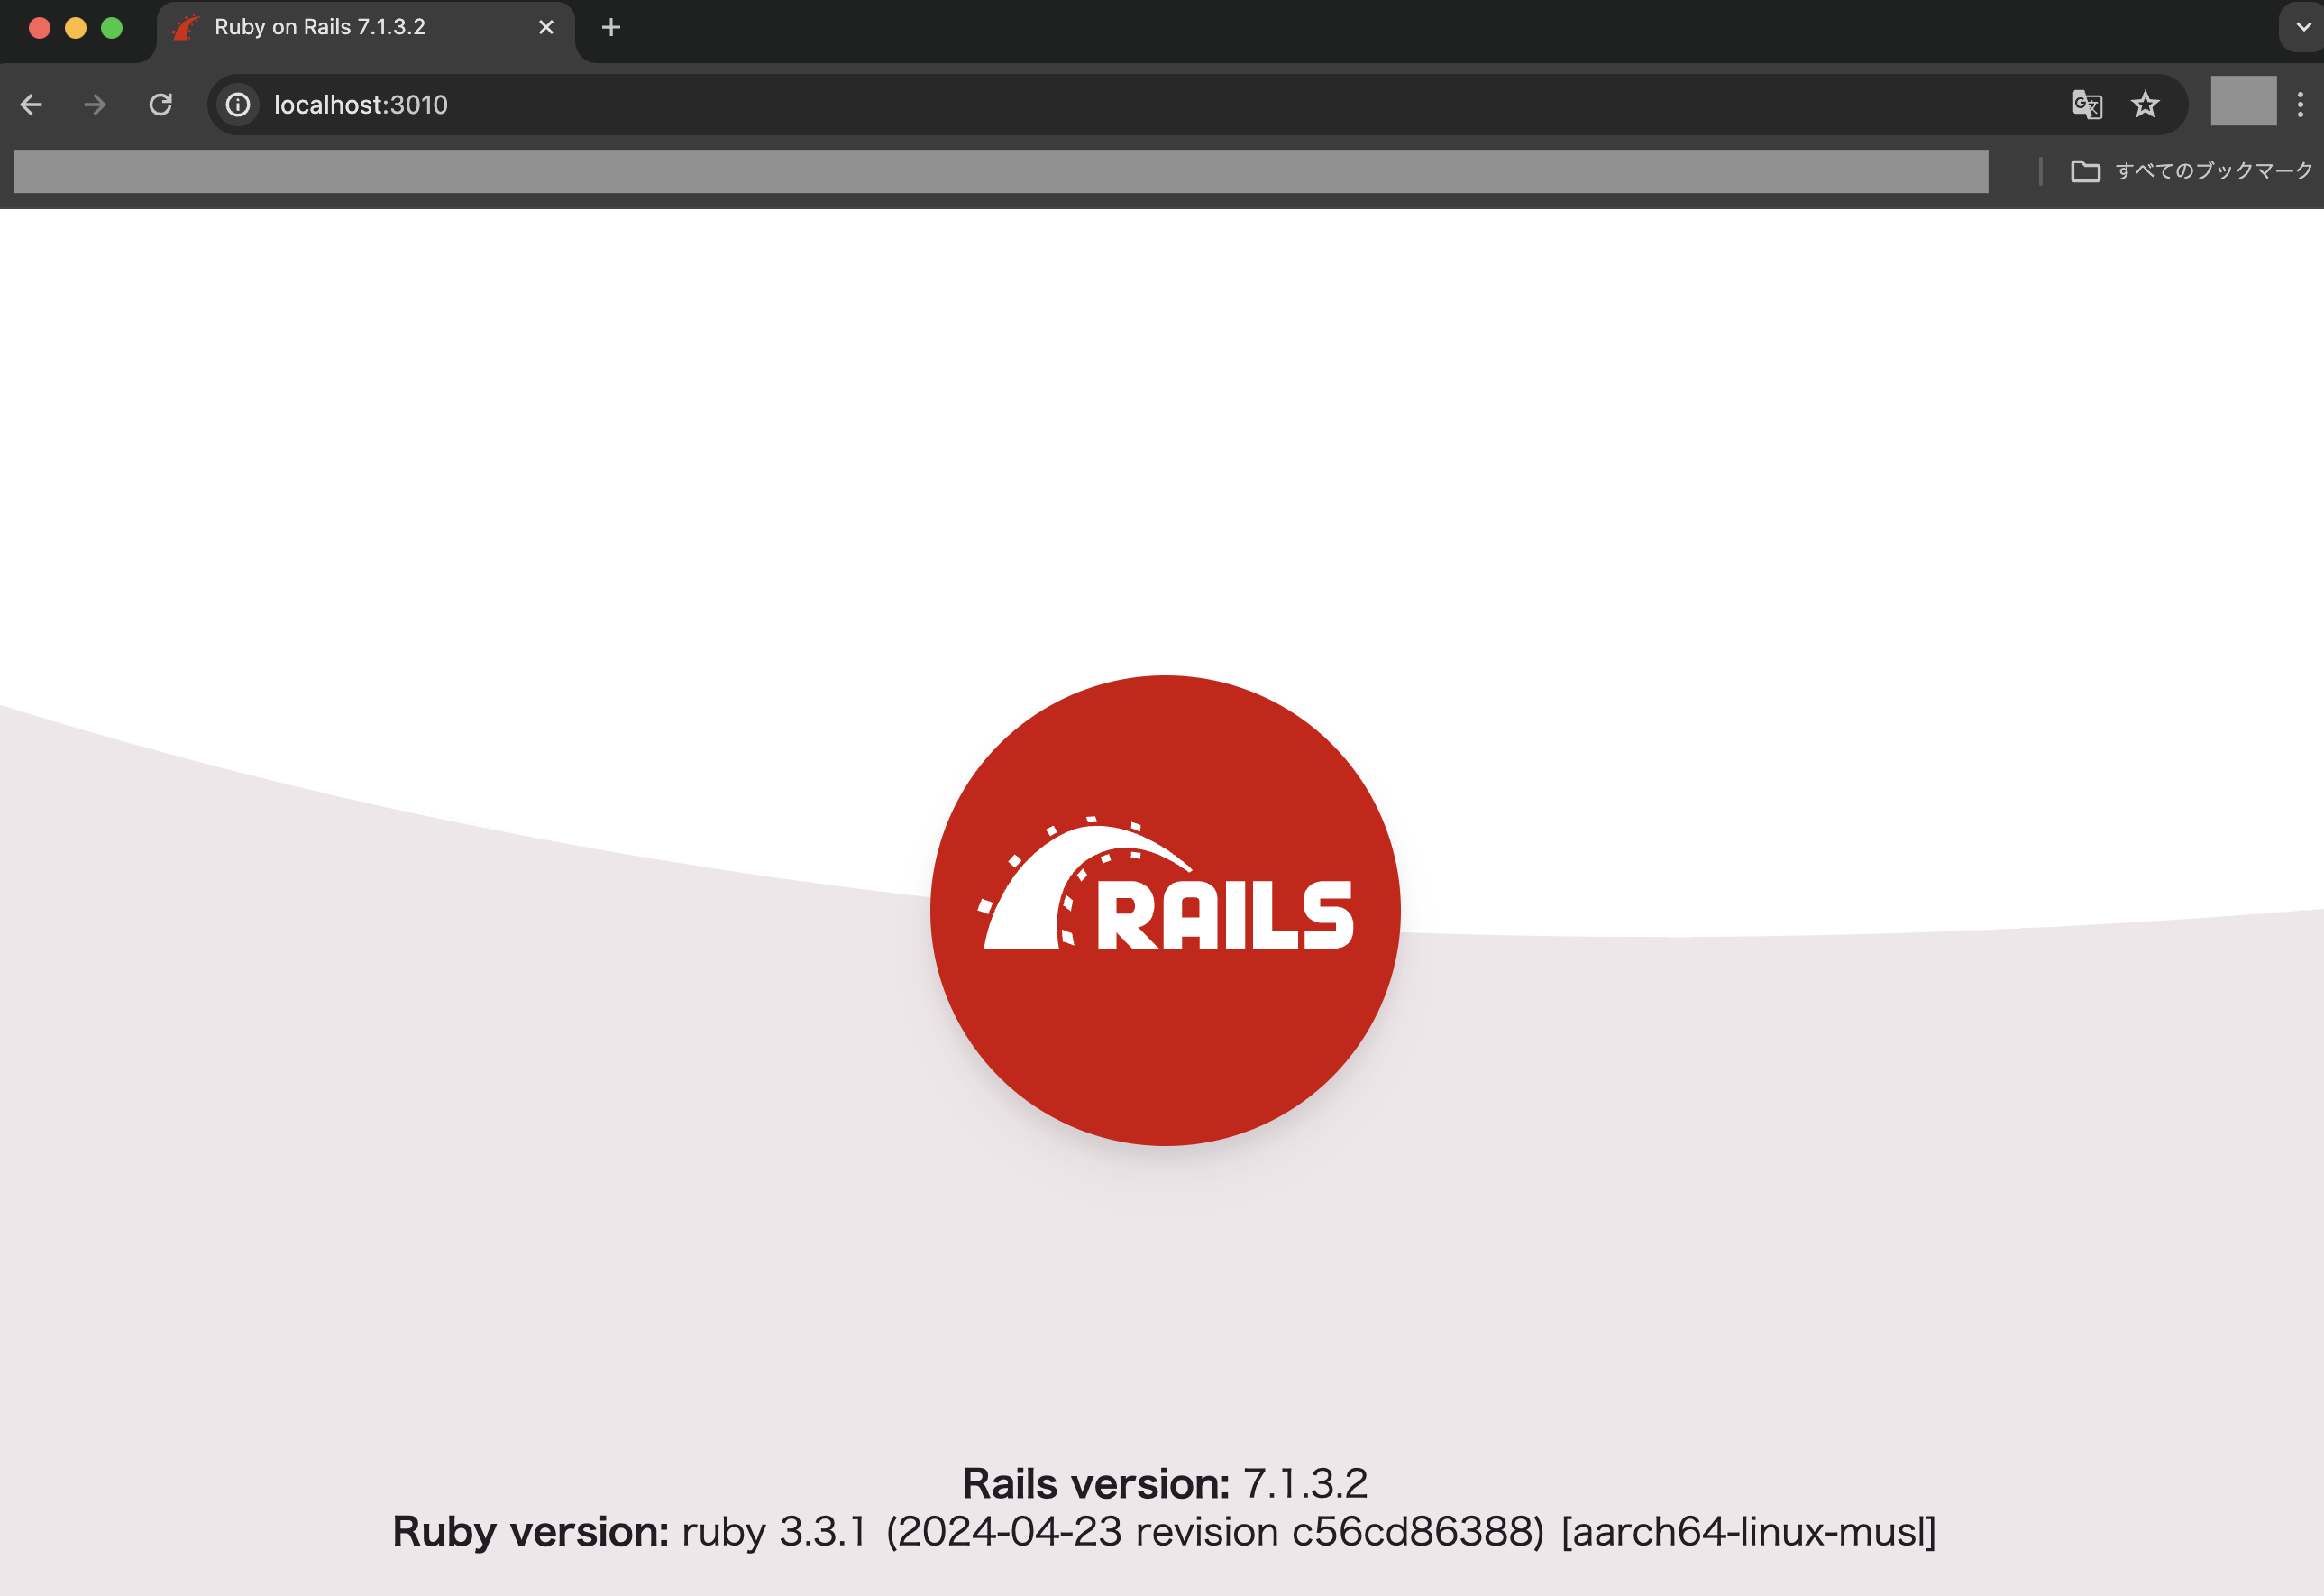
次にブラウザで「http://localhost:3010」にアクセスし、以下のように表示されればOKです。
hello worldを出力するAPIを作成
次にhello worldを試すため、テキスト「hello world !!」を出力するAPIを作成してみます。
ファイル「api/app/controllers/application_controller.rb」、「api/config/routes.rb」それぞれ以下のように修正します。
class ApplicationController < ActionController::API
  def hello
    render plain: "hello world !!"
  end
end
Rails.application.routes.draw do

・・

  # API用のルーティング設定
  scope "api"do
    scope "v1"do
      get "/hello", to: "application#hello"
    end
  end
end
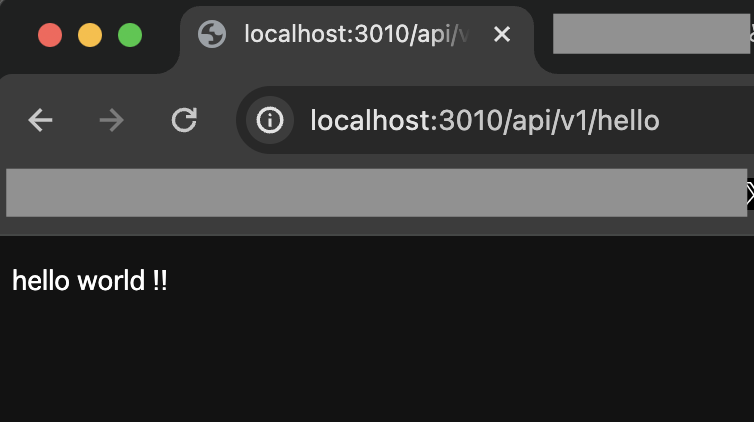
次にブラウザで「http://localhost:3010/api/v1/hello」にアクセスし、以下のように表示されればOKです。
テストコード用にRSpecの設定
次にテストを実施できるようにするため、RSpecを導入します。
以下のようにファイル「api/Gemfile」の「group :development, :test do」の部分にテスト関連のgemを追加します。
・・

group :development, :test do
  # See https://guides.rubyonrails.org/debugging_rails_applications.html#debugging-with-the-debug-gem
  gem "debug", platforms: %i[ mri windows ]

  # 一時的なDB設定用にnulldbのgemを追加
  gem "activerecord-nulldb-adapter"

  # テスト用のGemを「group :development, :test」内に追加
  gem "rspec-rails"
  gem "factory_bot_rails"
  gem "shoulda-matchers"
end

・・
次に以下のコマンドを実行し、RSpecをインストールします。
$ docker compose exec api bundle install
$ docker compose exec api rails g rspec:install
次にRSpecの初期設定として「api/.rspec」に「–color」と「–format documentation」を追加します。
--require spec_helper
--color
--format documentation
次に以下のコマンドを実行し、テスト実行用コマンドのエイリアスを設定します。
$ docker compose exec api bundle binstubs rspec-core
次に不要なspecファイルが無駄に作られないようにするため、「api/config/application.rb」にジェネレータの設定を追加します。
module Api
  class Application < Rails::Application

・・・

  # ジェネレータの設定を追加
  config.generators do |g|
    g.test_framework :rspec,
      fixtures: false,
      helper_specs: false,
      view_specs: false,
      routing_specs: false
    end
  end
end
次に環境変数に「RAILS_ENV=development」を設定した場合はRSpecの実行時の環境変数も「development」になってしまうため、「api/spec/rails_helper.rb」を以下のように修正します。
・・・

# RSpec実行時の環境変数「RAILS_ENV」の値が「test」になるように修正
# ENV['RAILS_ENV'] ||= 'test'
ENV['RAILS_ENV'] = 'test'

・・・
次に以下のコマンドを実行し、RSpecを実行して確認します。
$ docker compose exec api bin/rspec※binstubを設定していない場合はコマンド「bundle exec rspec」を使います。
テスト実行後、以下のようにRSpecが実行できればOKです。

RSpecでhello worldを出力するAPIのテストコードを作成
次に上記で作成したAPIのテストコードを作成するため、以下のコマンドを実行してテストコード用のファイルを作成します。
$ docker compose exec api rails g rspec:request application
次にファイル「api/spec/requests/applications_spec.rb」を以下のように修正します。
require 'rails_helper'

RSpec.describe "Applications", type: :request do
  # テスト用APIの検証
  describe "GET /api/v1/hello" do
    # レスポンスのステータス検証
    it "ステータス200で正常終了すること" do
      get hello_path
      expect(response).to have_http_status(:success)
    end

    # レスポンスの出力内容の検証
    it "「hello world !!」を出力すること" do
      get hello_path
      expect(response.body).to eq("hello world !!")
    end
  end
end
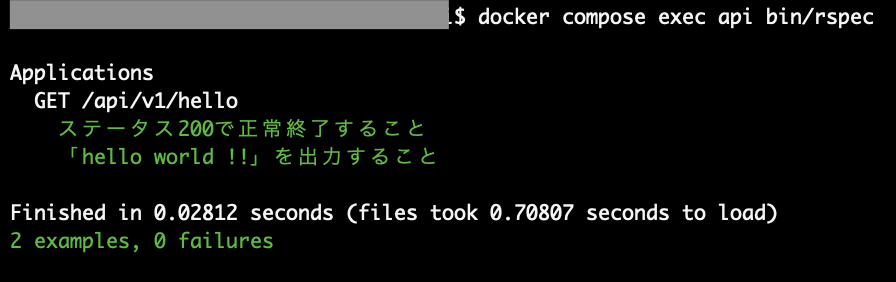
次に以下のコマンドを実行し、RSpecを実行してテスト結果を確認します。
$ docker compose exec api bin/rspec
テスト実行後、以下のような結果になればOKです。
Railsのタイムゾーンを日本に変更する
次にRailsのタイムゾーンを日本(Asia/Tokyo)に変更するため、「api/config/application.rb」に設定を追加します。
module Api
  class Application < Rails::Application

・・・

  # タイムゾーン設定を日本にする
  config.time_zone = "Asia/Tokyo"
  config.active_record.default_timezone = :local
end
次に以下のコマンドを実行し、コンテナを再起動します。
$ docker compose down
$ docker compose up -d
RailsのAPIモードでCookieを使えるようにする
RailsのAPIモードはデフォルトではCookieを使えないため、使えるようにしておきます。
まずはファイル「api/Gemfile」でコメントアウトされている「gem “rack-cors”」の部分をコメントを外して有効にします。
・・

# Use Rack CORS for handling Cross-Origin Resource Sharing (CORS), making cross-origin Ajax possible
gem "rack-cors"

・・
次に以下のコマンドを実行し、gemをインストールします。
$ docker compose exec api bundle install
次にファイル「api/config/initializers/cors.rb」、「api/config/application.rb」、「api/app/controllers/application_controller.rb」をそれぞれ以下のように修正します。
・・・

Rails.application.config.middleware.insert_before 0, Rack::Cors do
  allow do
    origins "http://localhost:3000"

    resource "/api/v1/*",
      headers: :any,
      methods: [:get, :post, :put, :patch, :delete, :options, :head],
      credentials: true
  end
end※api/config/initializers/cors.rbはクロスオリジンに関する設定ファイルで、originsにはフロントエンド側のドメインを設定します。
次に「Cookies」を使えるようにするため、「api/config/application.rb」に設定を追加します。
module Api
  class Application < Rails::Application

・・・

  # Cookiesを利用するための設定
  config.middleware.use ActionDispatch::Cookies
  config.action_dispatch.cookies_same_site_protection = :none
end
次にファイル「api/app/controllers/application_controller.rb」で「ActionController::Cookies」読み込み、上記で作成したAPIでCookieを設定するよう修正します。
class ApplicationController < ActionController::API
  # Cookiesを読み込む
  include ActionController::Cookies

  def hello
    # レスポンスにCookieを設定
    cookies[:hello] = {
      value: "hello",
      expires: 90.day.from_now,
      path: '/',
      httponly: true,
      secure: true
    }

    render plain: "hello world !!"
  end
end
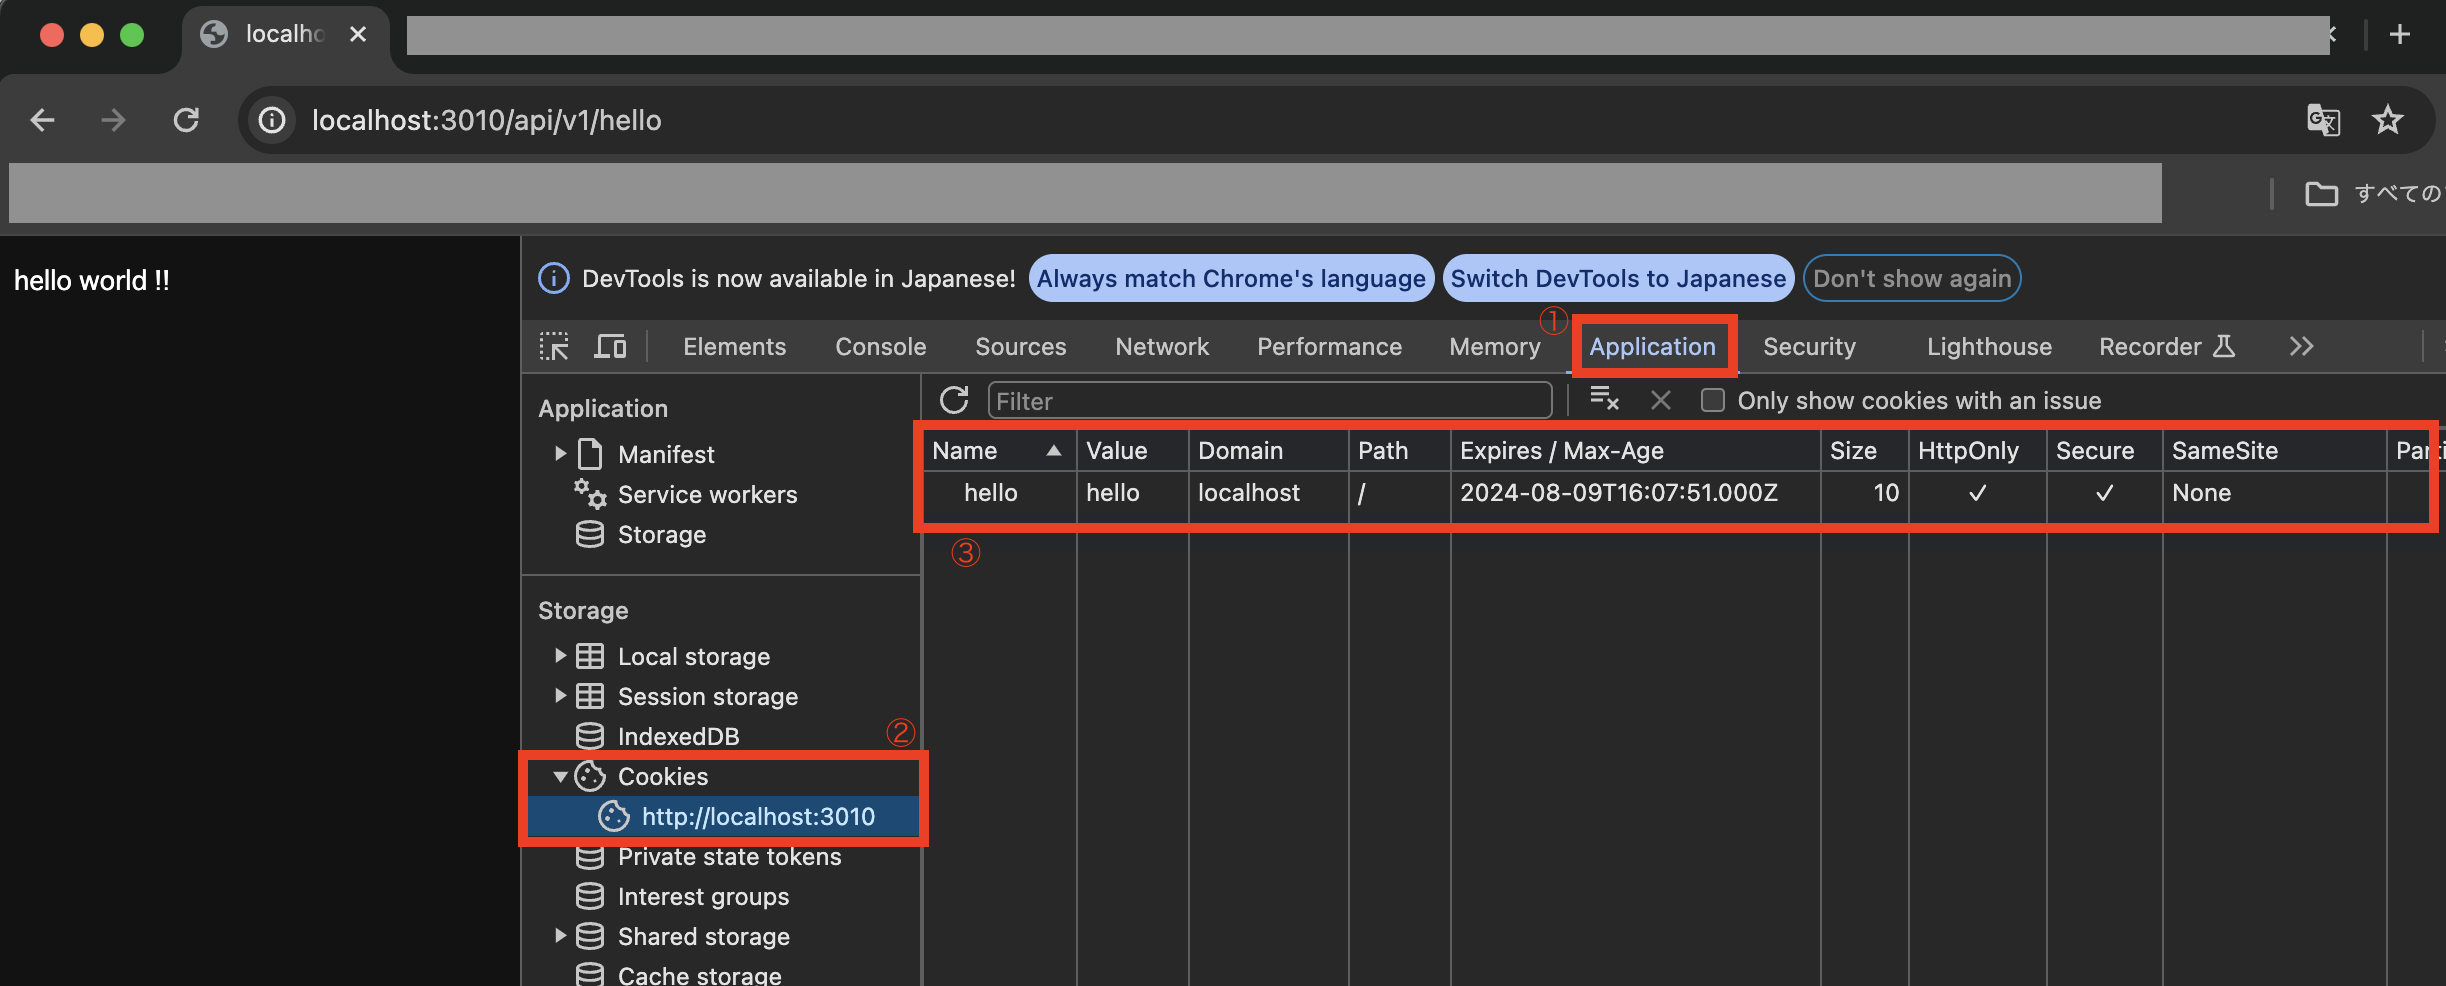
次にブラウザで「http://localhost:3010/api/v1/hello」にアクセスし、ブラウザの開発者用モードで「Application > Cookies > http://localhost:3010」を確認してCookieがあればOKです。
DBとしてMySQLを追加する
次にDBとしてMySQLを追加します。ファイル「api/.env」、「api/compose.yml」、「api/config/database.yml」をそれぞれ以下のように修正します。
・・・


MYSQL_ROOT_PASSWORD=password
※api/.envにMySQLのルートパスワードの設定を追加します。
services:
  api:
    container_name: rails-s-api
    build:
      context: .
      dockerfile: ./docker/local/Dockerfile
      args:
        - RAILS_ENV=${RAILS_ENV}
        - BUNDLER_VERSION=${BUNDLER_VERSION}
        - LANG=${LANG}
        - TZ=${TZ}
        - PORT=${PORT}
    volumes:
      - .:/api
    ports:
      - 3010:${PORT}
    env_file:
      - ./.env
    depends_on:
      - db
    command: bundle exec puma -C "config/puma.rb"
  # DBに関する設定
  db:
    container_name: rails-s-db
    image: mysql:8.0.36
    env_file:
      - ./.env
    ports:
      - 3306:3306
    volumes:
      - ./tmp/db:/var/lib/mysql
※api/compose.ymlにDB用のコンテナ設定を追加します。
・・・

default: &default
  # adapterを初期設定に戻す
  adapter: mysql2
  encoding: utf8mb4
  # コレクションを指定
  collation: utf8mb4_bin
  pool: <%= ENV.fetch("RAILS_MAX_THREADS") { 5 } %>
  # 以下をコメントアウト
  # username: root
  # password:
  # host: localhost

development:
  <<: *default
  database: api_development
  # DBへの接続情報を追加
  username: root
  password: <%= ENV["MYSQL_ROOT_PASSWORD"] %>
  host: db

# Warning: The database defined as "test" will be erased and
# re-generated from your development database when you run "rake".
# Do not set this db to the same as development or production.
test:
  <<: *default
  database: api_test
  # DBへの接続情報を追加
  username: root
  password: <%= ENV["MYSQL_ROOT_PASSWORD"] %>
  host: db

・・・
※api/config/database.ymlにDBへの接続設定を追加修正します。
次に以下のコマンドを実行し、コンテナを再起動します。
$ docker compose down
$ docker compose up -d
次に以下のコマンドを実行し、DBを作成します。
$ docker compose exec api rails db:create
次にブラウザで「http://localhost:3010」にアクセスし、エラーにならず正常に表示されればOKです。
ユーザーテーブルとデータを操作するAPIを作成する
次はユーザーテーブルを作成し、データを操作するCRUD処理のAPIを作成してみます。
データ削除時は論理削除を行いたいため、まずはGemfileにgem「discard」を追加します。
・・・

# 論理削除用
gem "discard"

・・・
次に以下のコマンドを実行してgemをインストールします。
$ docker compose exec api bundle install
次に以下のコマンドを実行し、ユーザーテーブル用の各種ファイルを作成します。
$ docker compose exec api rails g model User uid:string member_id:integer last_name:string first_name:string email:string discarded_at:datetime
次に作成されたマイグレーションファイルとモデルファイルについて、それぞれ以下のように修正します。
class CreateUsers < ActiveRecord::Migration[7.1]
  def change
    create_table :users do |t|
      t.string :uid, null: false
      t.integer :member_id
      t.string :last_name, null: false
      t.string :first_name, null: false
      t.string :email, null: false

      t.timestamps
      t.datetime :discarded_at
    end
    add_index :users, :uid, unique: true
    add_index :users, :member_id, unique: true
    add_index :users, :email, unique: true
    add_index :users, :discarded_at
    add_index :users, [:email, :discarded_at], unique: true, name: 'unique_email_discarded_at'
  end
end
class User < ApplicationRecord
  # 論理削除設定
  include Discard::Model
  default_scope -> { kept }

  # バリデーション
  validates :uid, presence: true, uniqueness: true, length: { maximum: 255 }
  validates :member_id, uniqueness: true, length: { maximum: 9 }
  validates :last_name, presence: true, length: { maximum: 255 }
  validates :first_name, presence: true, length: { maximum: 255 }
  validates :email, presence: true, uniqueness: { scope: :discarded_at }, length: { maximum: 255 }

  # 日付項目のフォーマット変換
  def f_created_at
    created_at.strftime('%Y/%m/%d %H:%M:%S')
  end

  def f_updated_at
    updated_at.strftime('%Y/%m/%d %H:%M:%S')
  end

  def f_discarded_at
    if discarded_at
      discarded_at.strftime('%Y/%m/%d %H:%M:%S')
    else
      nil
    end
  end
end
次に以下のコマンドを実行し、マイグレーションを実行します。
$ docker compose exec api rails db:migrate
$ docker compose exec api rails db:migrate RAILS_ENV=test
次に以下のコマンドを実行し、サービス層を構築するための各種ファイルを作成します。
$ cd app
$ mkdir services
$ cd services
$ mkdir user
$ cd user
$ touch create_user_service.rb
$ touch get_a_user_service.rb
$ touch update_user_service.rb
$ touch delete_user_service.rb
$ touch get_users_with_discarded_service.rb
$ cd ../../..
※業務ロジックを全てコントローラーに書くのはよくないので、サービス層を作ってコントローラーから呼び出すようにします。ただし、全てをサービス層に寄せるのもよくないので、処理の流れやDBのやり取りなどはサービス層に寄せつつ、コアなルールはモデルに寄せるようにした方がいいです。
次に作成した各種サービスファイルをそれぞれ以下のように記述します。
class User::CreateUserService

  def self.call(...)
    new(...).call
  end

  def initialize(params)
    @params = params
  end

  def call
    @user = User.new(@params)

    # トランザクション
    ActiveRecord::Base.transaction do
      # 一時保存
      @user.save!

      # 会員IDの設定(9桁)
      @member_id = 100000000 + @user.id
      @user.member_id = @member_id
      @user.save!
    end

    # 戻り値
    @user

  rescue => e
    nil
  end
end
class User::GetAUserService

  def self.call(...)
    new(...).call
  end

  def initialize(uid)
    @uid = uid
  end

  def call
    @user = User.where(uid: @uid).first
  end
end
class User::UpdateUserService

  def self.call(...)
    new(...).call
  end

  def initialize(params, uid)
    @params = params
    @uid = uid
  end

  def call
    @user = User.where(uid: @uid).first

    # トランザクション
    ActiveRecord::Base.transaction do
      @user.update!(@params)
    end

    # 戻り値
    @user

  rescue => e
    nil
  end
end
class User::DeleteUserService

  def self.call(...)
    new(...).call
  end

  def initialize(uid)
    @uid = uid
  end

  def call
    ActiveRecord::Base.transaction do
      @user = User.where(uid: @uid).first
      @user.discard!
    end

    # 戻り値
    @user

  rescue => e
    nil
  end
end
class User::GetUsersWithDiscardedService

  def self.call(...)
    new(...).call
  end

  def initialize()
  end

  def call
    @users = User.with_discarded
  end
end
次に以下のコマンドを実行し、コンテナを再起動します。
$ docker compose down
$ docker compose build --no-cache
$ docker compose up -d
次に以下のコマンドを実行し、ユーザーコントローラーを作成します。
$ docker compose exec api rails g controller users
次に作成したユーザーコントローラーを次のように記述します。
class UsersController < ApplicationController
  def create
    # サービスを実行
    res = User::CreateUserService.call(create_params)

    # 実行結果によりレスポンスを設定
    if res
      render json: res, status: :created
    else
      render json: { message: "会員登録ができませんでした。" }, status: :internal_server_error
    end
  end

  def get_user
    # パスパラメータの取得
    uid = params[:uid]

    # サービスを実行
    user = User::GetAUserService.call(uid)

    # レスポンス設定
    render json: user
  end

  def update
    # パスパラメータの取得
    uid = params[:uid]

    # サービスを実行
    res = User::UpdateUserService.call(update_params, uid)

    # 実行結果によりレスポンスを設定
    if res
      render json: res
    else
      render json: { message: "会員情報の更新ができませんでした。" }, status: :internal_server_error
    end
  end

  def delete
    # パスパラメータの取得
    uid = params[:uid]

    # サービスを実行
    res = User::DeleteUserService.call(uid)

    # 実行結果によりレスポンスを設定
    if res
      render json: { message: "OK" }, status: :ok
    else
      render json: { message: "退会処理ができませんでした。" }, status: :internal_server_error
    end
  end

  def get_users_with_discarded
    # サービスを実行
    users = User::GetUsersWithDiscardedService.call()

    # レスポンス設定
    render json: users
  end

  private
    # ストロングパラメータ
    def create_params
      params.require(:user).permit(:uid, :last_name, :first_name, :email)
    end

    def update_params
      params.require(:user).permit(:last_name, :first_name, :email)
    end
end
※Railsでは登録や更新時には対象の項目以外を更新させないようにするため、ストロングパラメータを使います。
次にルーティングファイルにルートを追加します。
Rails.application.routes.draw do

・・

  # API用のルーティング設定
  scope "api"do
    scope "v1"do
      get "/hello", to: "application#hello"

      post "/user", to: "users#create"
      get "/user/:uid", to: "users#get_user"
      put "/user/:uid", to: "users#update"
      delete "/user/:uid", to: "users#delete"
      get "/users/with-discarded", to: "users#get_users_with_discarded"
    end
  end
end
これでCRUD処理をするAPIの準備が整ったので、Postmanを使って試してみます。(Postmanについての詳細は割愛させていただきます。)
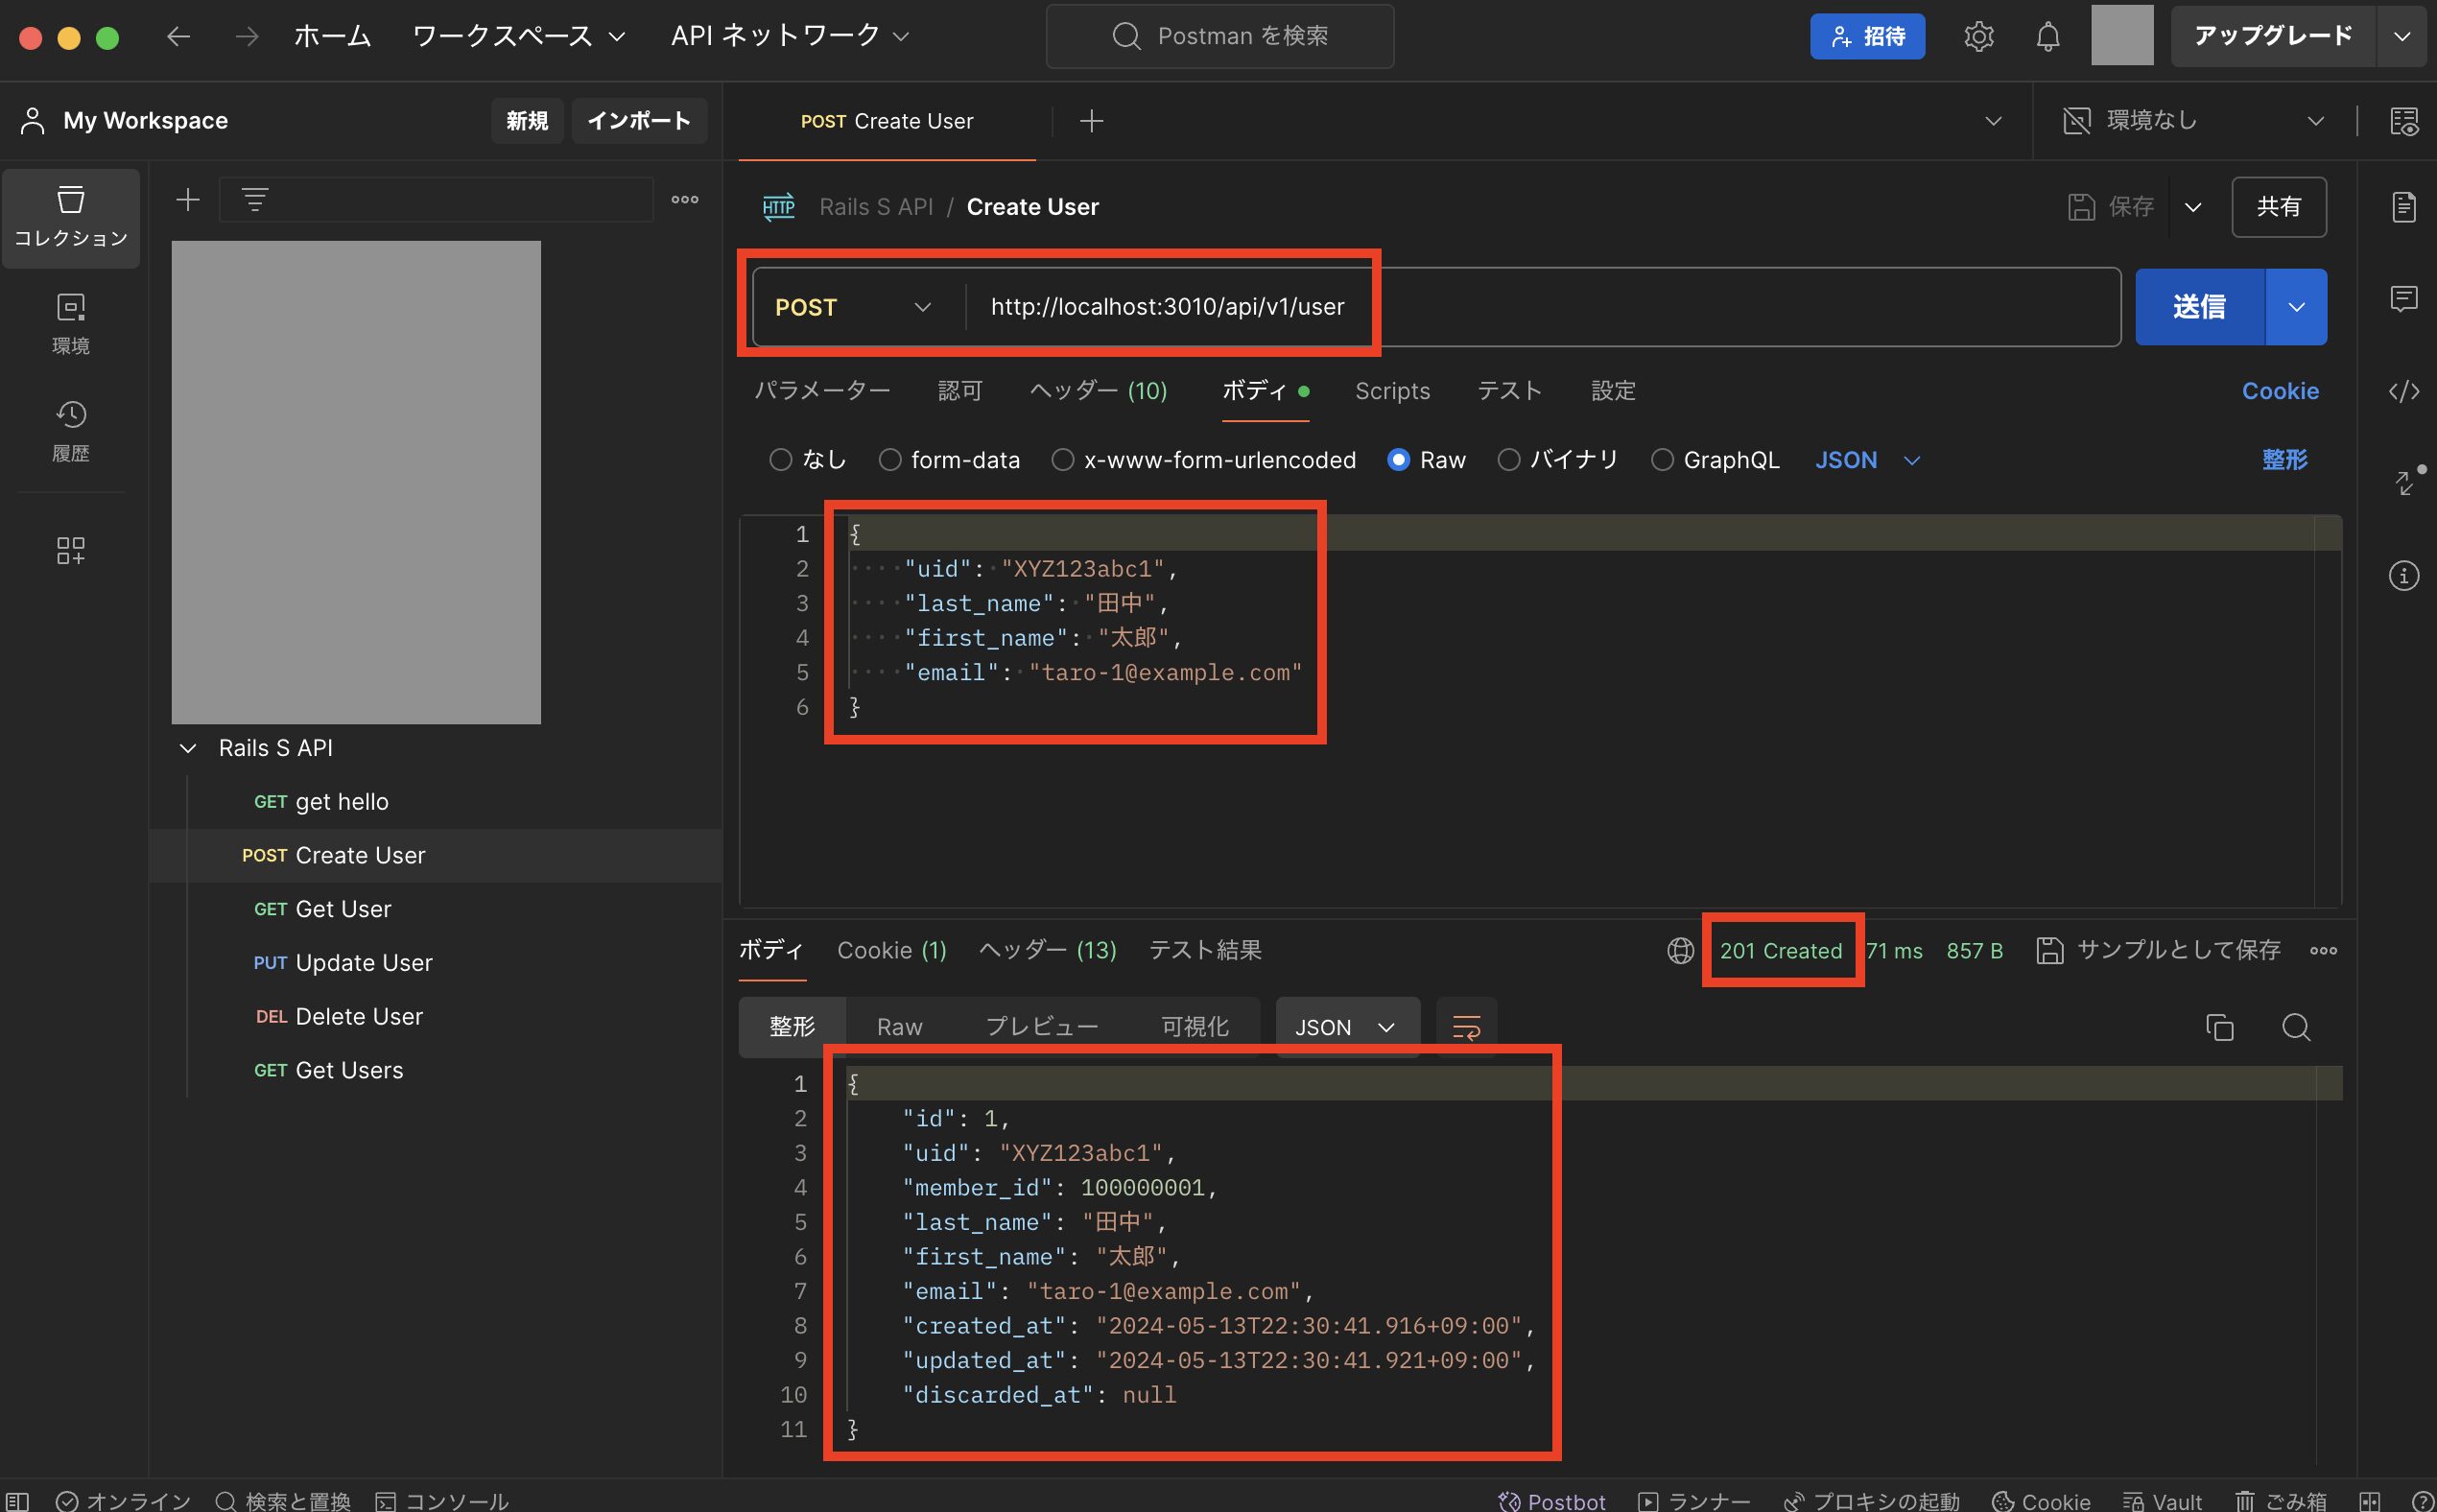
まずはユーザー作成用の「http://localhost:3010/api/v1/user」をPOSTで実行し、下図のように正常終了すればOKです。
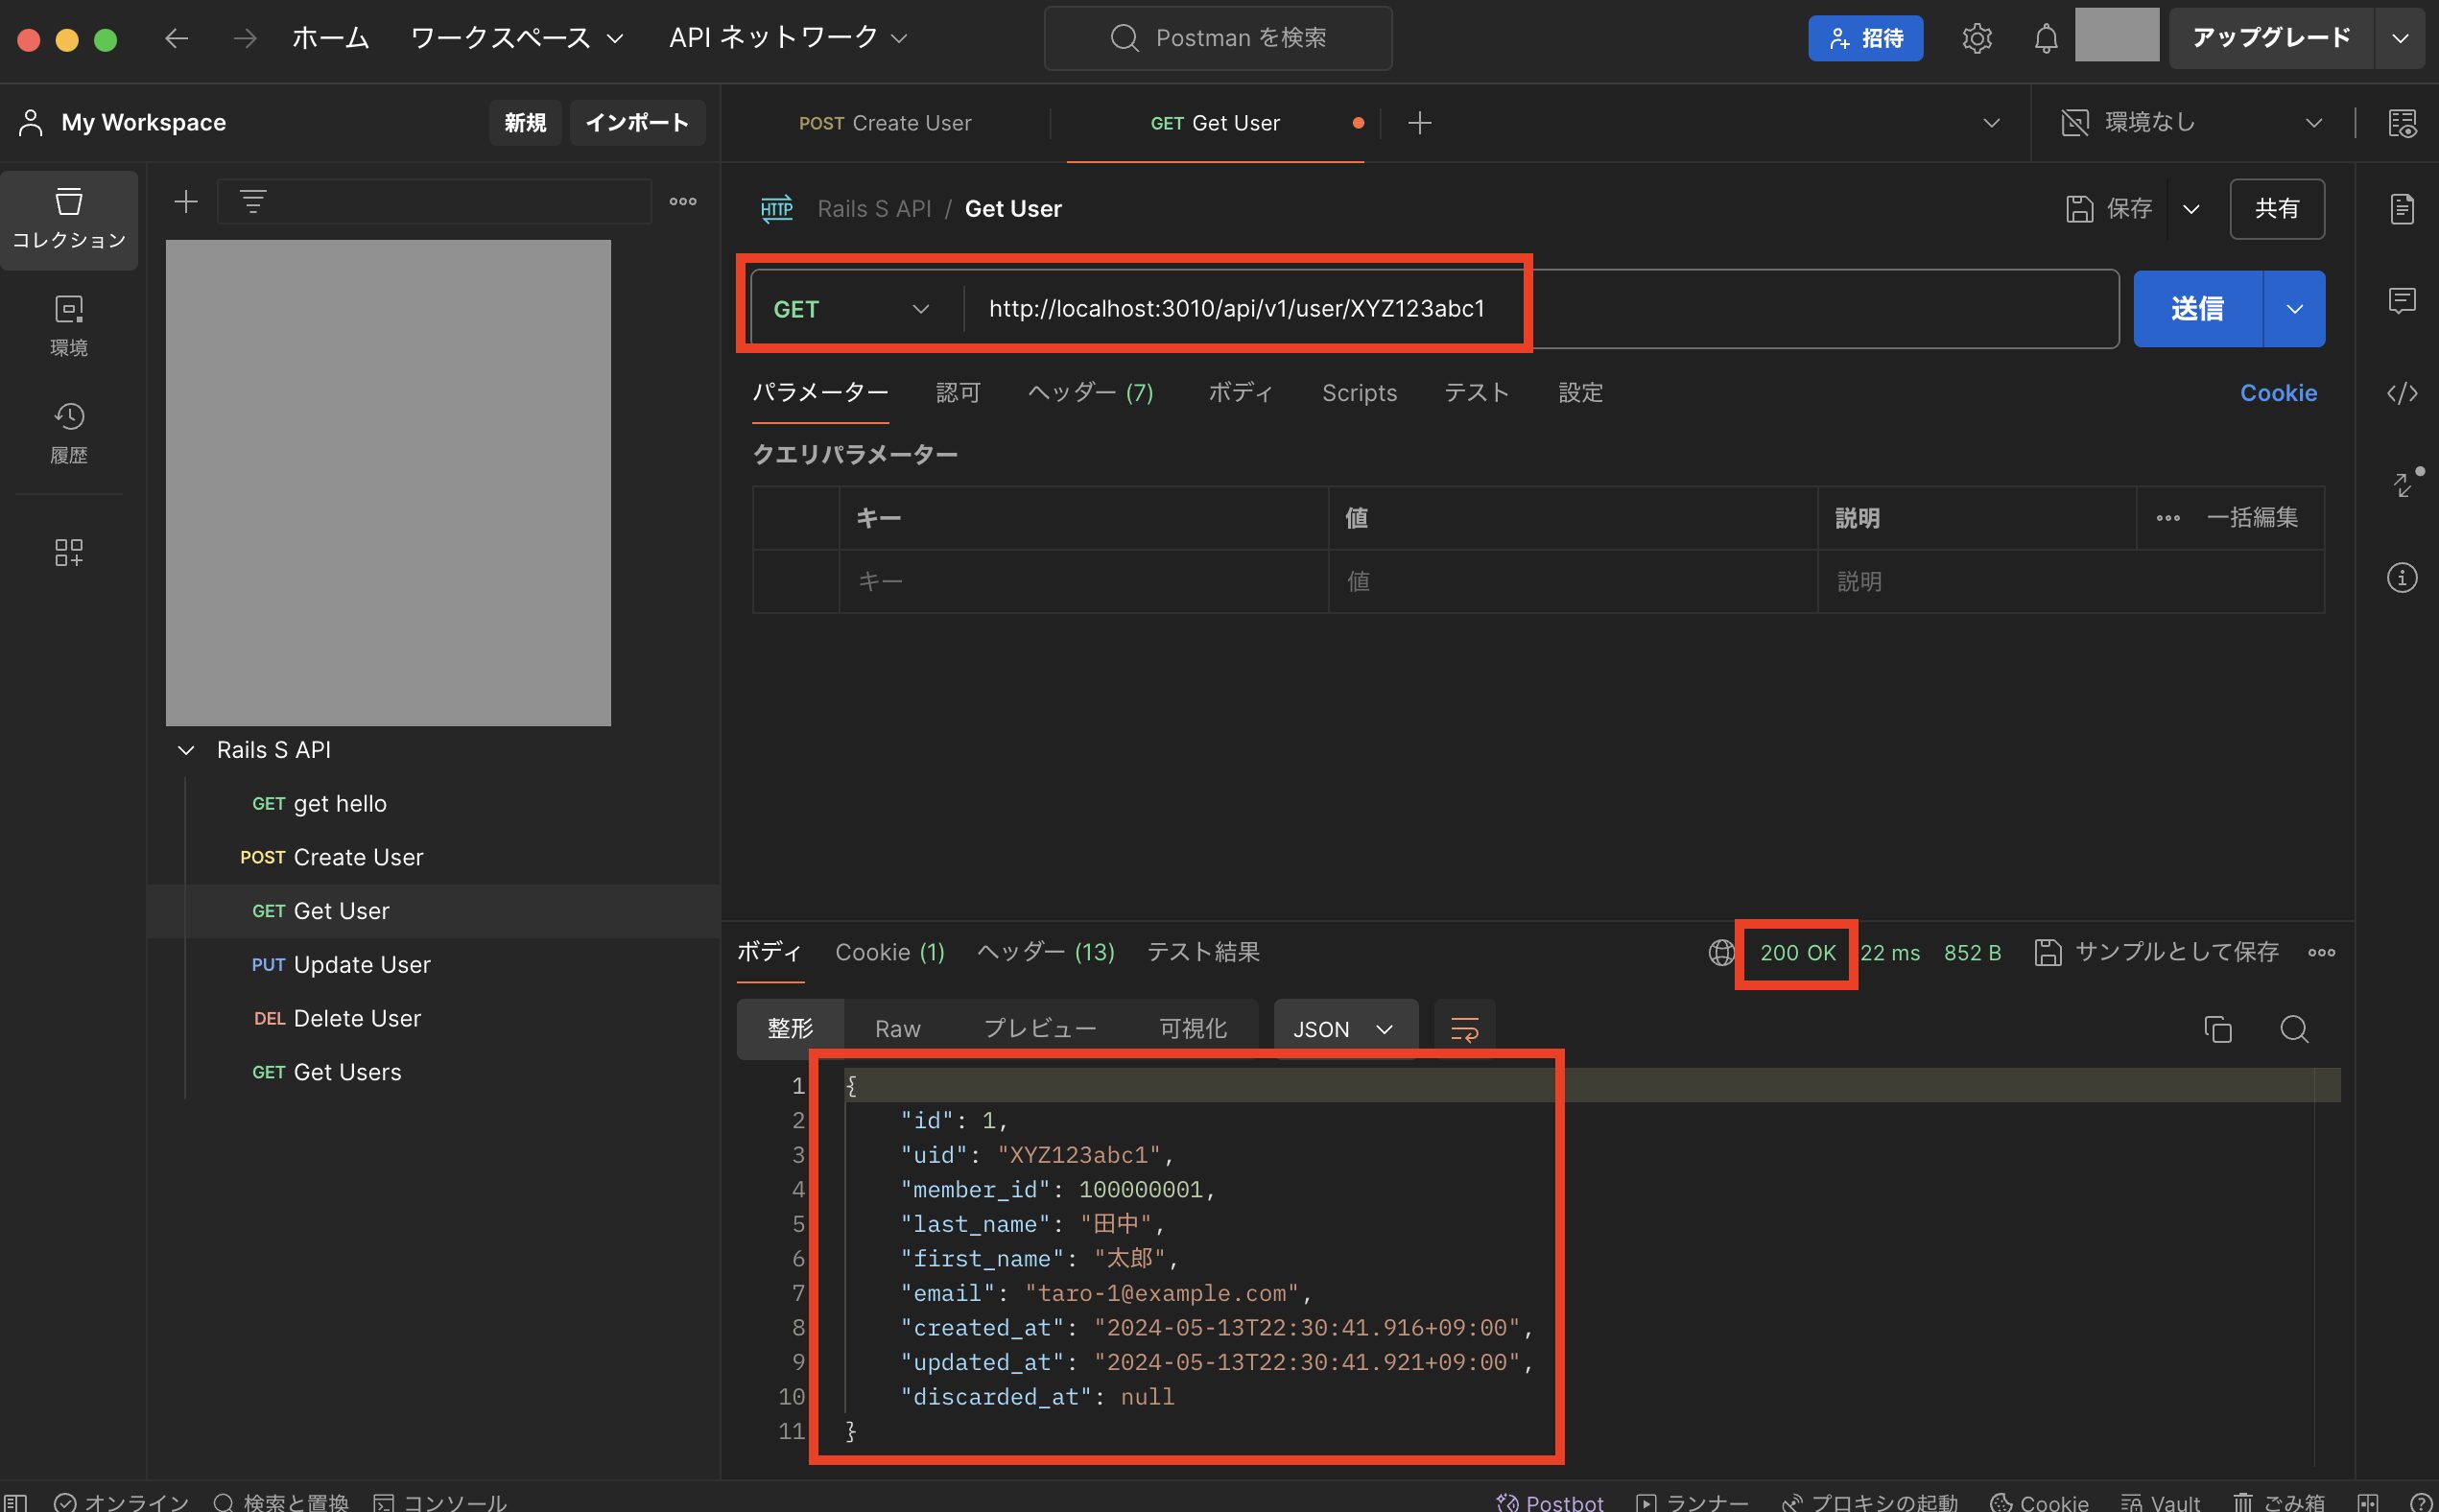
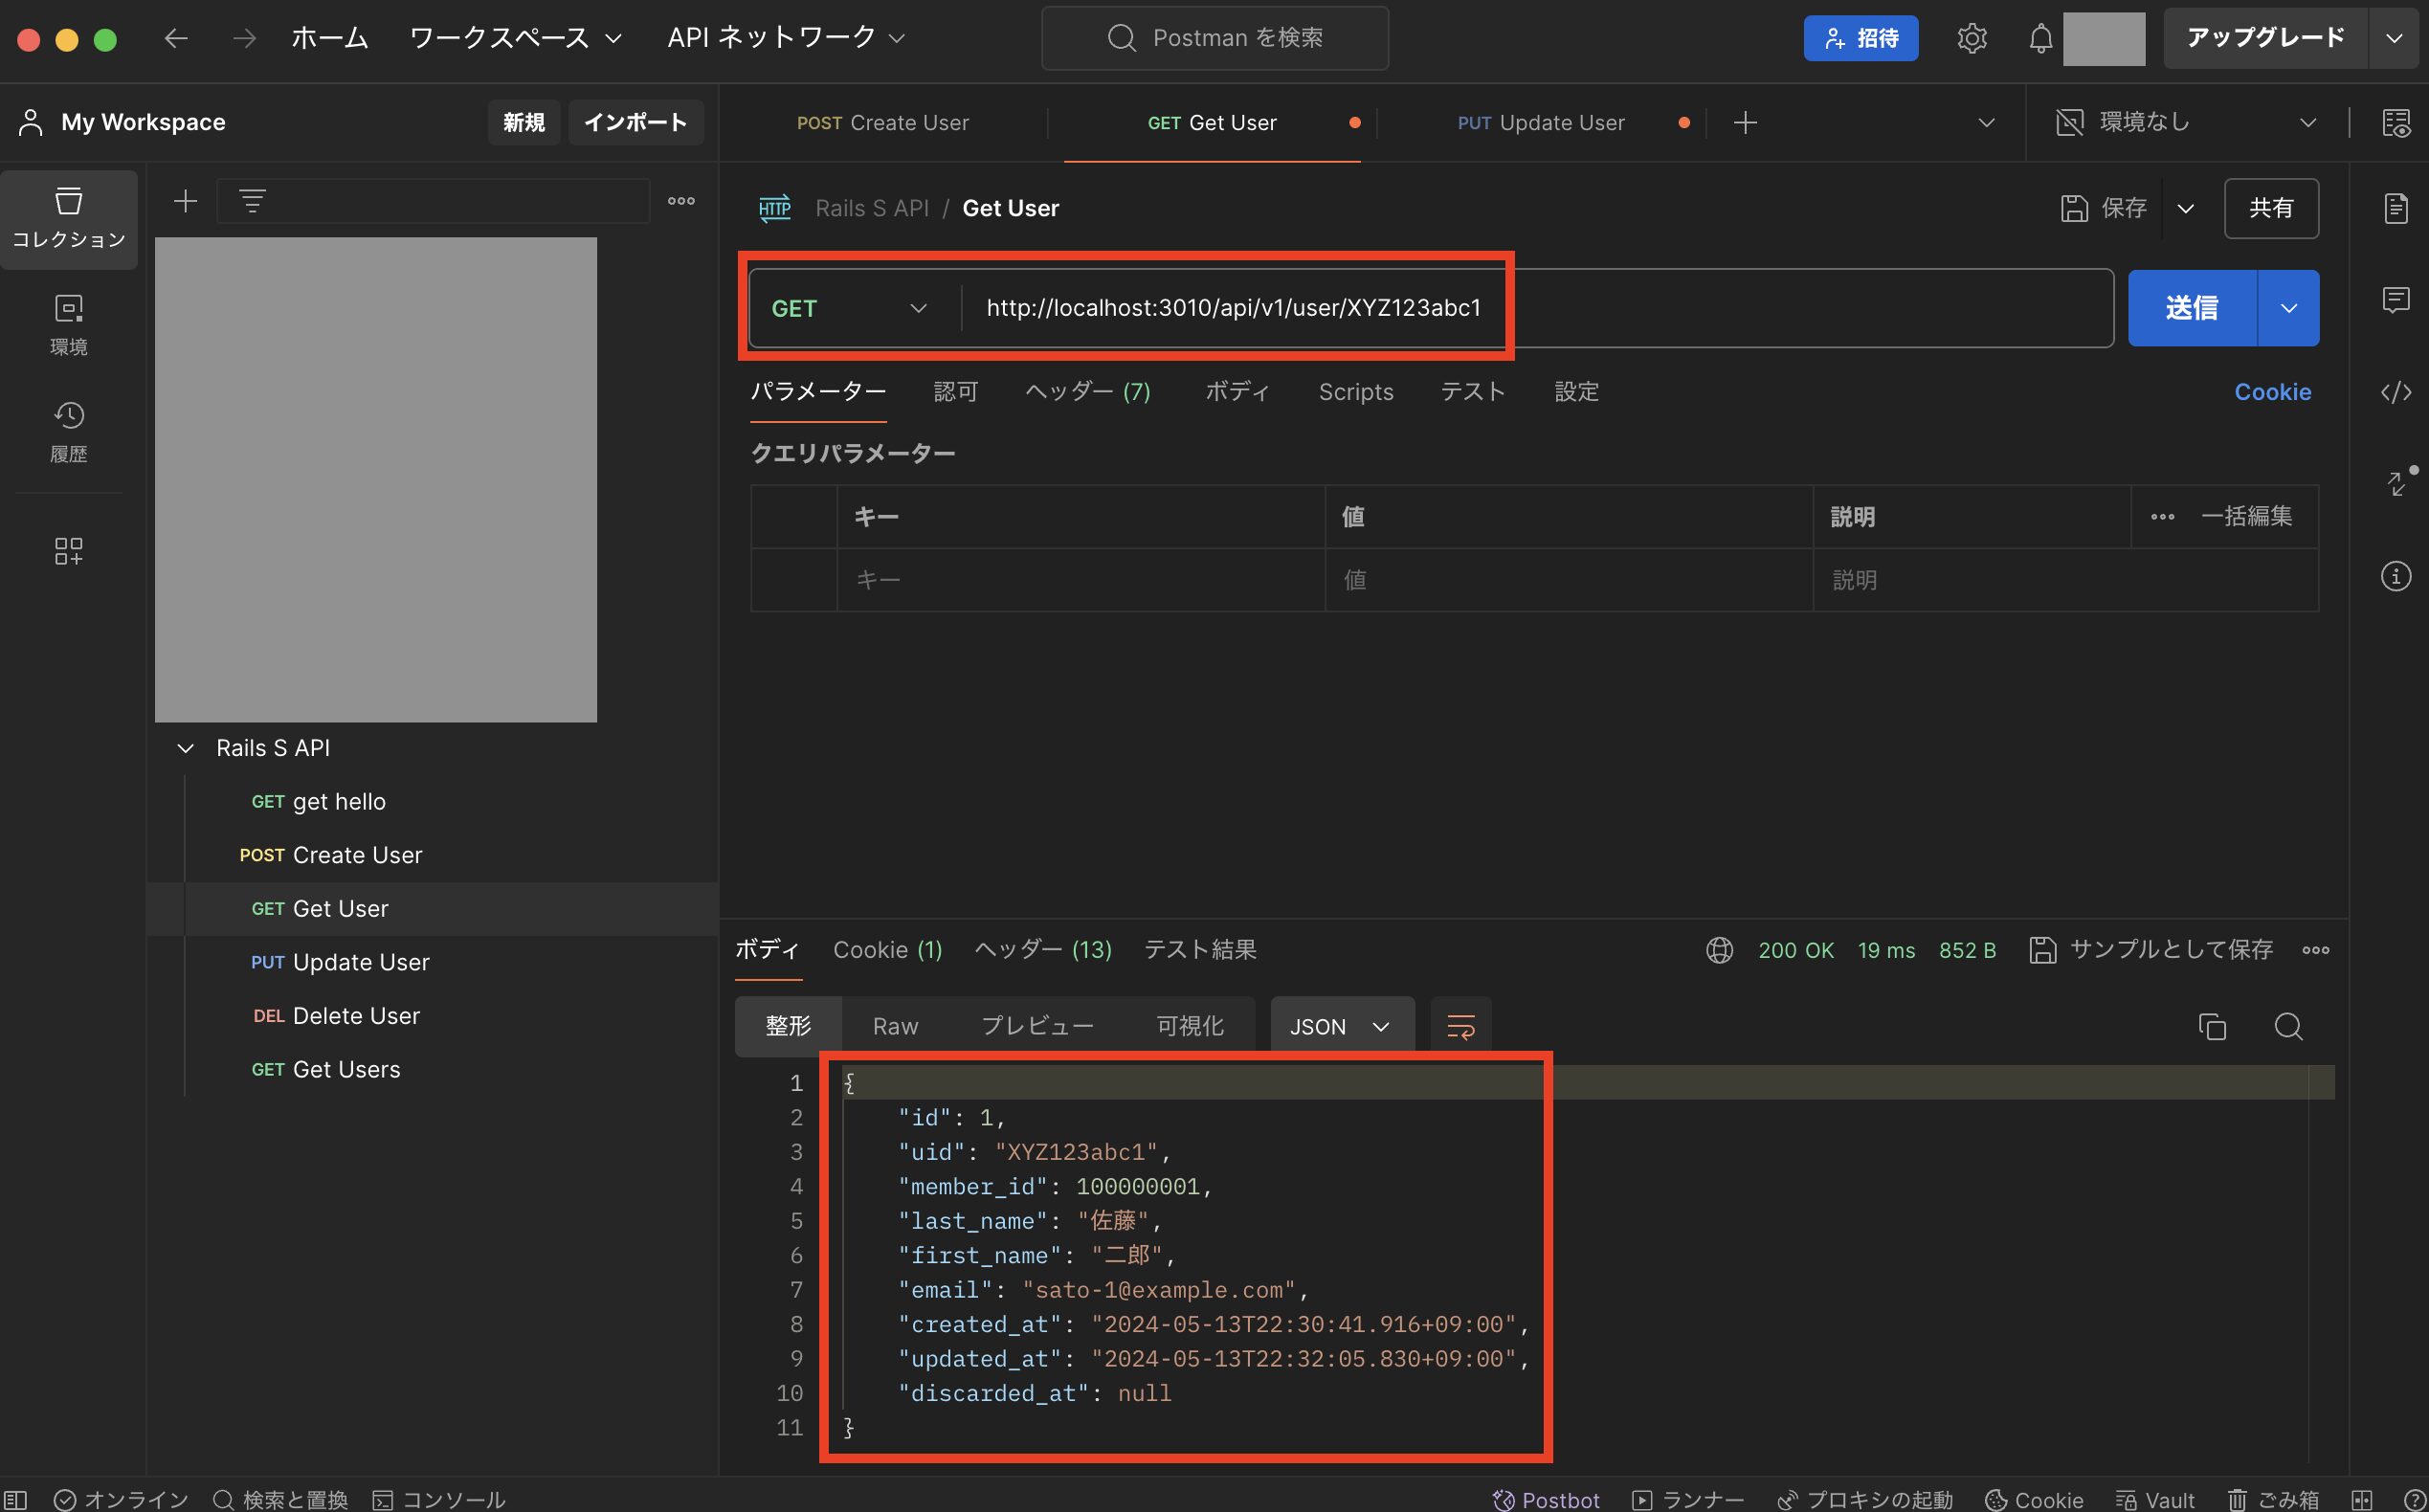
次にユーザー取得用の「http://localhost:3010/api/v1/user/XYZ123abc1」をGETで実行し、下図のようにユーザー情報が取得できればOKです。
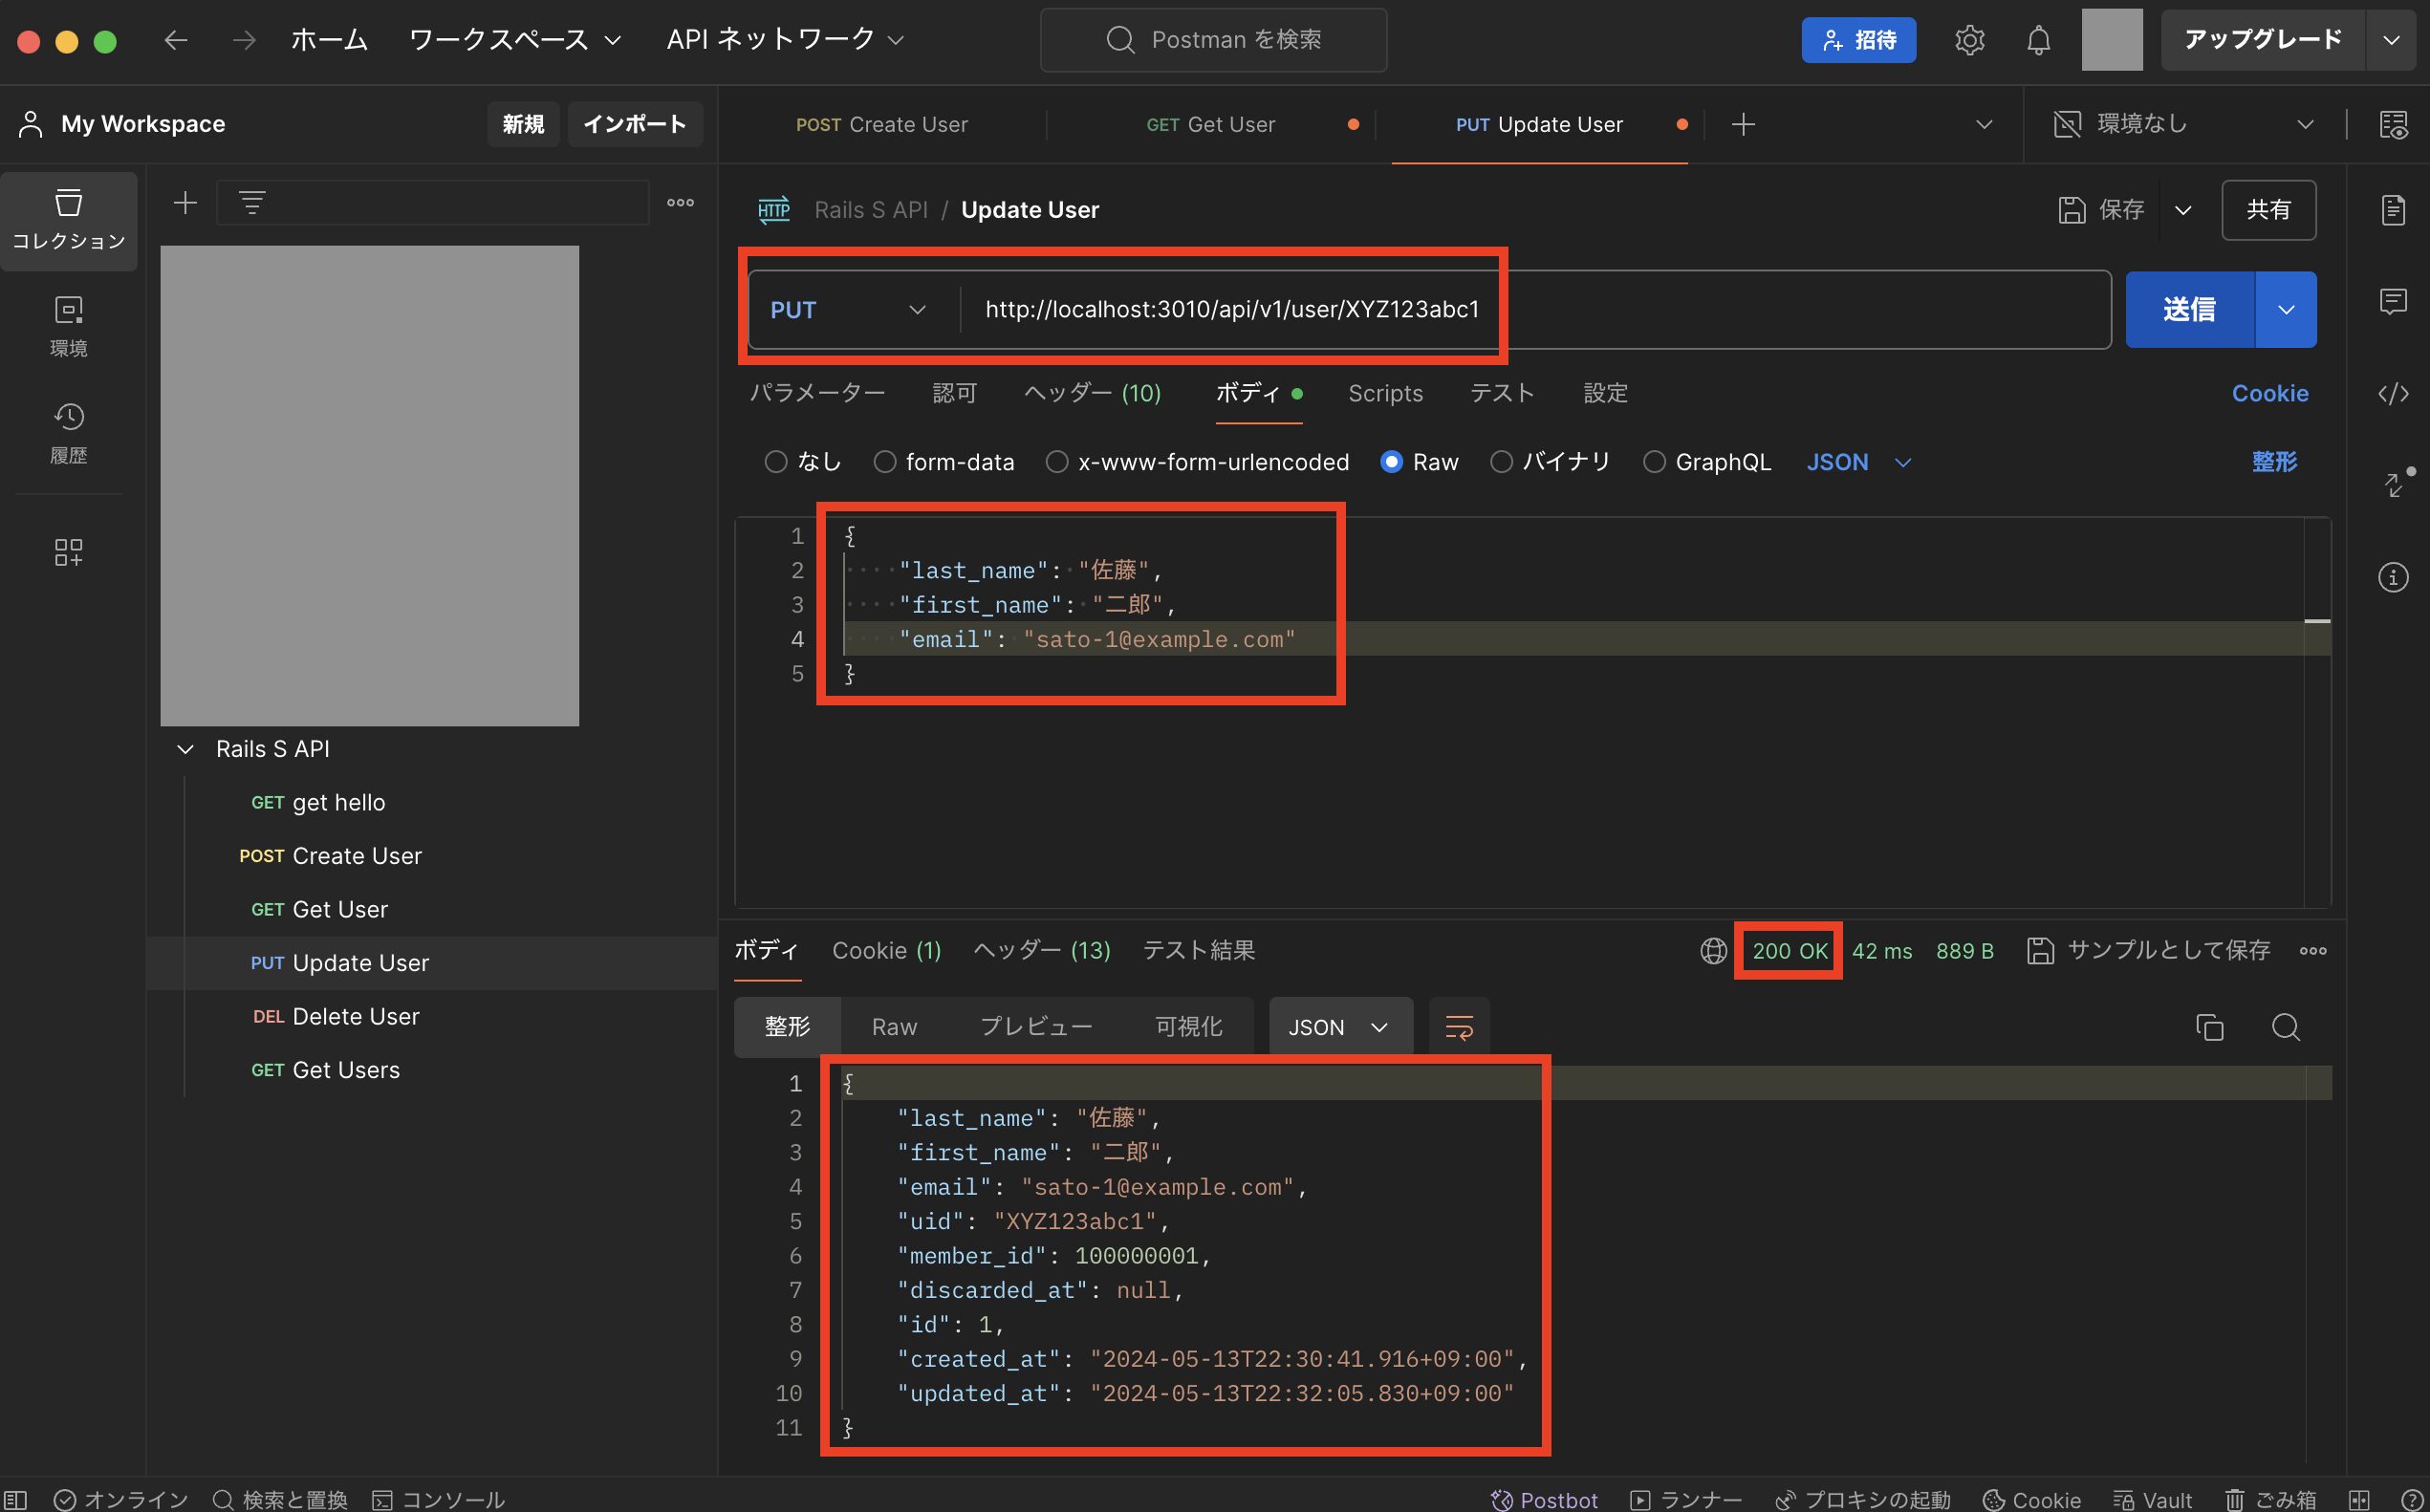
次にユーザー情報更新用の「http://localhost:3010/api/v1/user/XYZ123abc1」をPUTで実行し、下図のように正常終了すればOKです。
次にもう一度ユーザー取得用の「http://localhost:3010/api/v1/user/XYZ123abc1」をGETで実行し、下図のように対象項目が更新されていればOKです。
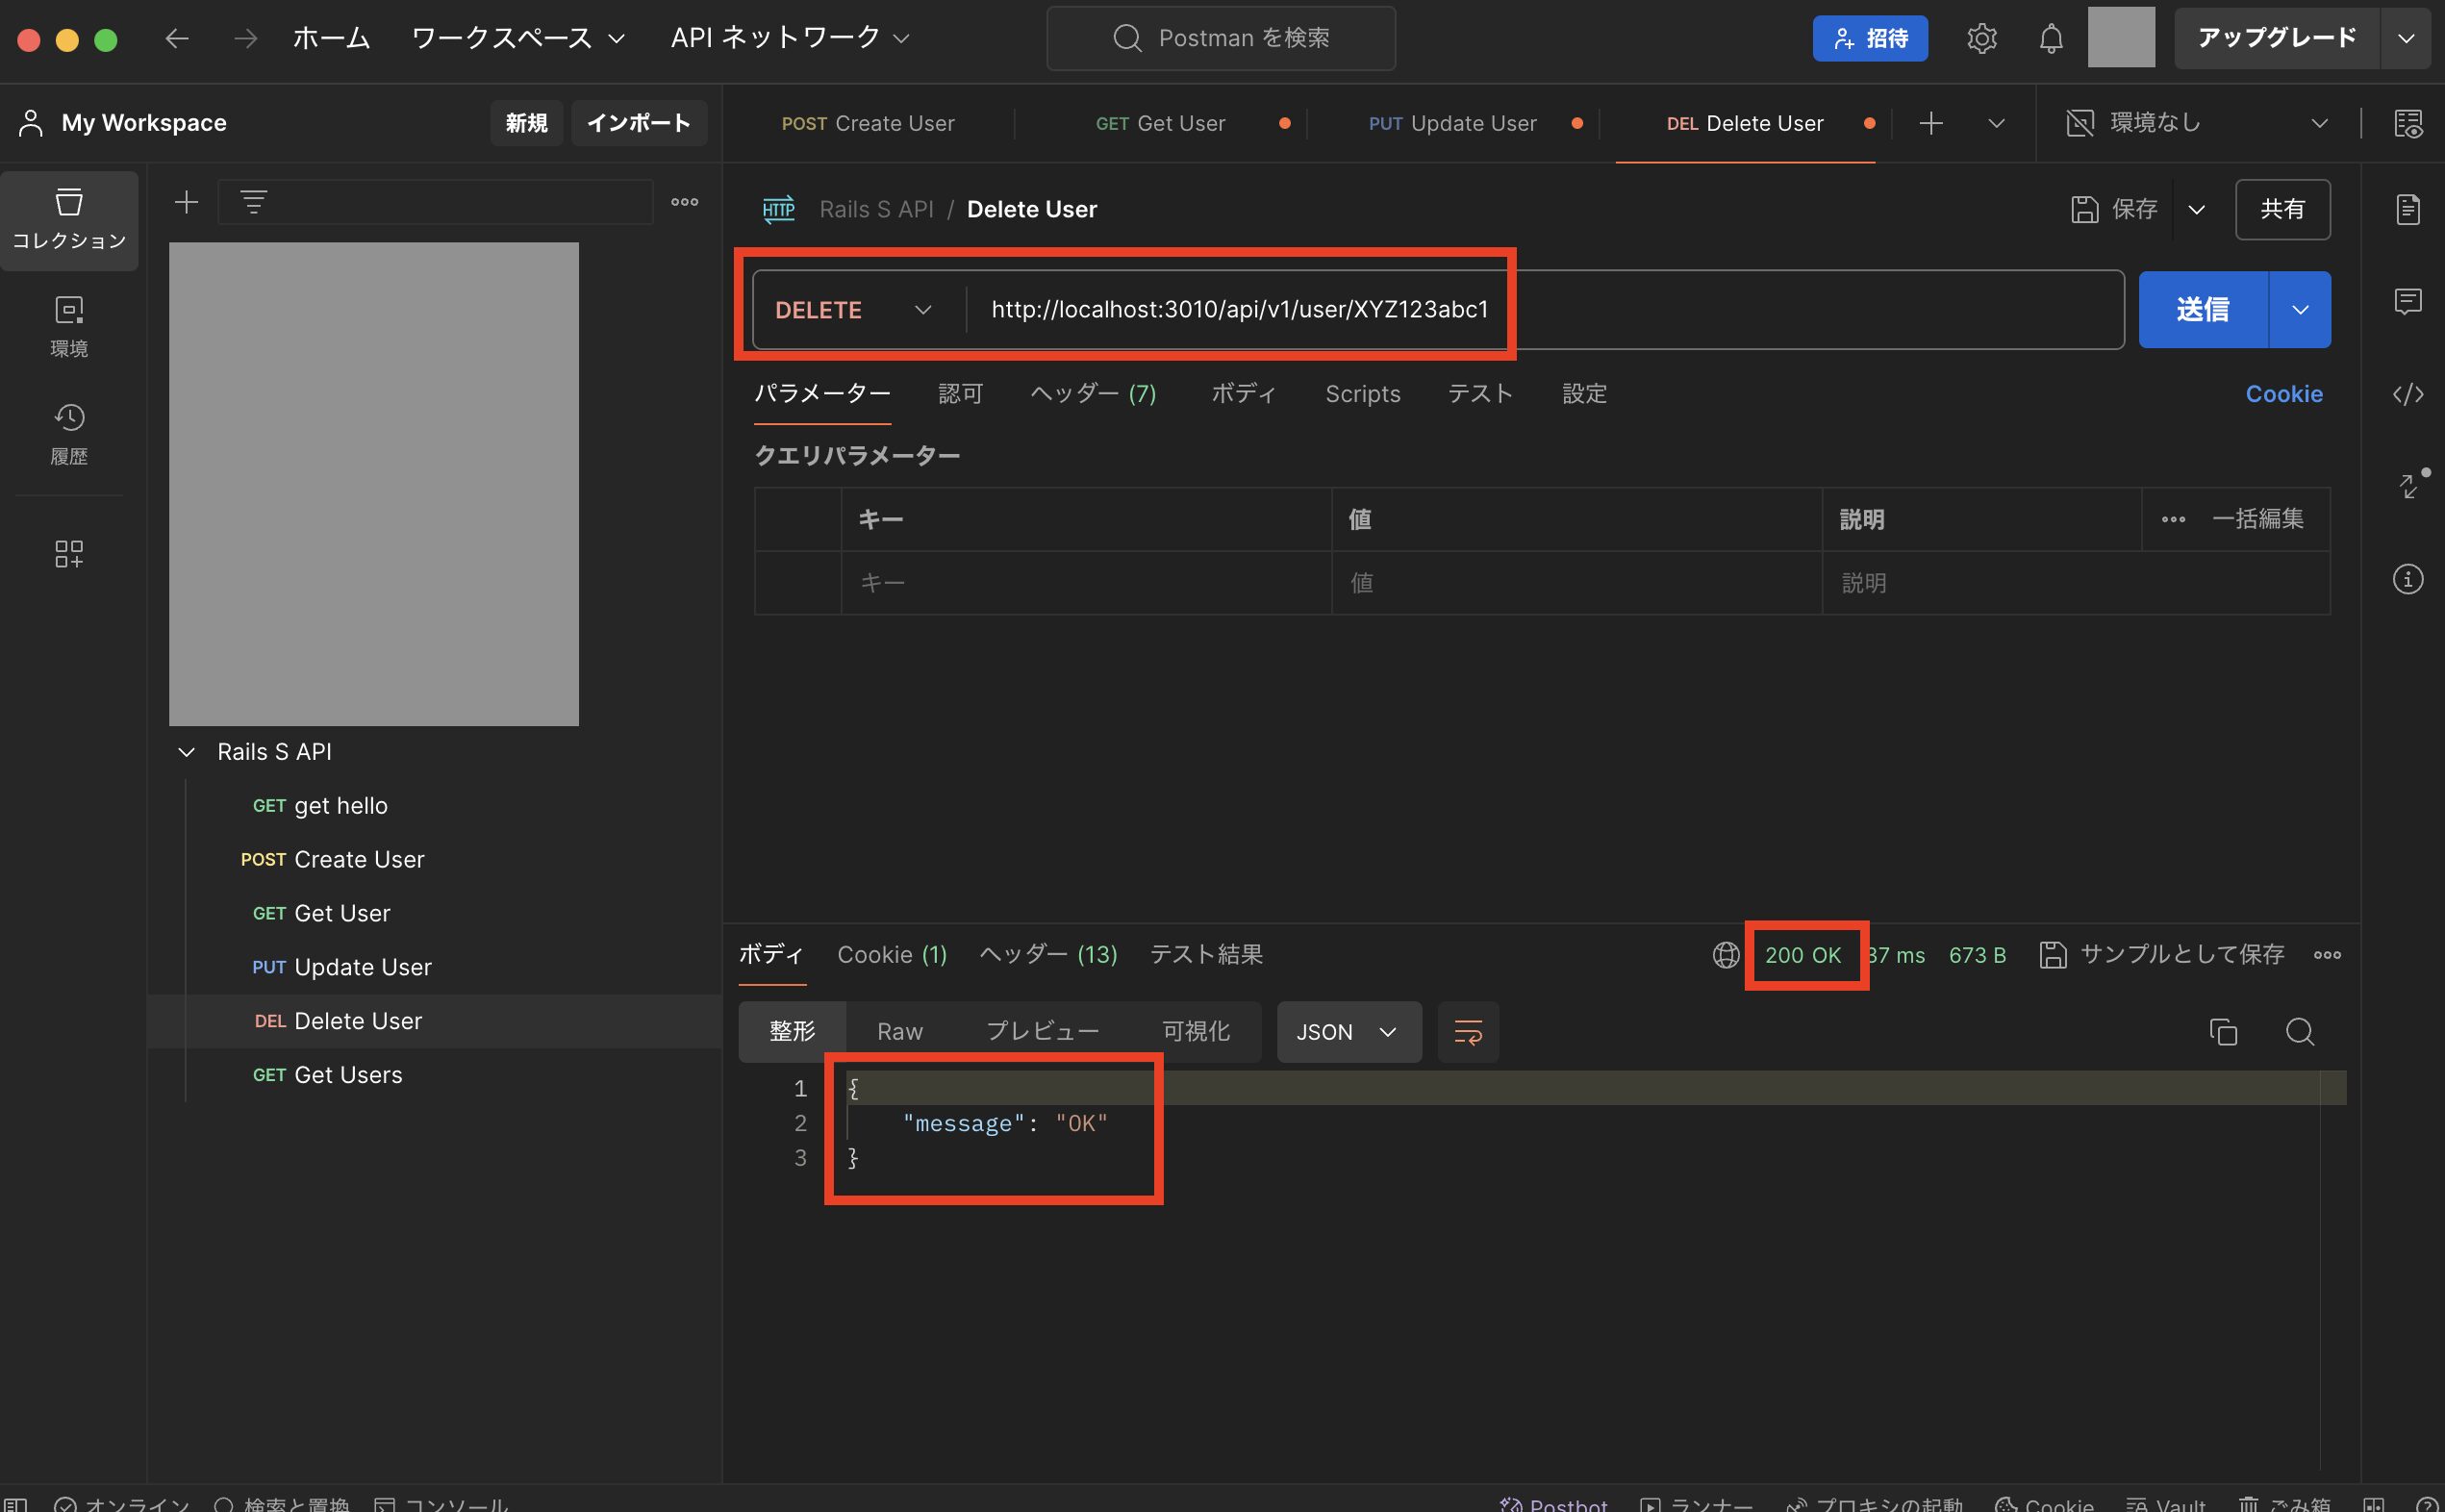
次にユーザーを論理削除する「http://localhost:3010/api/v1/user/XYZ123abc1」をDELETEで実行し、下図のように正常終了すればOKです。
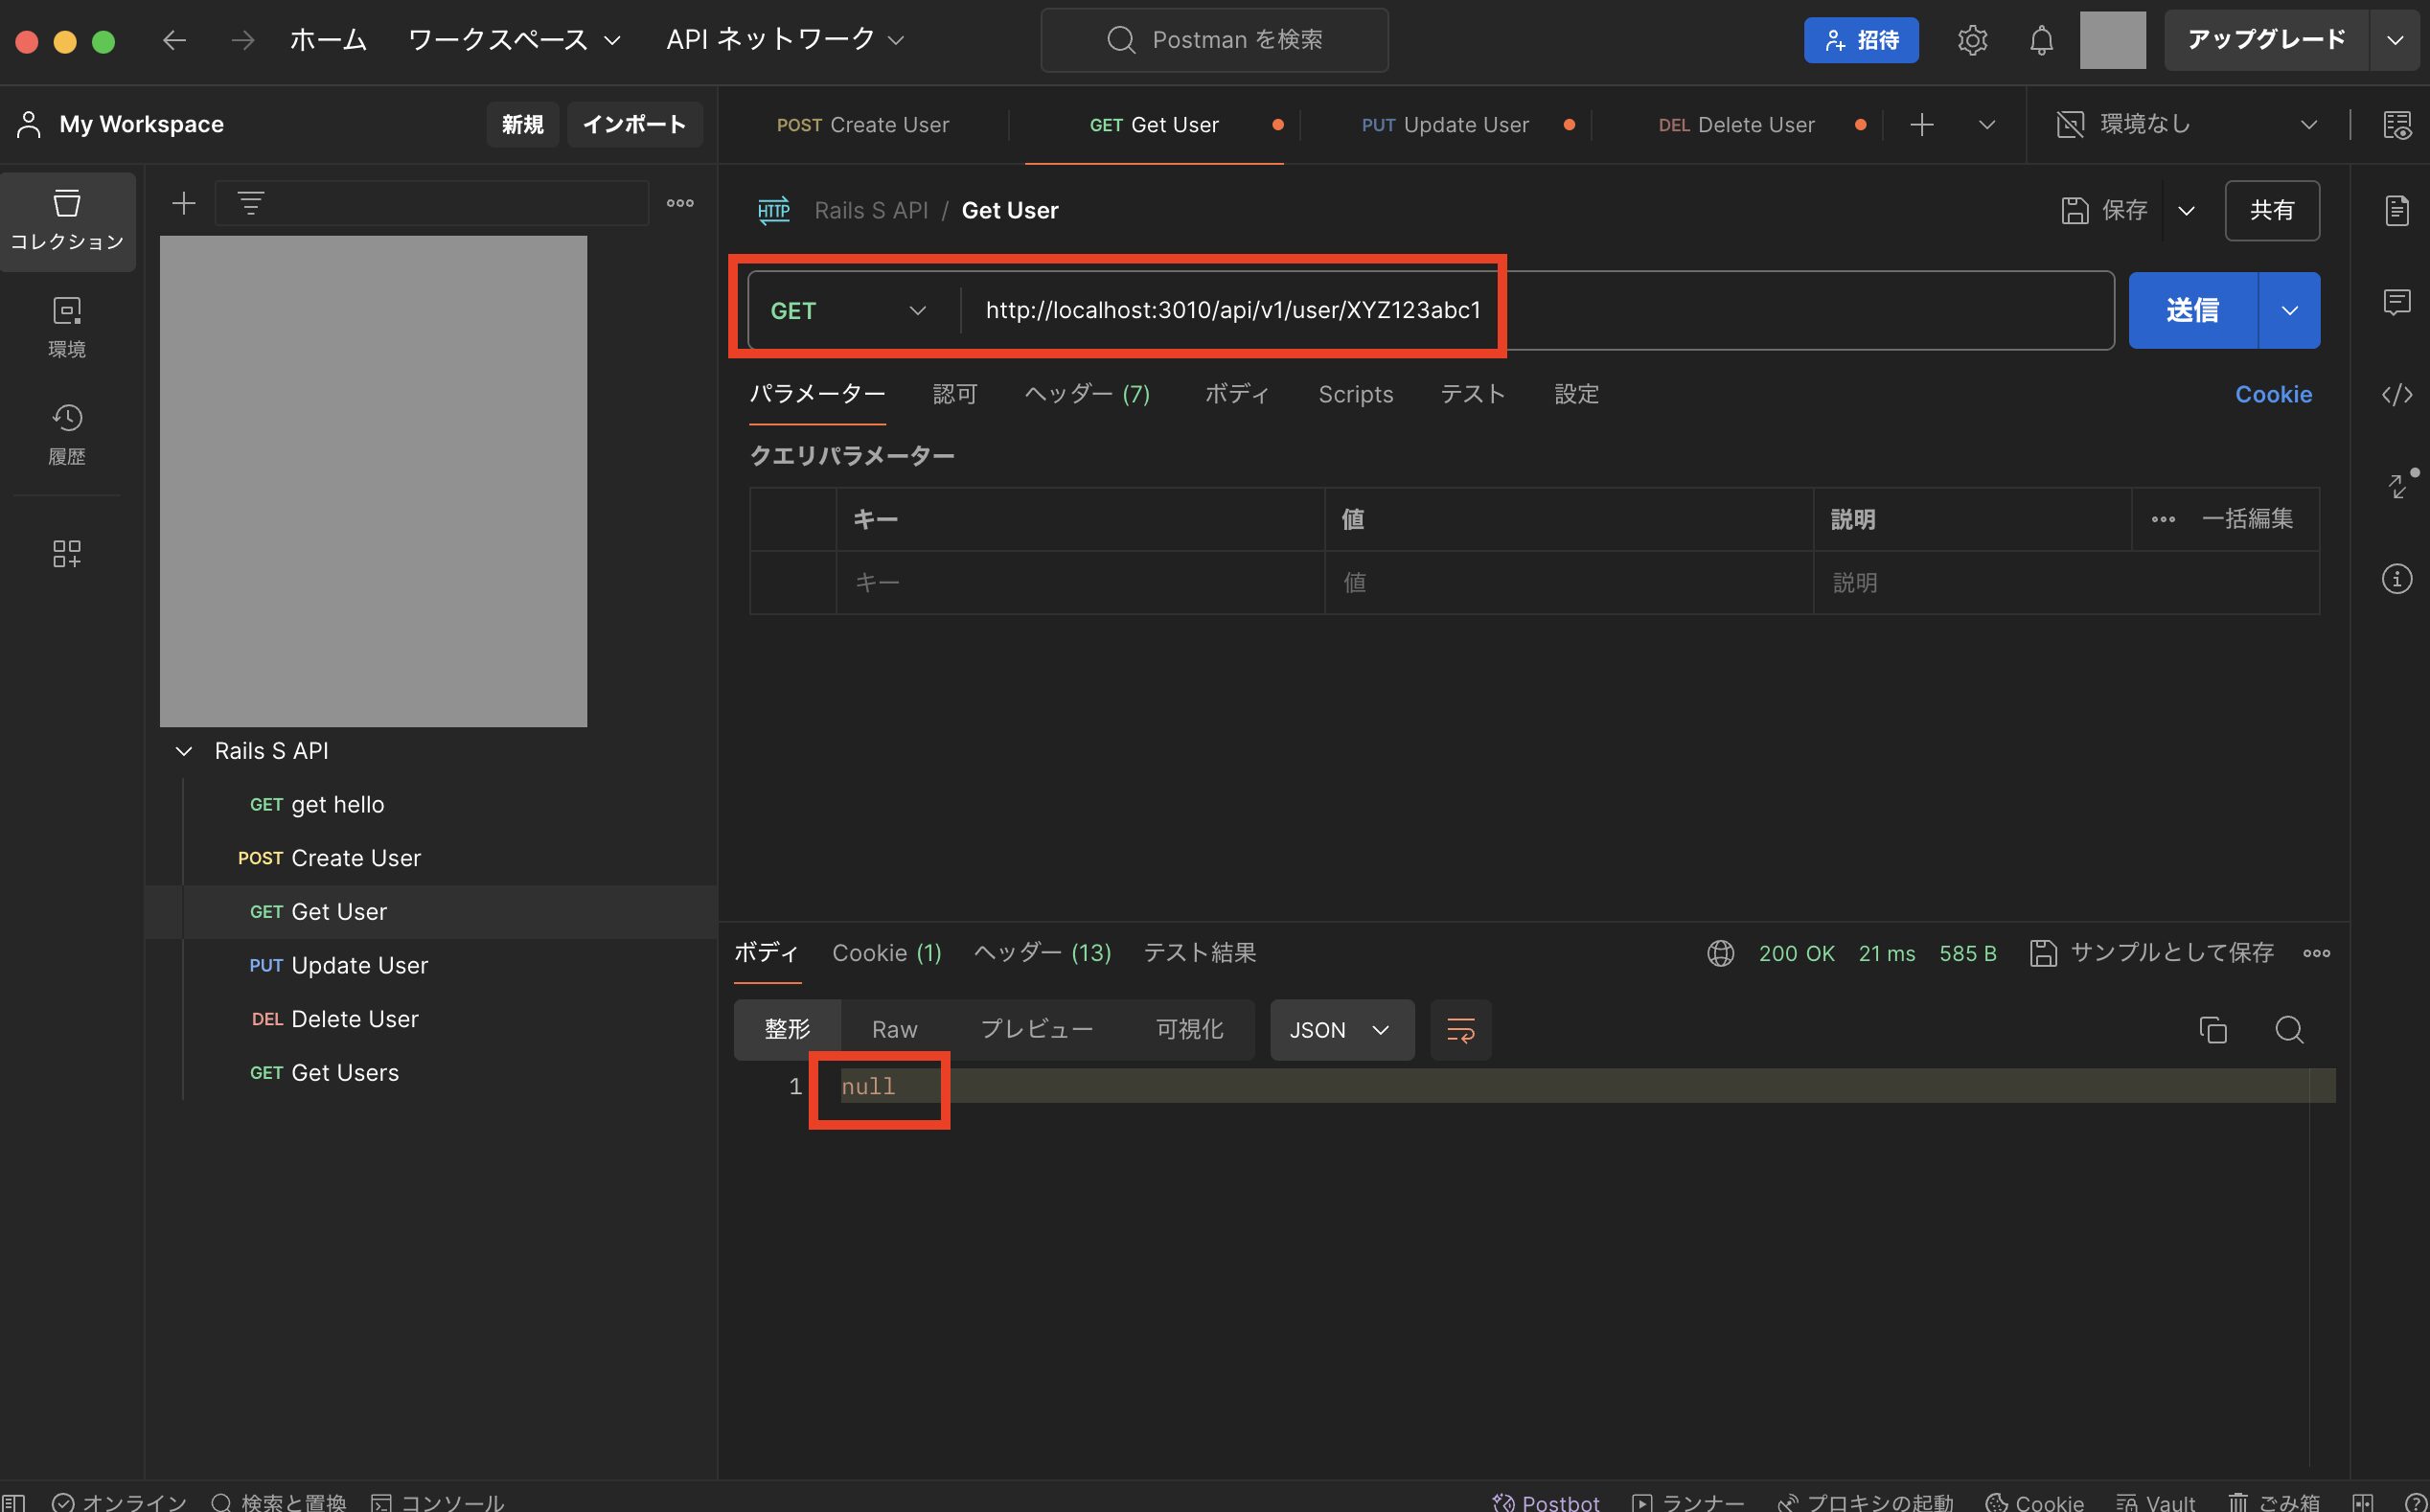
次にもう一度ユーザー取得用の「http://localhost:3010/api/v1/user/XYZ123abc1」をGETで実行し、対象データが存在せずnullが取得できればOKです。
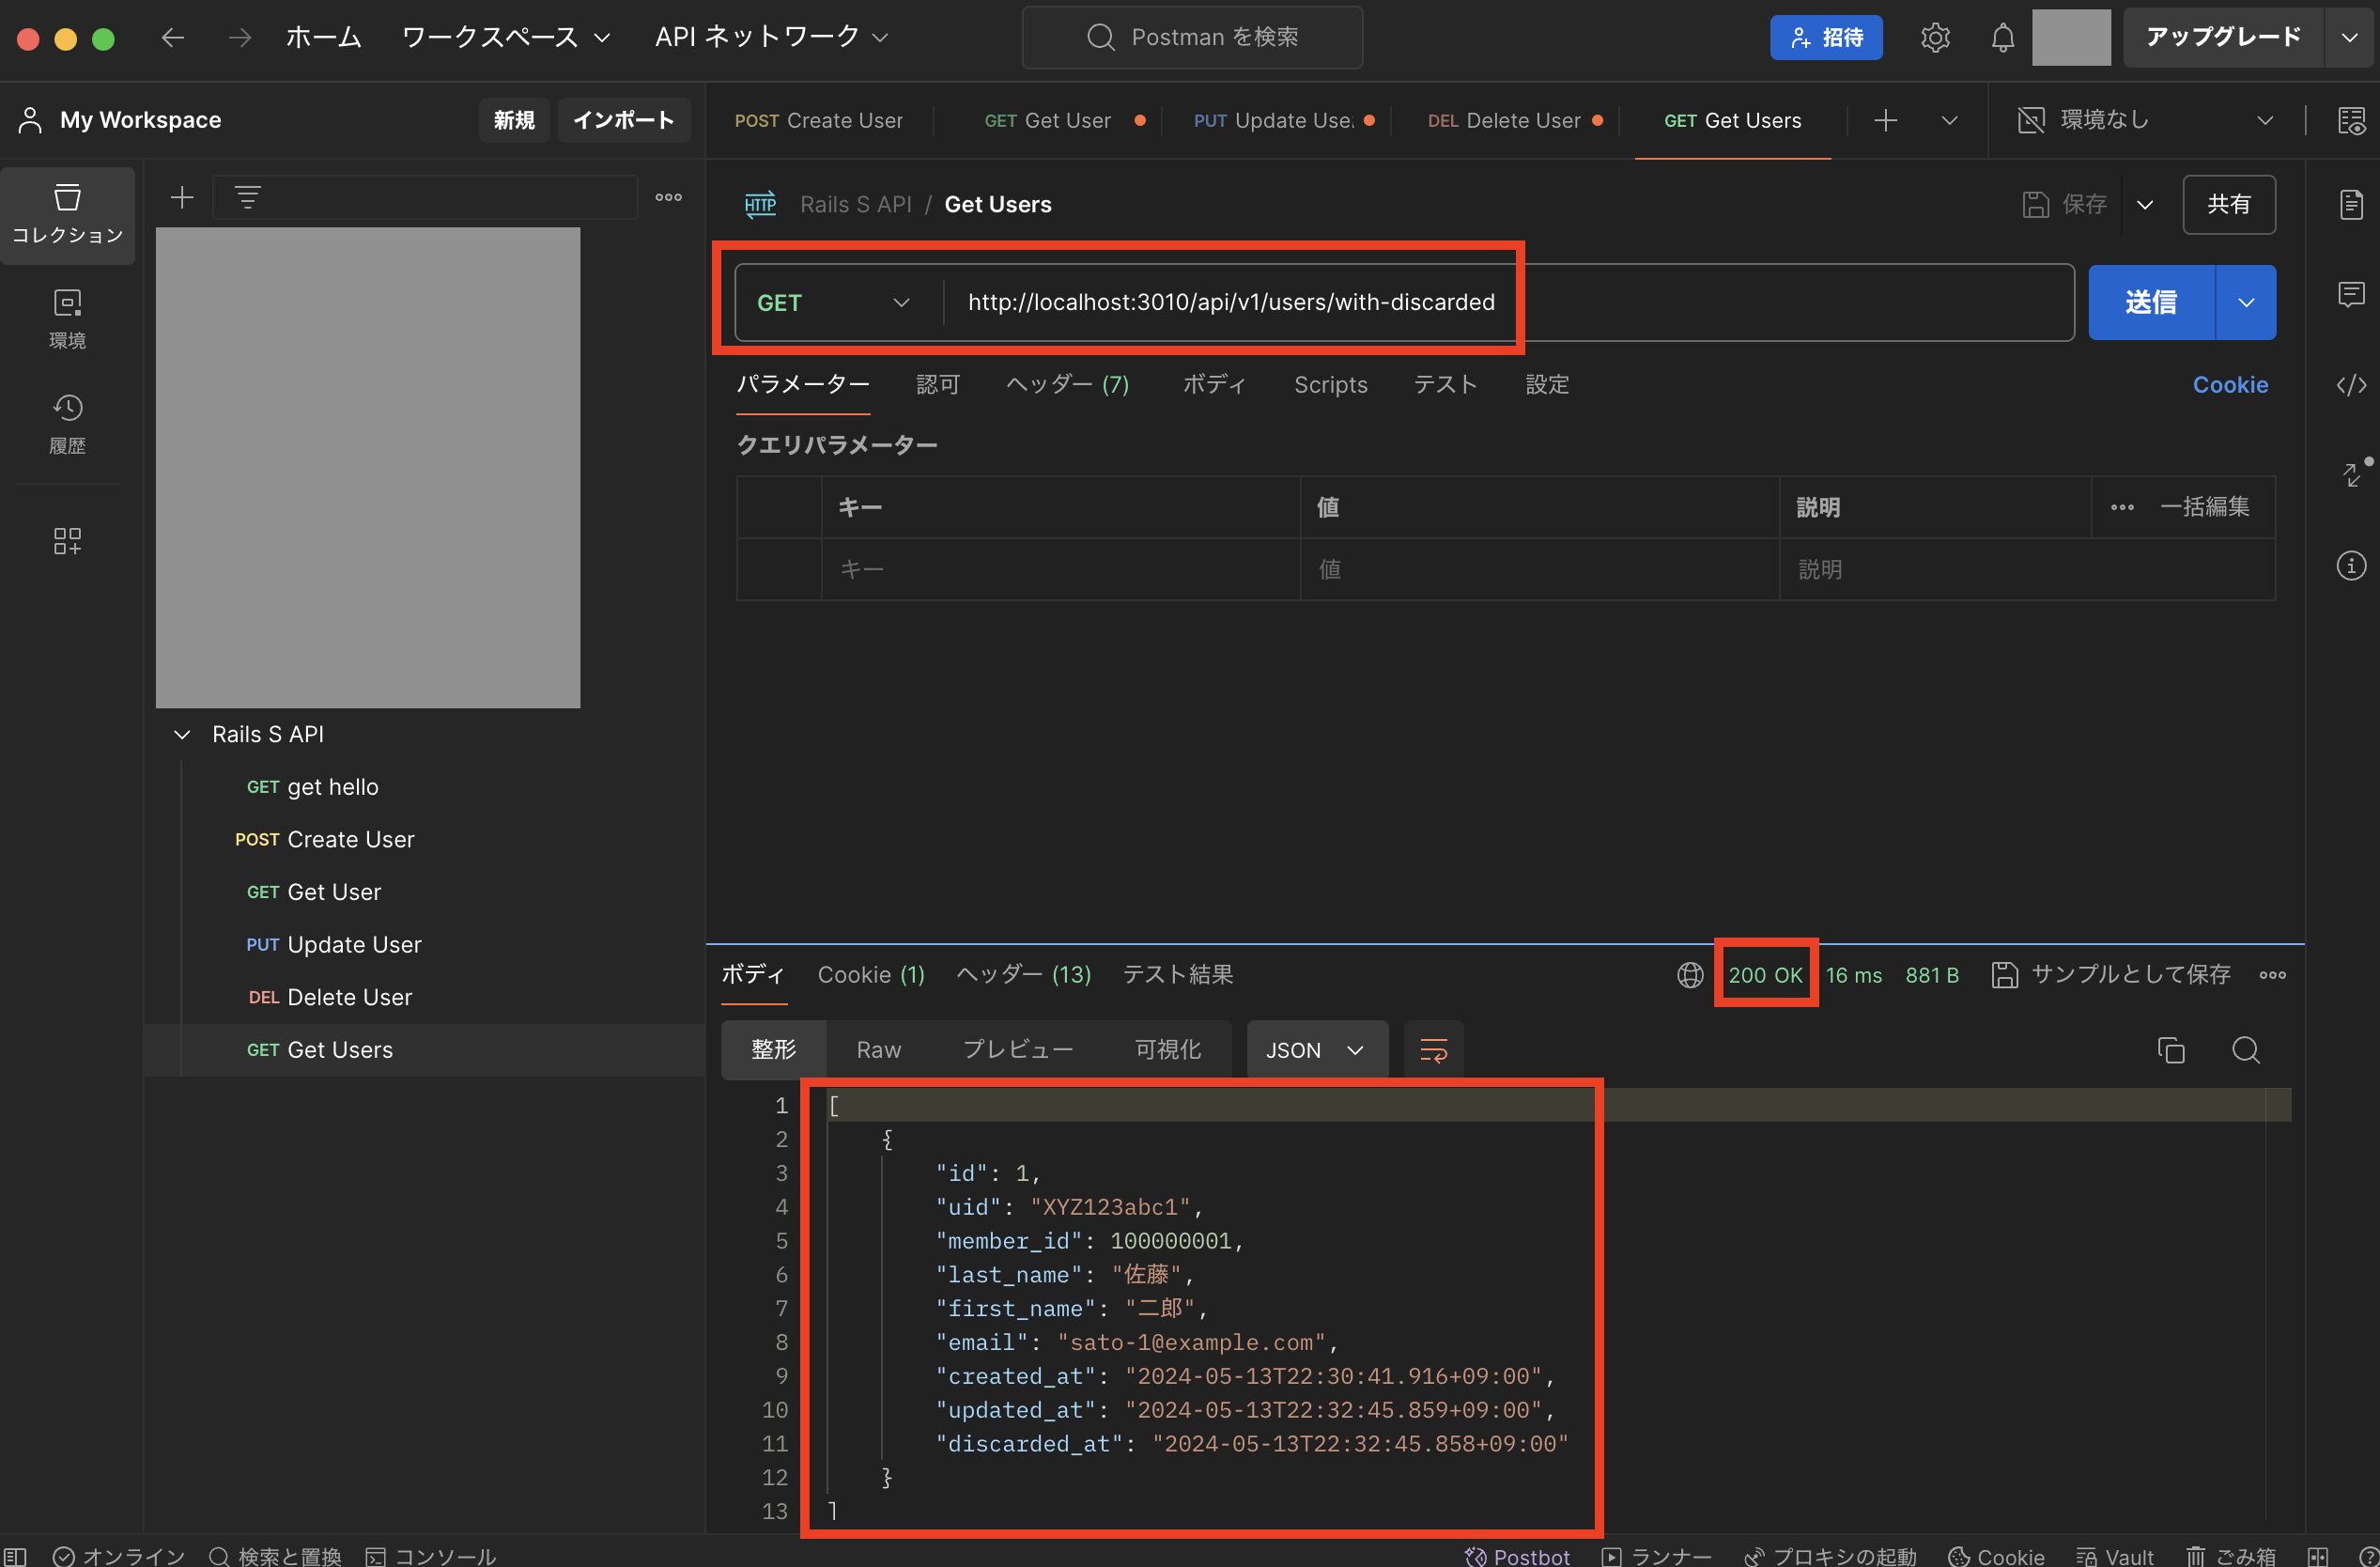
次に削除済みデータも含めて全てのユーザーを取得する「http://localhost:3010/api/v1/users/with-discarded」をGETで実行し、下図のようにユーザー情報が取得でき、discarded_atに削除日が設定されていればOKです。
最後に
今回はRails7の最小構成でバックエンドAPIを開発する方法についてまとめました。
久しぶりに触ってみた感じ、やはりRailsは色々なところが自動化されていて、使いやすいフレームワークだなと改めて思いました。
また私自身が実務経験を経てレベルアップしたこともあり、以前よりもいい感じでコードを書けるようになってきたのが実感できて良かったです。
過去にもRailsの記事は書いてきましたが、今回ご紹介した方法の方がシンプルでいい感じに作り始めることができると思うので、これから試す方はぜひ参考にしてみて下さい!
各種SNSなど、チャンネル登録やフォローをしていただけると励みになるので、よければぜひお願いします!


コメントを残す