こんにちは。Tomoyuki(@tomoyuki65)です。
最近はChatGPTやGeminiなどの生成AI技術が話題ですが、これから様々なサービスに生成AI技術が組み込まれていくことになると思います。
そんな生成AI技術をサービスに組み込む際には、APIを作って処理させることになると思いますが、現状Pythonのライブラリがメインで使われているため、APIを作る際はPythonのフレームワークを使う必要がでてきます。
とはいえ、日本のWeb開発業界ではバックエンドにPythonのフレームワークを使うことは非常に少ないことに加え、PythonだけでAPIを作るより、AI機能はPythonで作り、全体のAPIはGolangなどで作った方が処理が早かったりするようなので、今後も基本的にはそういった使われ方をしていきそうです。
そういった用途の場合、Pythonのフレームワークの中で軽量かつ人気が高い「FastAPI」というのがあり、気になったので試してみることにしました。
この記事では、そんなFastAPIでAPIを開発する方法についてまとめます。
目次
【FastAPI入門】Dockerで環境構築してPythonのAPIを開発する方法まとめ
まずは以下のコマンドを実行し、各種ファイルを作成します。
$ mkdir fastapi_sample
$ cd fastapi_sample
$ touch compose.yml
$ mkdir docker
$ mkdir src
$ cd docker
$ mkdir python
$ cd python
$ mkdir local
$ cd local
$ touch Dockerfile
$ cd ../../../src
$ touch __init__.py
$ touch main.py
$ cd ..
次に作成した各種ファイルの内容を以下のように記述します。
# 軽量版のイメージを使用
FROM python:3.12.3-slim-bullseye

WORKDIR /code

# パッケージ管理用のpoetryをインストール
RUN pip3 install poetry
services:
  api:
    container_name: fastapi_sample
    build:
      context: .
      dockerfile: ./docker/python/local/Dockerfile
    volumes:
      - .:/code
    ports:
      - "9004:9004"
from fastapi import FastAPI
from fastapi.responses import PlainTextResponse

app = FastAPI()

@app.get("/")
def root():
    return PlainTextResponse("Hello World !!")
次に以下のコマンドを実行し、コンテナのビルド後にパッケージ管理ツールの「poetry」を初期化します。
※パッケージ管理は他にも方法がありますが、最近はこの「poetry」を使うのがモダンなようです。
$ docker compose build --no-cache
$ docker compose run --rm api poetry init
コマンド実行後、初期設定に関する入力を求められるので、Package nameを入力し、それ以外は基本的にEnterで進めます。(Authorだけ「n」を入力)
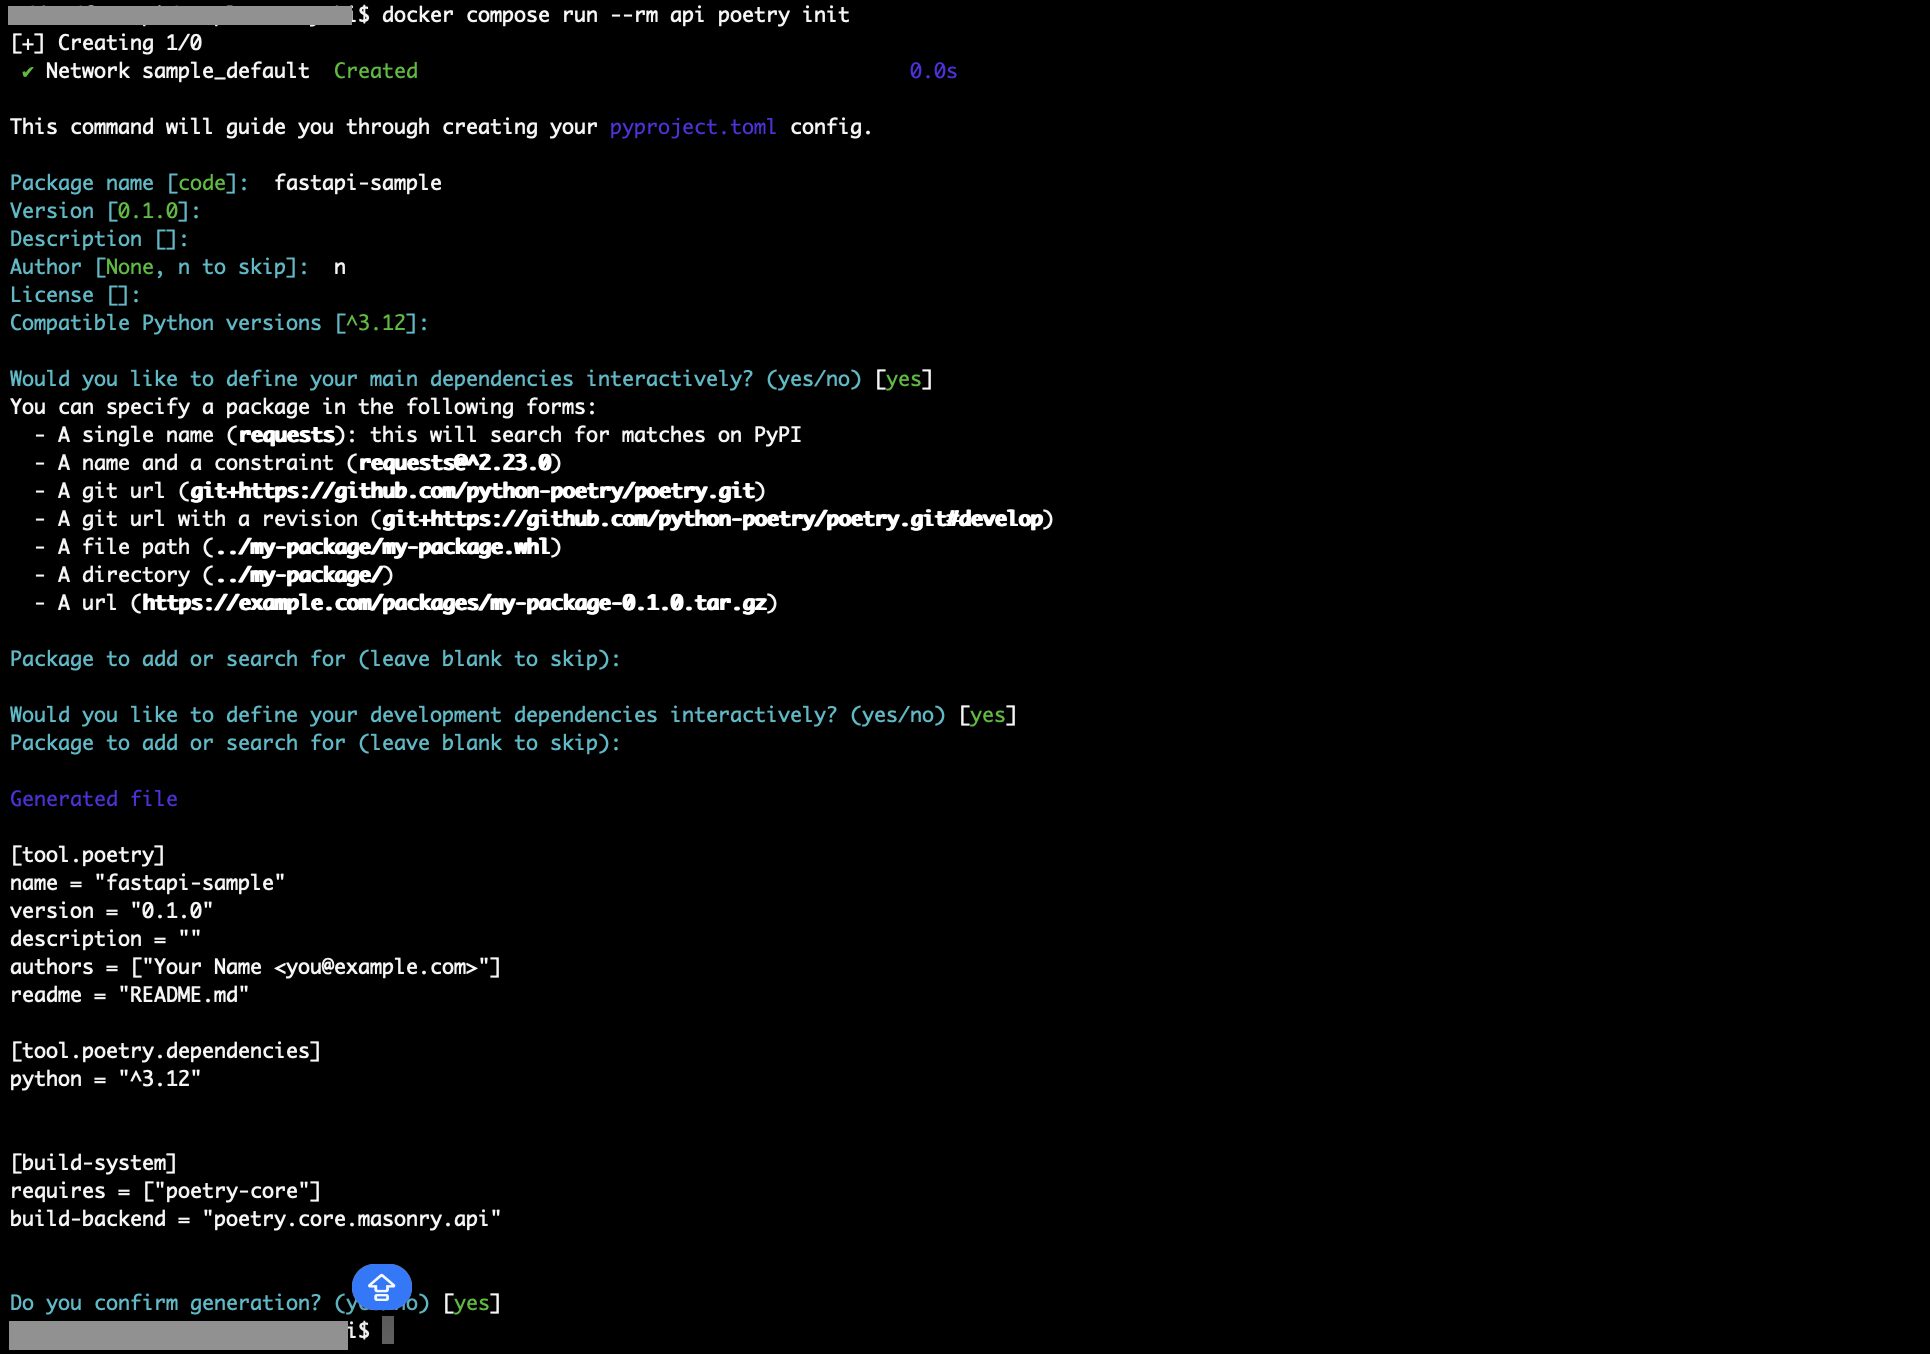
完了するとファイル「pyproject.toml」が作成されるので、以下のコマンドを実行して「fastapi」、「uvicorn」、「pydantic」をインストールします。
※FastAPIを使う際は「fastapi」と「uvicorn(通信用のライブラリ)」をセットで使い、スキーマの定義で「pydantic(型ヒントや型指定のライブラリ)」を使います。
$ docker compose run --rm api poetry add fastapi uvicorn pydantic
次にDockerfileとcompose.ymlをそれぞれ以下のように修正します。
# 軽量版のイメージを使用
FROM python:3.12.3-slim-bullseye

WORKDIR /code

# パッケージ管理用のpoetryをインストール
RUN pip3 install poetry

# poetry.lockから依存パッケージをインストール
COPY ./pyproject.toml /code/pyproject.toml
COPY ./poetry.lock /code/poetry.lock
RUN poetry install

WORKDIR /code/src

CMD ["poetry", "run", "uvicorn", "main:app", "--host", "0.0.0.0", "--port", "80"]
services:
  api:
    container_name: fastapi_sample
    build:
      context: .
      dockerfile: ./docker/python/local/Dockerfile
    volumes:
      - .:/code
    ports:
      - "9004:9004"
    tty: true
    stdin_open: true
    command: poetry run uvicorn main:app --reload --host 0.0.0.0 --port 9004
※インフラ構成の補足として、実務でサーバーを立てる際、だいたいAWSなどでALB(Application Load Balancer)を使うので、そういった場合はWebサーバーとしてNginxを使う必要はないようです。そのためこの記事でもNginxは無しの前提で進めます。
次に以下のコマンドを実行し、コンテナの再ビルド後に起動します。
$ docker compose build --no-cache
$ docker compose up -d
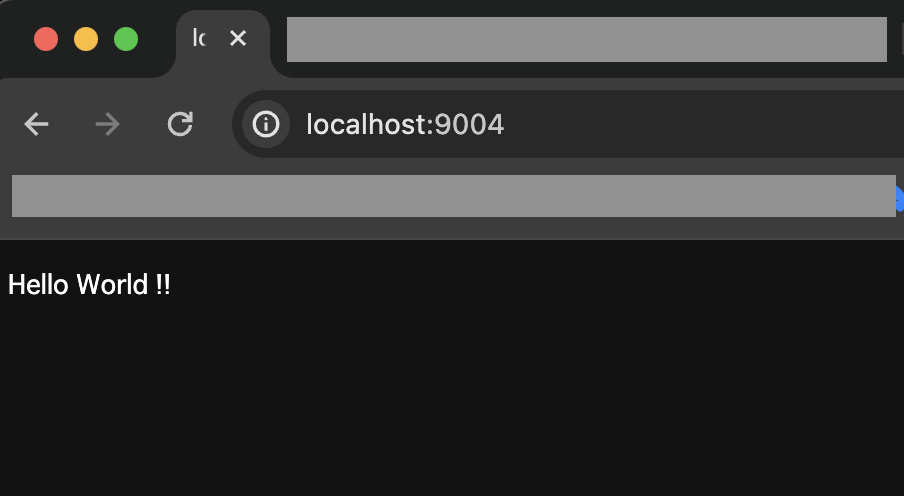
次にブラウザで「http://localhost:9004」にアクセスし、下図のように表示されればOKです。
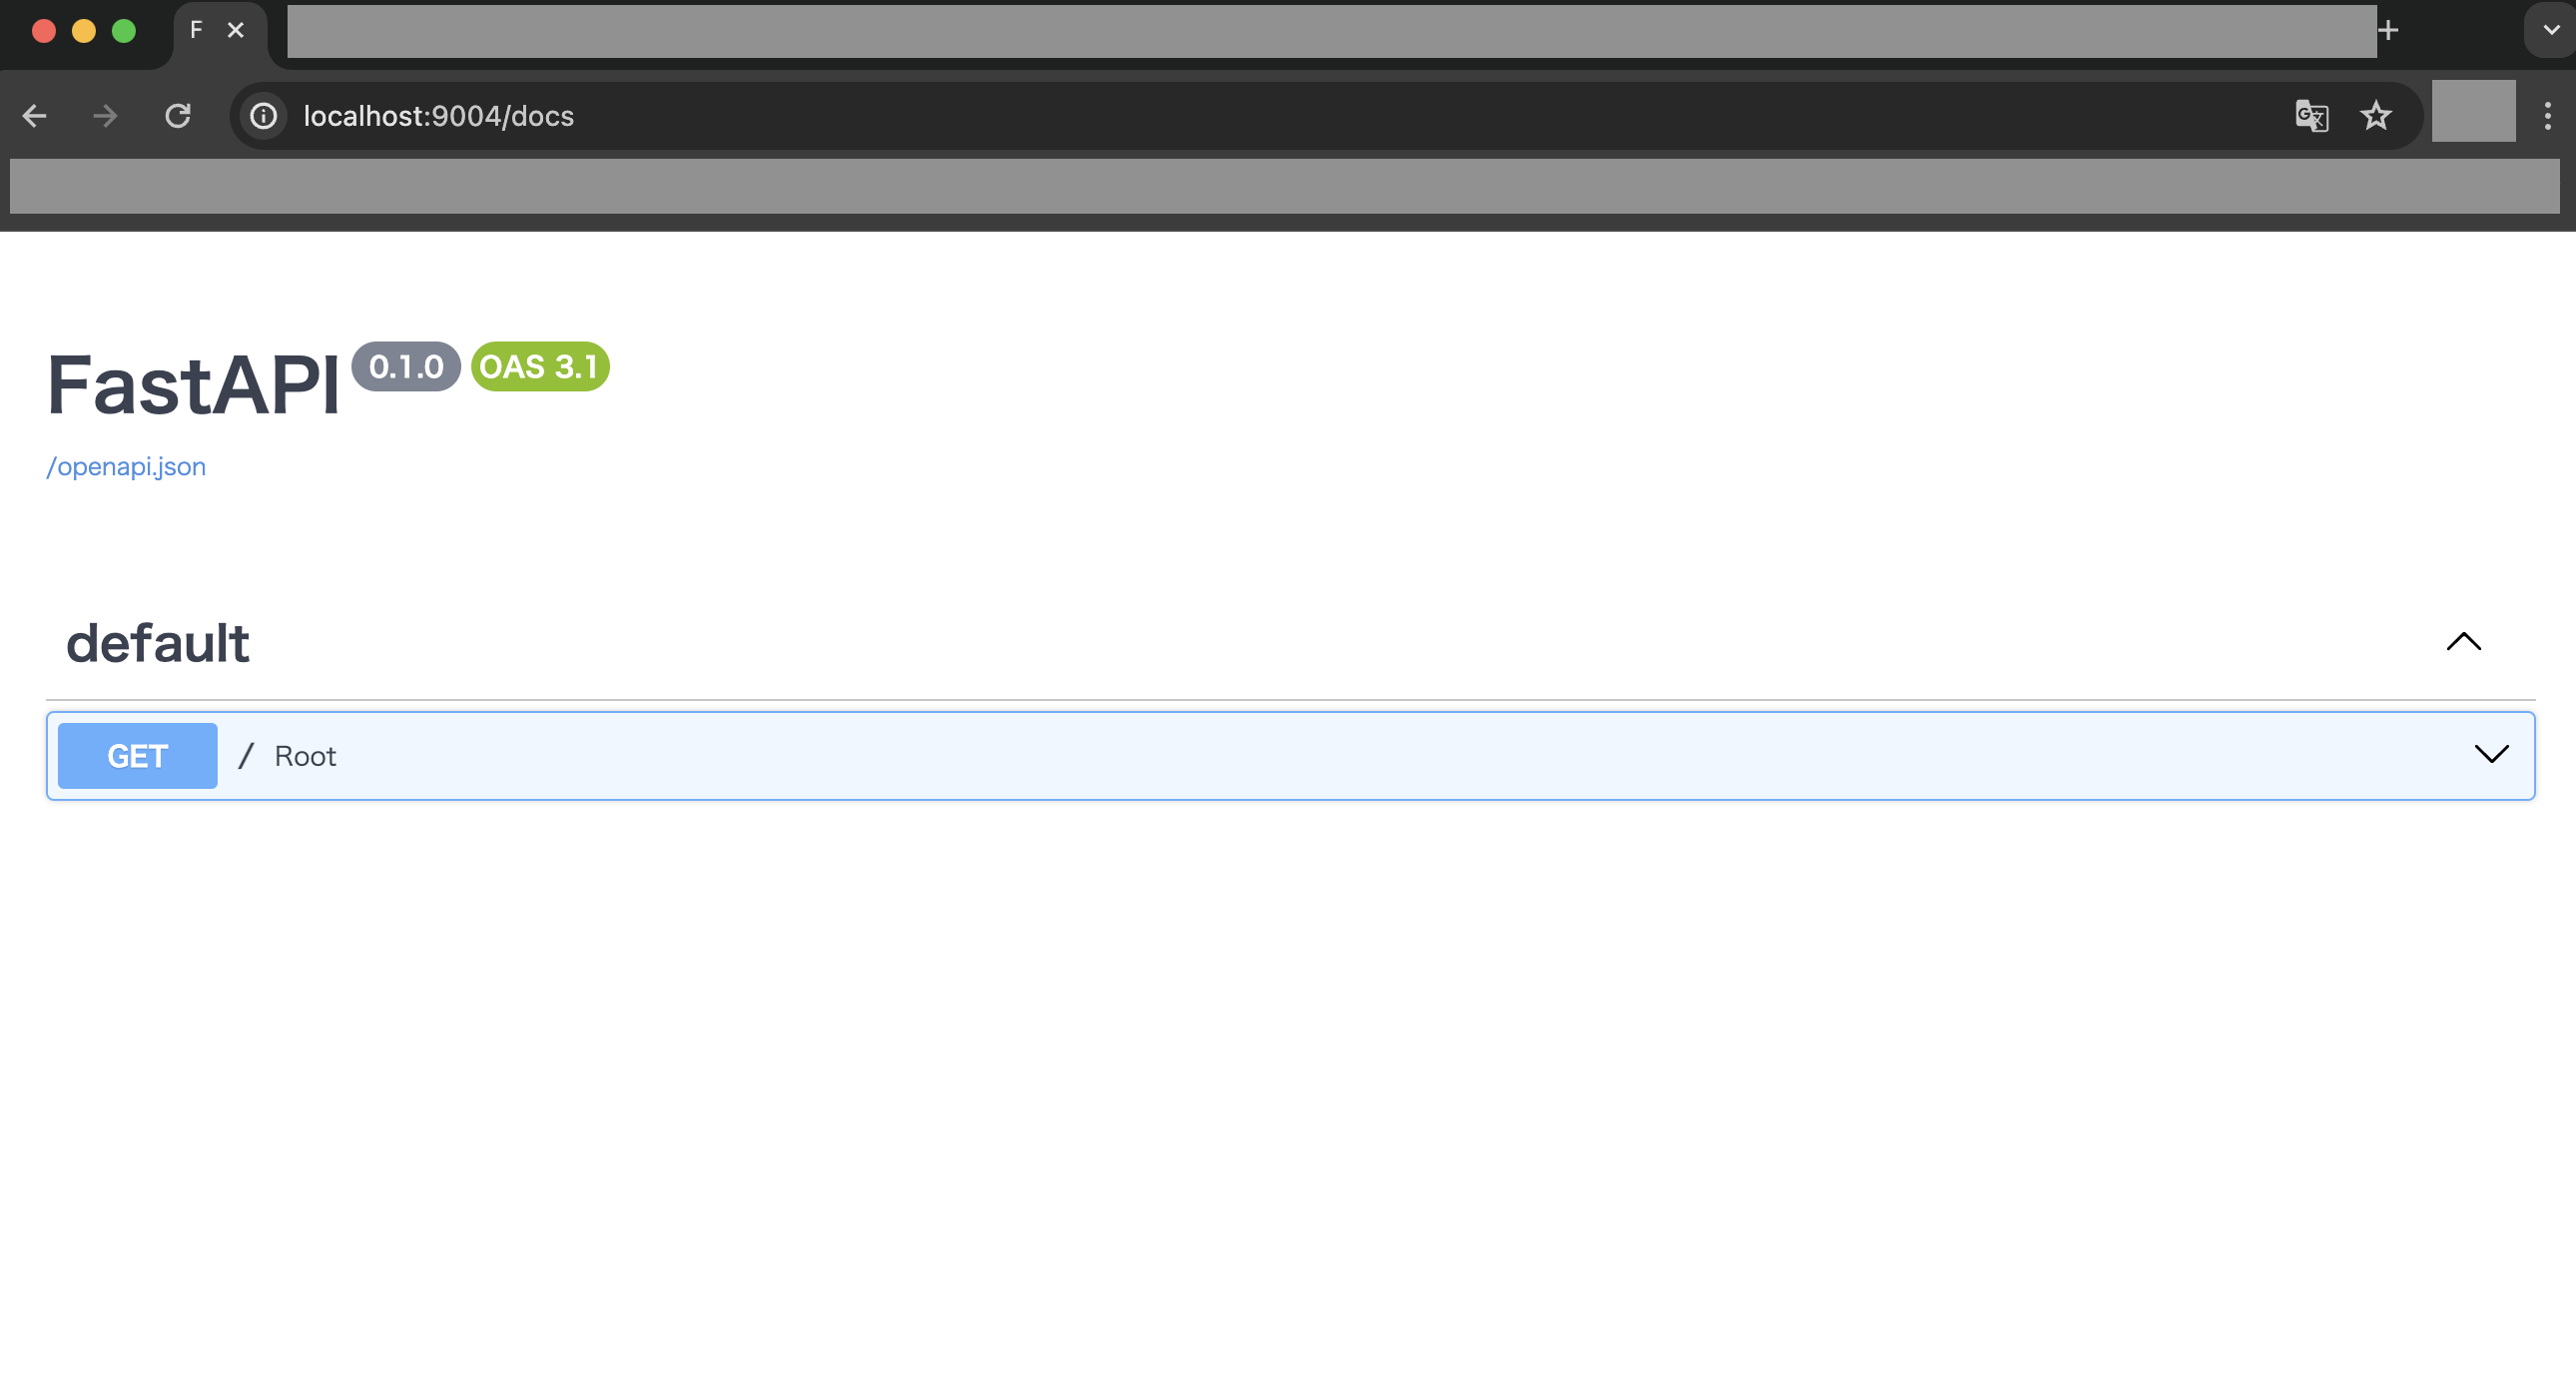
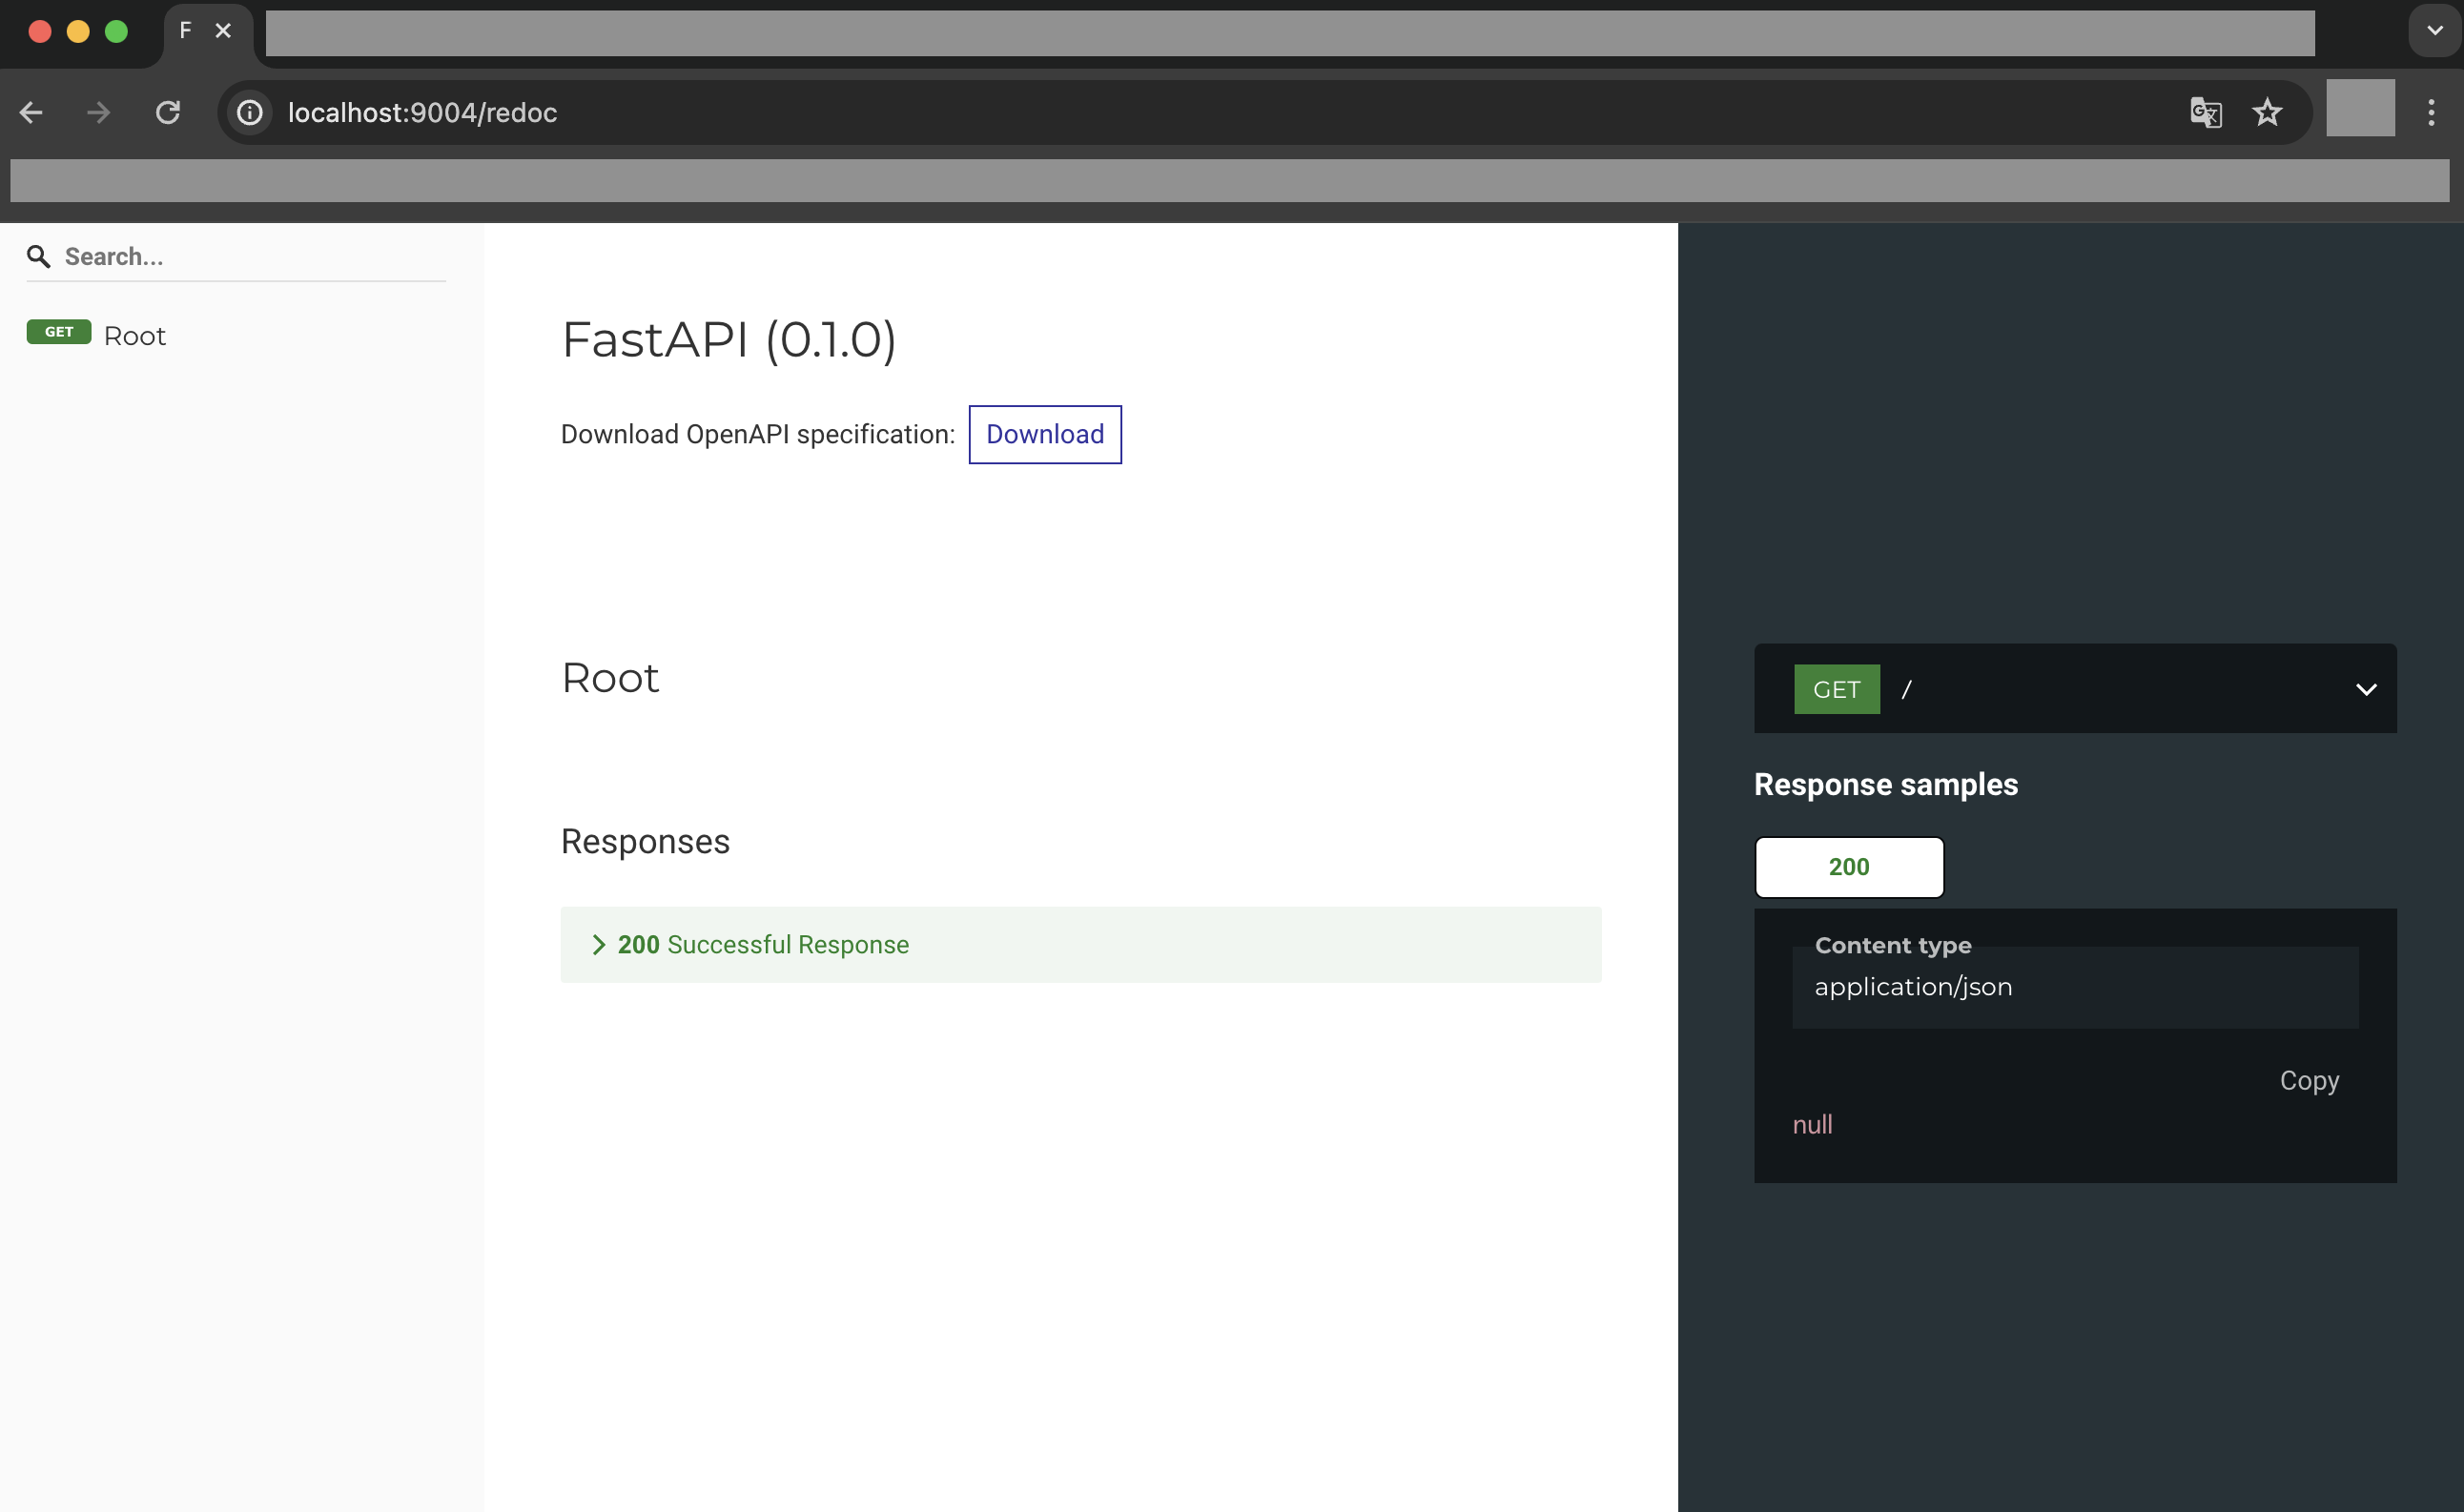
尚、FastAPIではOpenAPI形式の仕様書が自動で作成されていくのが特徴なので、ブラウザで「http://localhost:9004/docs」または「http://localhost:9004/redoc」にアクセスすると確認できます。
※FastAPIではこのOpenAPI形式で入力項目と出力項目をしっかり定義し、その上で内部ロジックを組んでいく形になります。API完成後は仕様書として使えるため、openapi.jsonを出力してmdファイルに変換後、GitHubで管理するのもおすすめです。
ルーティングとスキーマを追加
ルーティングを追加したい場合は「main.py」に追加していく必要がありますが、そのまま追加するとコードが肥大化するため、別途ルーティング用のディレクトリ「routers」を作成し、そこで管理できるようにします。
また、FastAPIで開発する際にはスキーマから定義する必要があるため、スキーマはディレクトリ「schemas」で管理します。
では次のコマンドを実行し、各種ディレクトリやファイルを作成します。
$ cd src
$ mkdir schemas
$ mkdir routers
$ cd schemas
$ touch __init__.py
$ touch common.py
$ touch sample.py
$ cd ../routers
$ touch __init__.py
$ touch sample.py
$ cd ..
次に作成した各種ファイルの内容を以下のように記述します。
from pydantic import BaseModel

class OK(BaseModel):
    message: str

    model_config = {
        "json_schema_extra": {
            "examples": [
                {
                    "message": "OK",
                }
            ]
        }
    }

class Created(BaseModel):
    message: str

    model_config = {
        "json_schema_extra": {
            "examples": [
                {
                    "message": "Created",
                }
            ]
        }
    }

class BadRequest(BaseModel):
    message: str

    model_config = {
        "json_schema_extra": {
            "examples": [
                {
                    "message": "Bad Request",
                }
            ]
        }
    }

class Unauthorized(BaseModel):
    message: str

    model_config = {
        "json_schema_extra": {
            "examples": [
                {
                    "message": "Unauthorized",
                }
            ]
        }
    }

class NotFound(BaseModel):
    message: str

    model_config = {
        "json_schema_extra": {
            "examples": [
                {
                    "message": "Not Found",
                }
            ]
        }
    }

class InternalServerError(BaseModel):
    message: str

    model_config = {
        "json_schema_extra": {
            "examples": [
                {
                    "message": "Internal Server Error",
                }
            ]
        }
    }
from pydantic import BaseModel

class SampleStr(BaseModel):
    message: str

    model_config = {
        "json_schema_extra": {
            "examples": [
                {
                    "message": "メッセージ",
                }
            ]
        }
    }
from fastapi import APIRouter, HTTPException
# スキーマのインポート
import schemas.sample as sample_schema
import schemas.common as common_schema

router = APIRouter()

@router.get("/sample",
    # デフォルトのレスポンスステータスコード
    status_code=200,
    # レスポンススキーマの種類
    responses={
        200: { "model": sample_schema.SampleStr },
    },
)
async def sample_str():
    return sample_schema.SampleStr(message="サンプル")

# 例外処理あり
@router.get("/sample-exception",
    # デフォルトのレスポンスステータスコード
    status_code=201,
    # レスポンススキーマの種類
    responses={
        201: { "model": sample_schema.SampleStr },
        500: { "model": common_schema.InternalServerError },
    },
)
async def sample_str():
    try:
        return sample_schema.SampleStr(message="サンプル")
    except Exception as e:
        raise HTTPException(status_code=500, detail=str(e))
次に「main.py」にルーティングを追加するため、以下のように修正します。
from fastapi import FastAPI
from fastapi.responses import PlainTextResponse
# ルーターのインポート
from routers import sample

app = FastAPI()

# ルーティング追加
app.include_router(sample.router)

@app.get("/")
def root():
    return PlainTextResponse("Hello World !!")
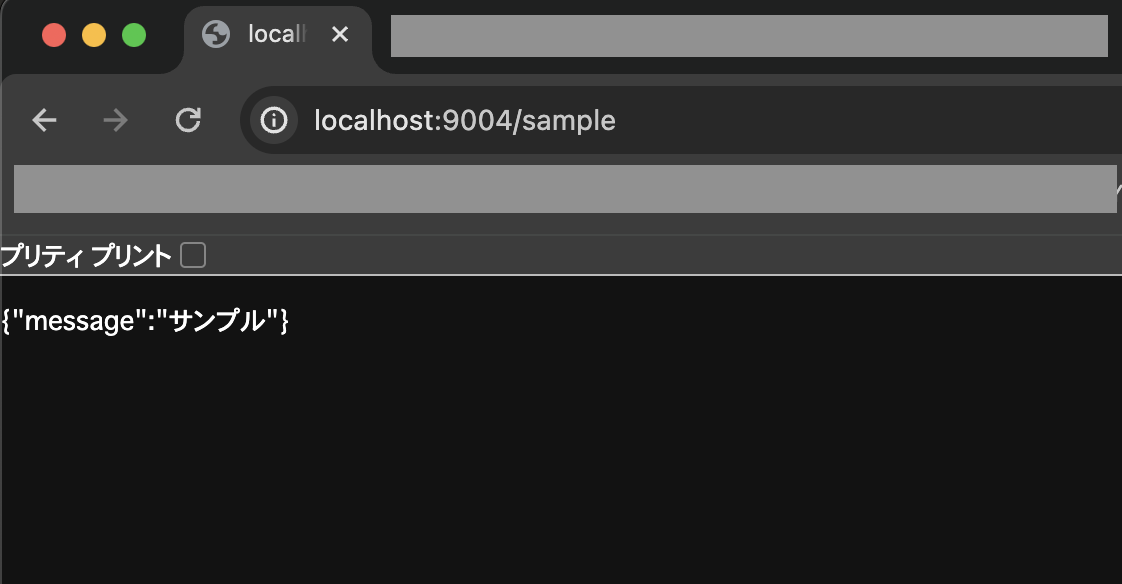
これでルーティングが追加されたので、ブラウザで「http://localhost:9004/sample」にアクセスし、設定したメッセージが出力されればOKです。
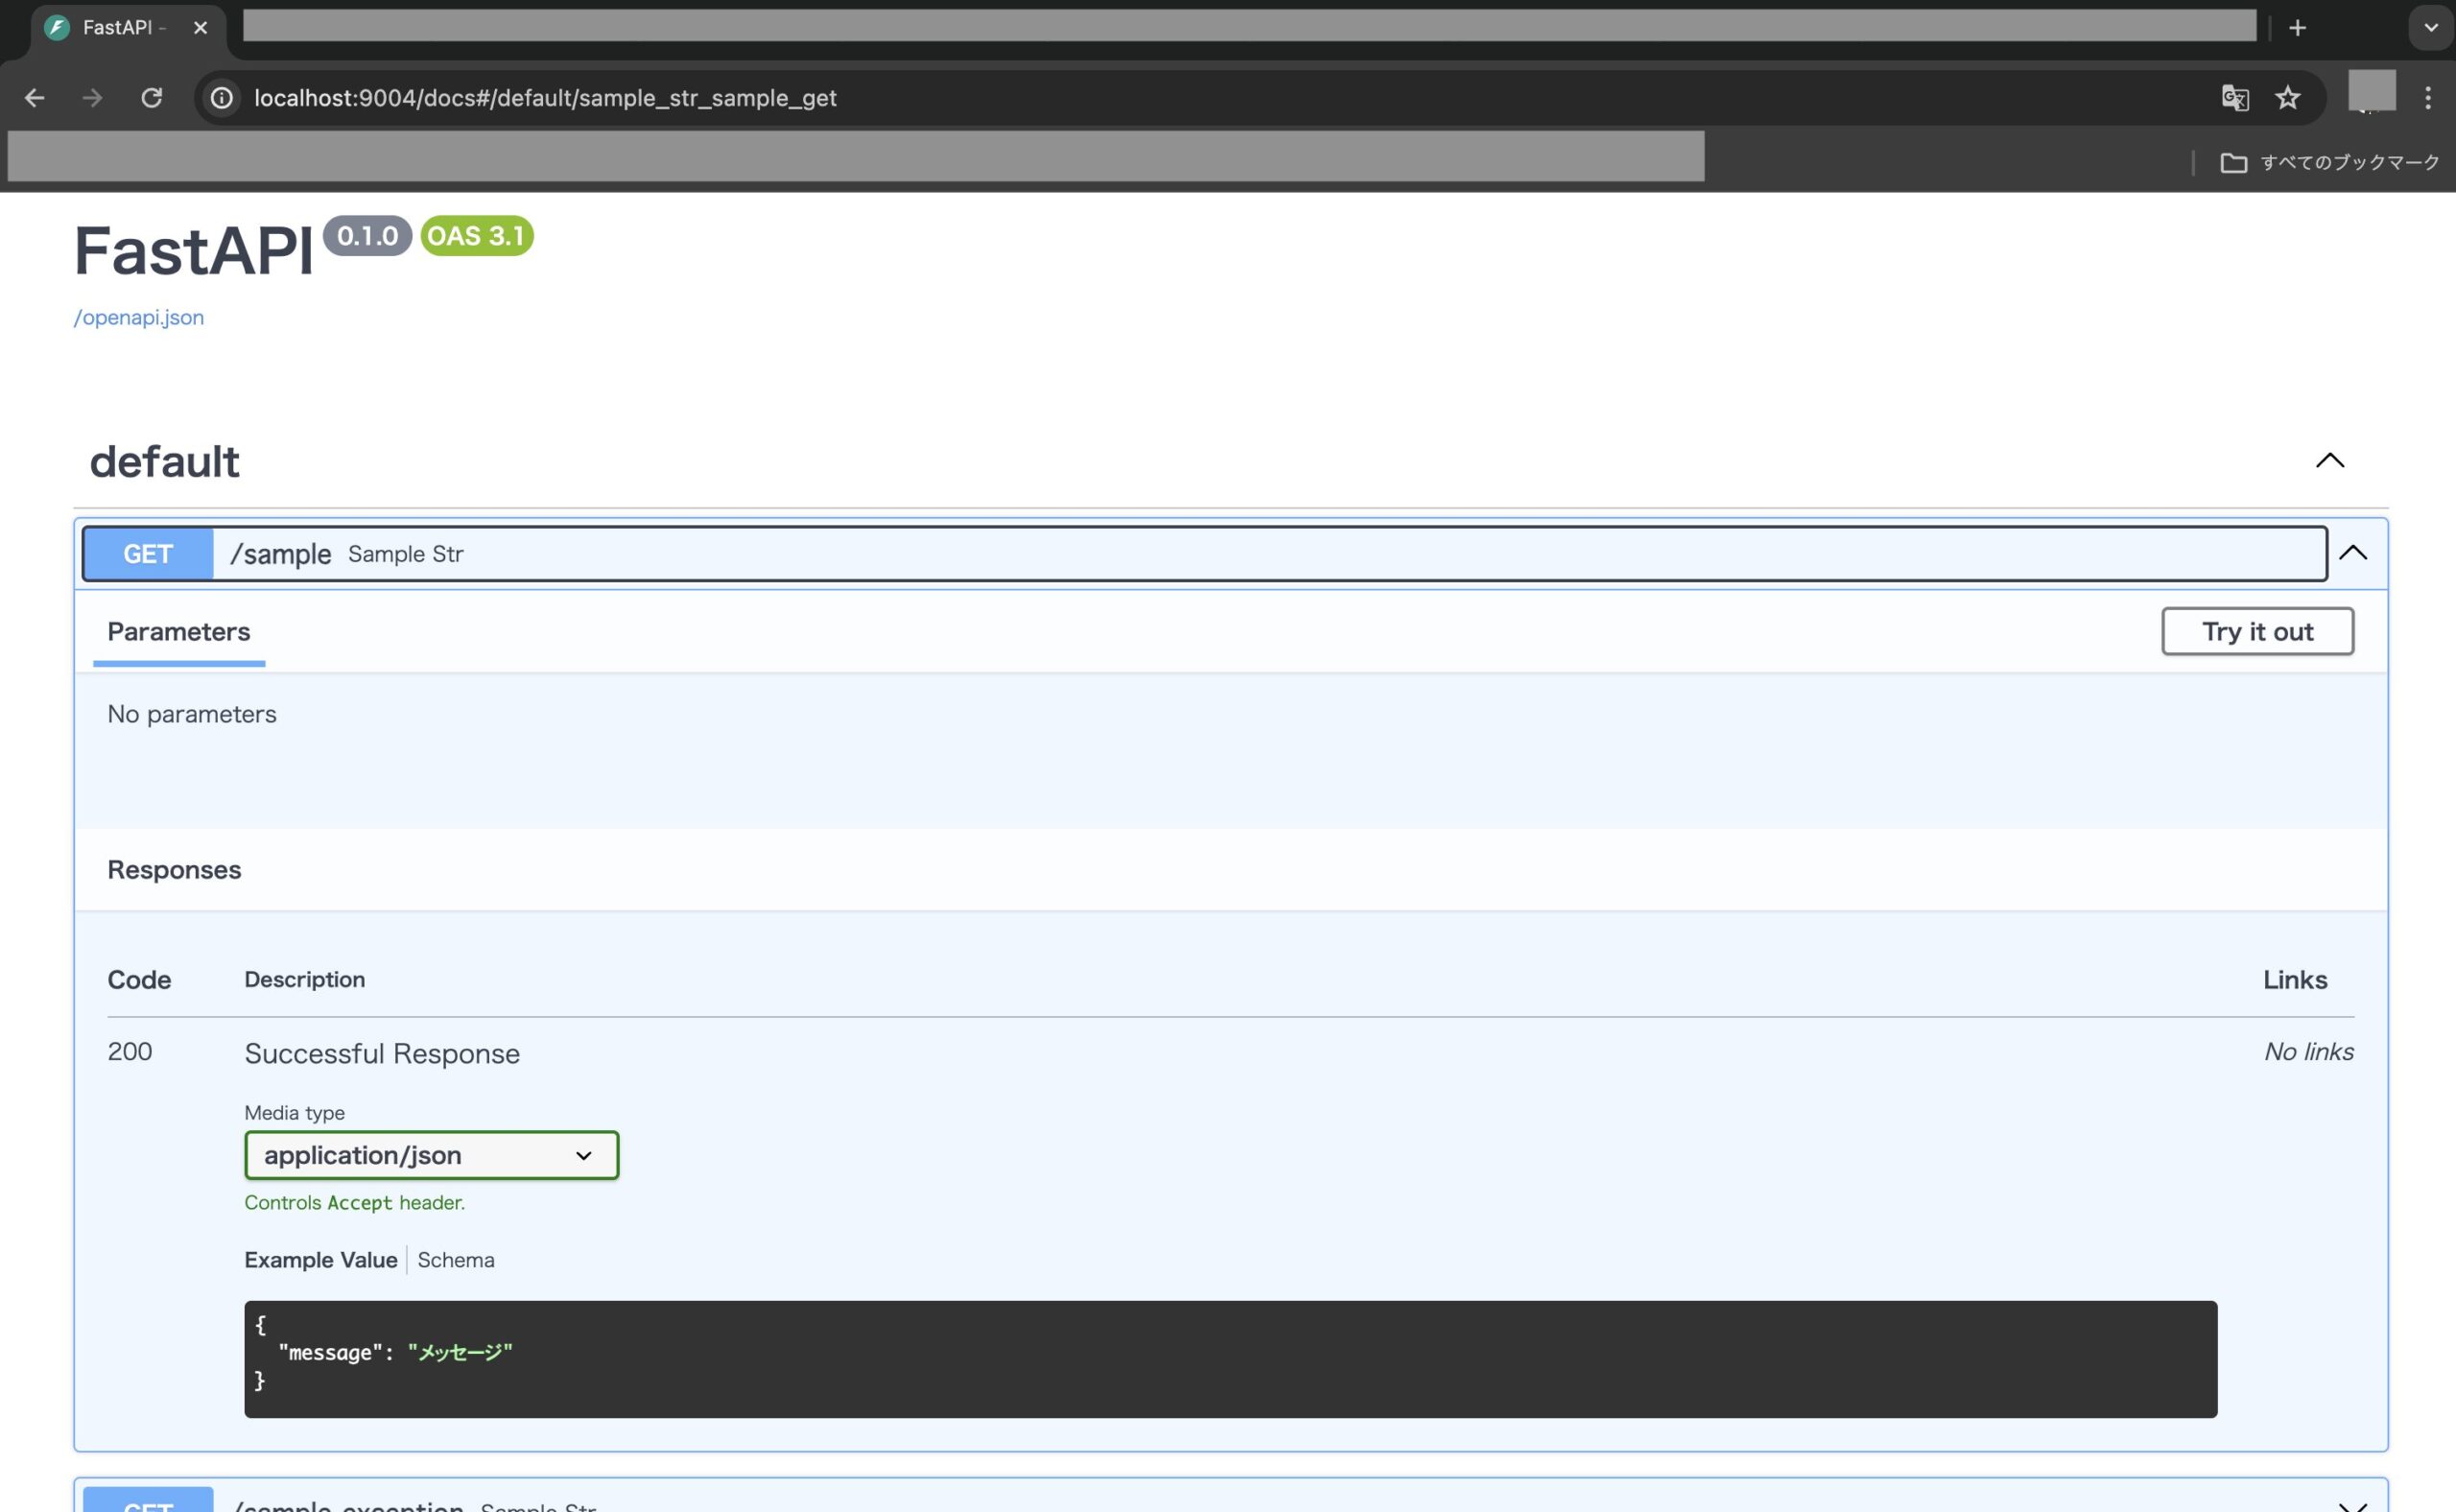
合わせて、ブラウザで「http://localhost:9004/docs」を確認し、OpenAPI仕様書が追加されていればOKです。
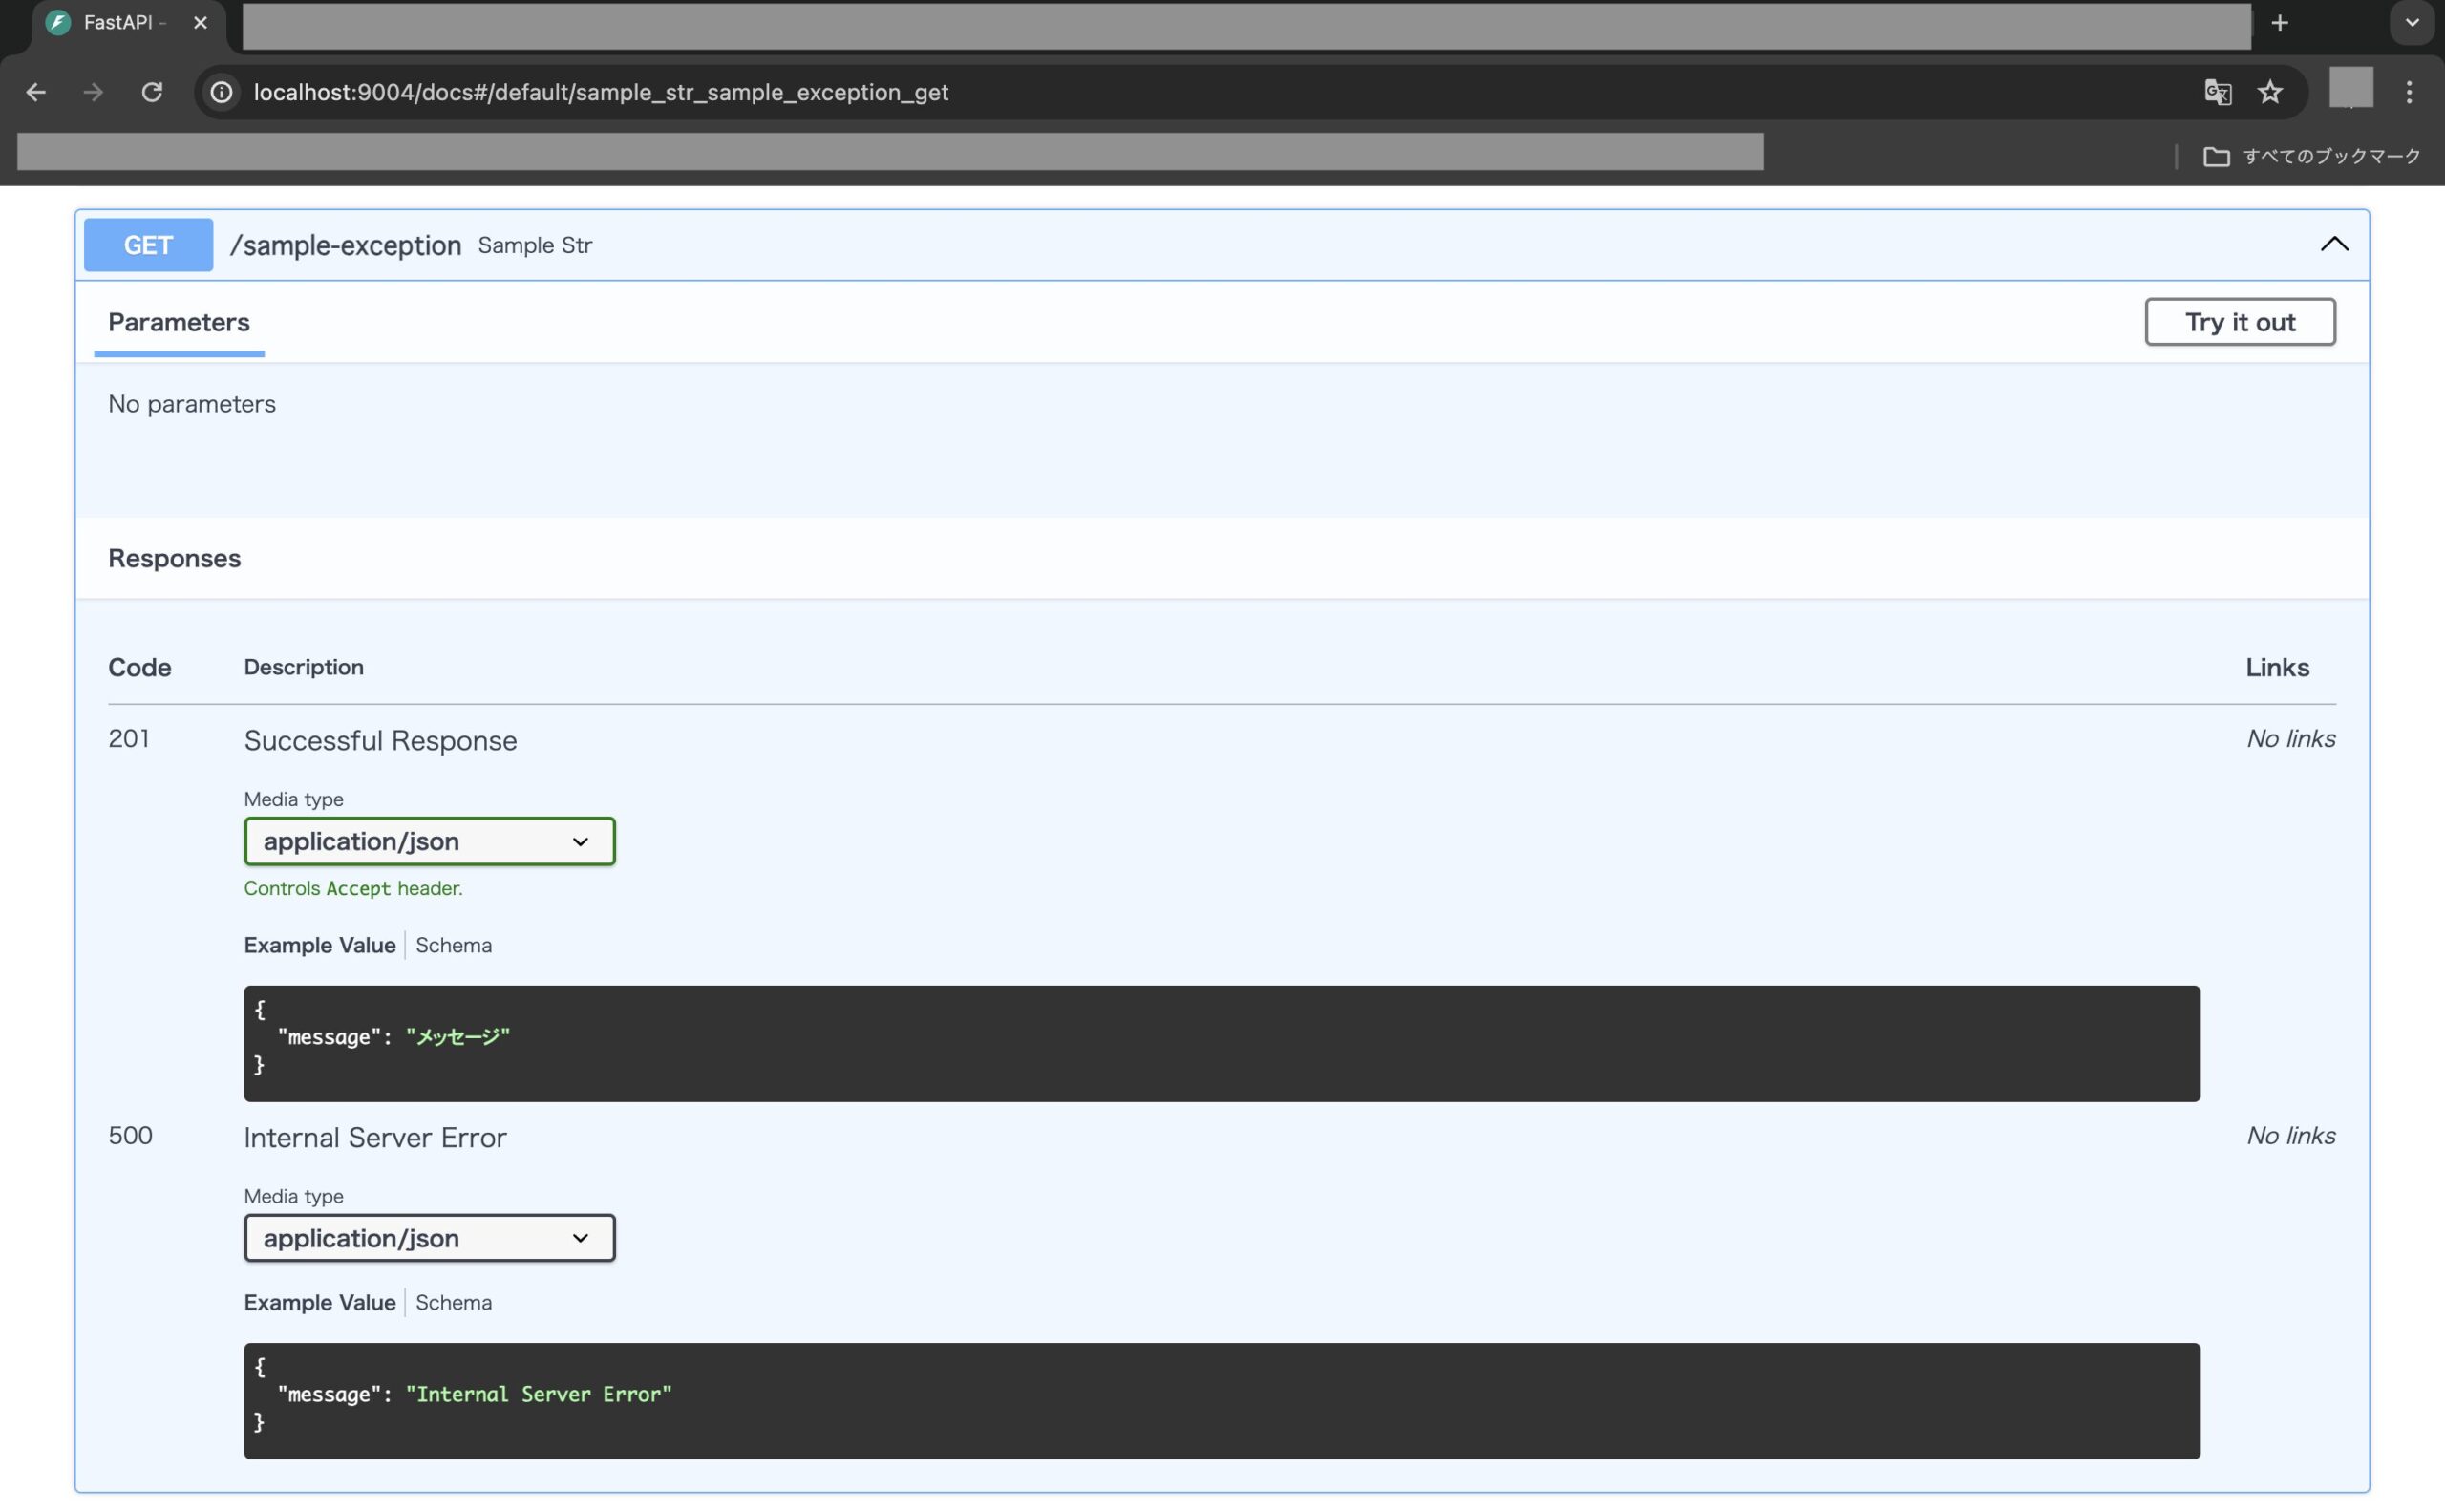
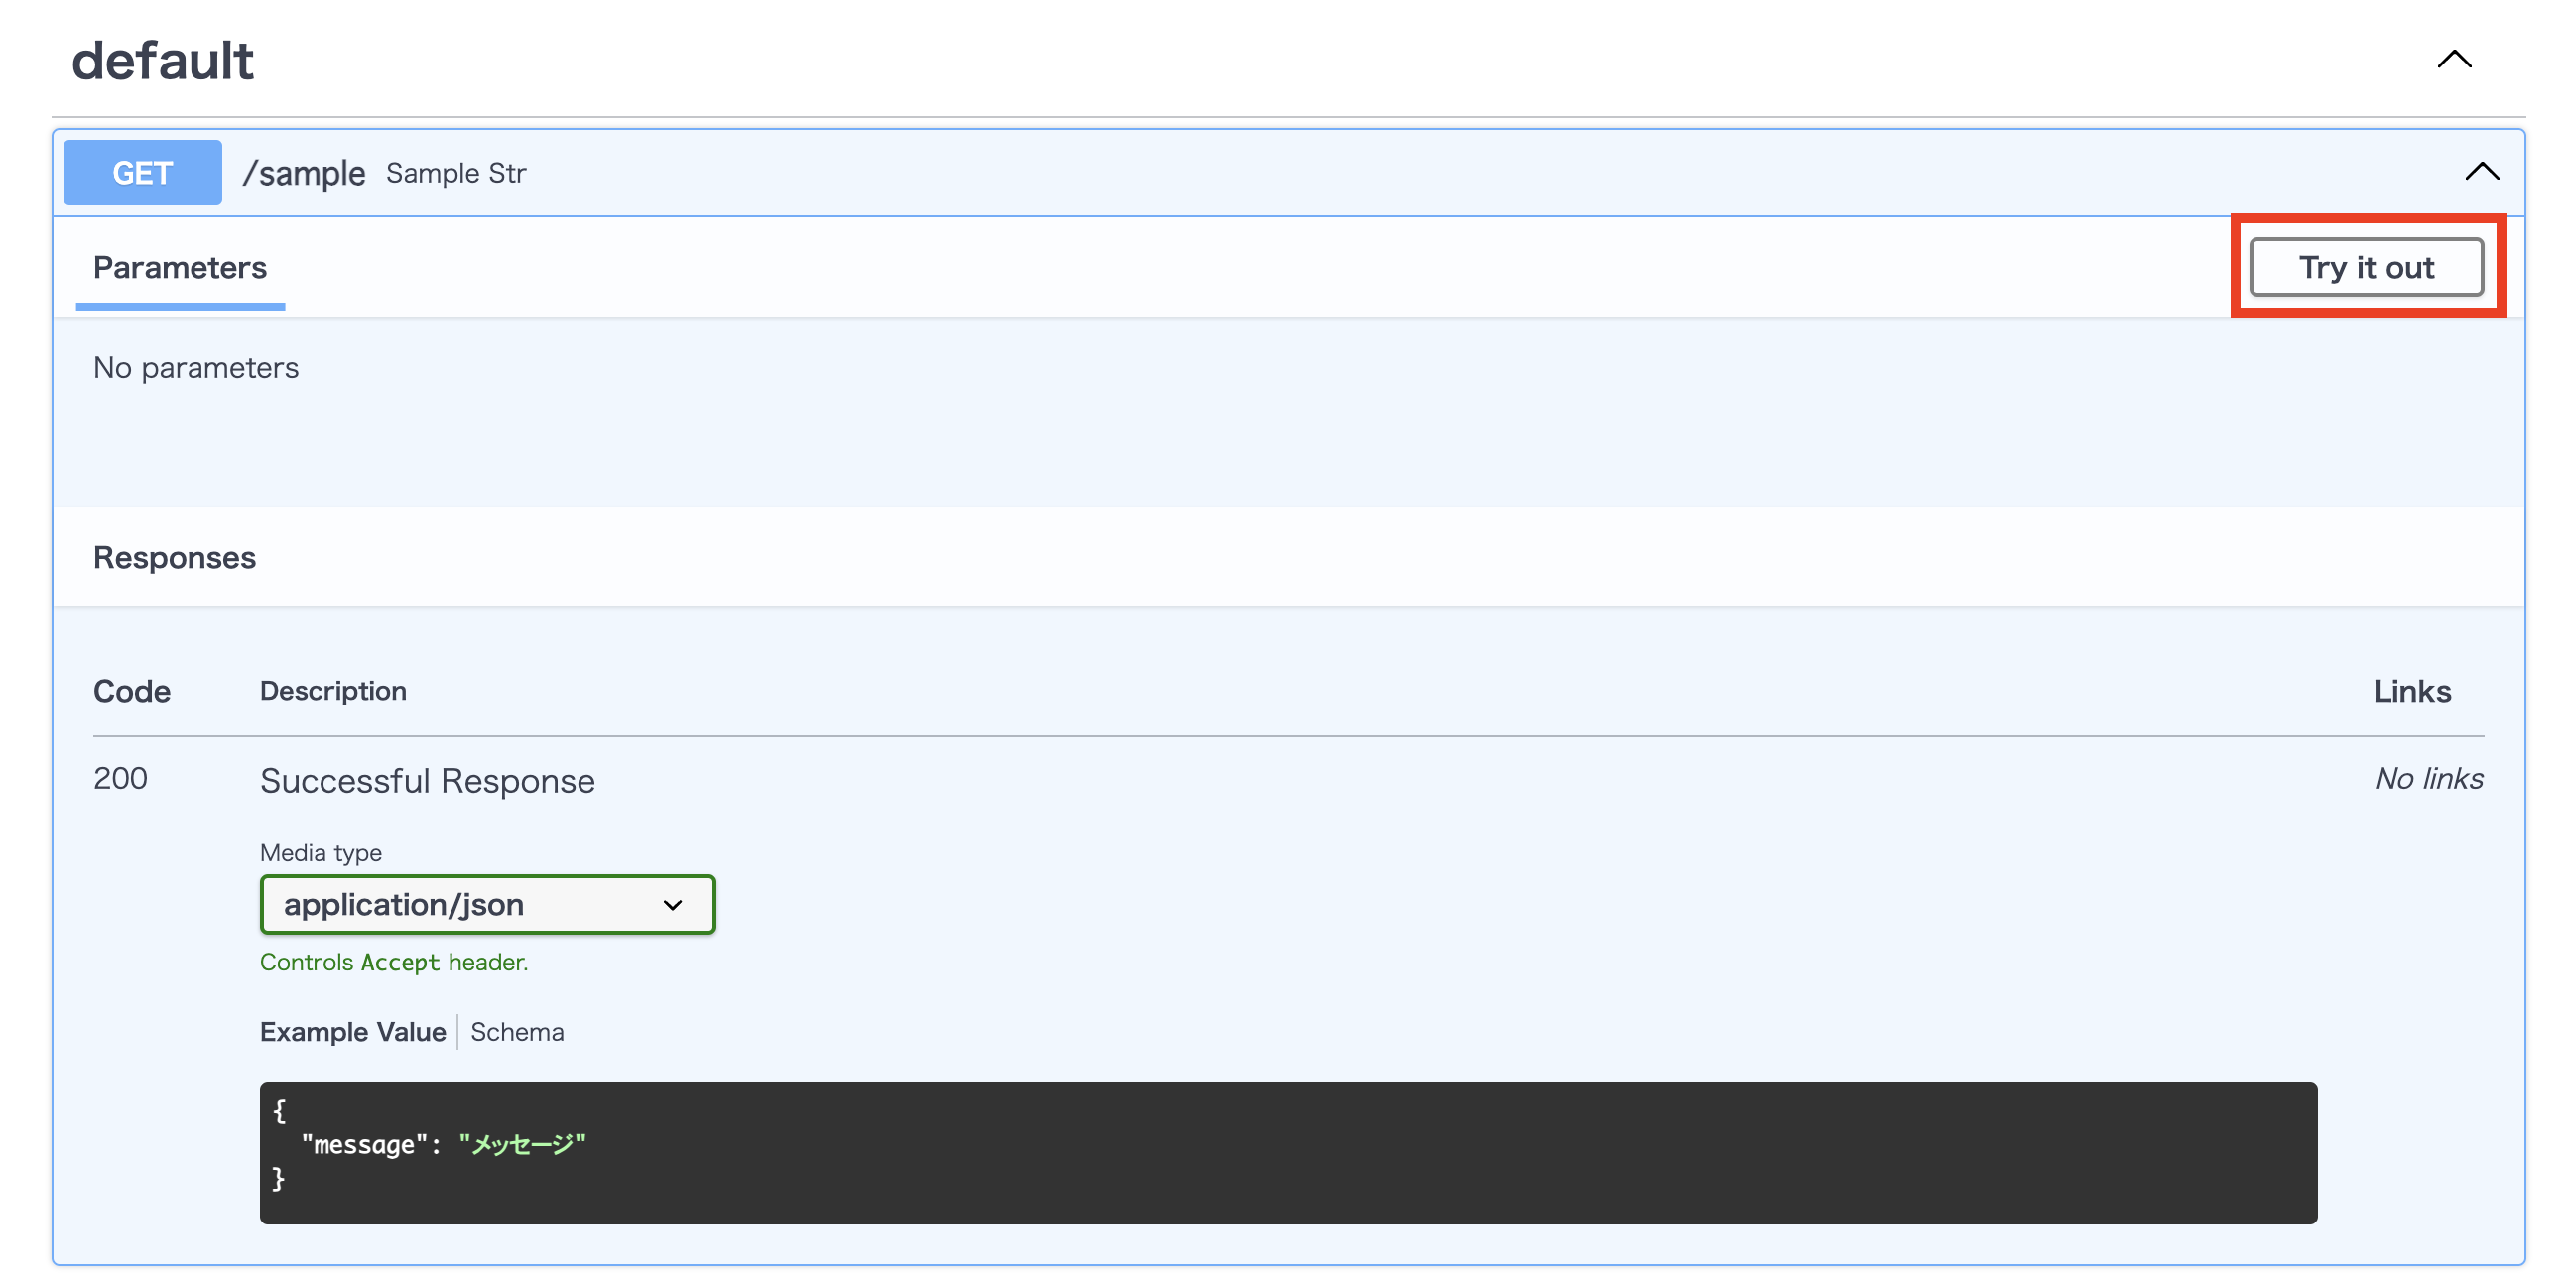
尚、OpenAPIの仕様書からAPIを実行して試すことが可能です。試したい場合は画面右上の「Try it out」をクリックします。
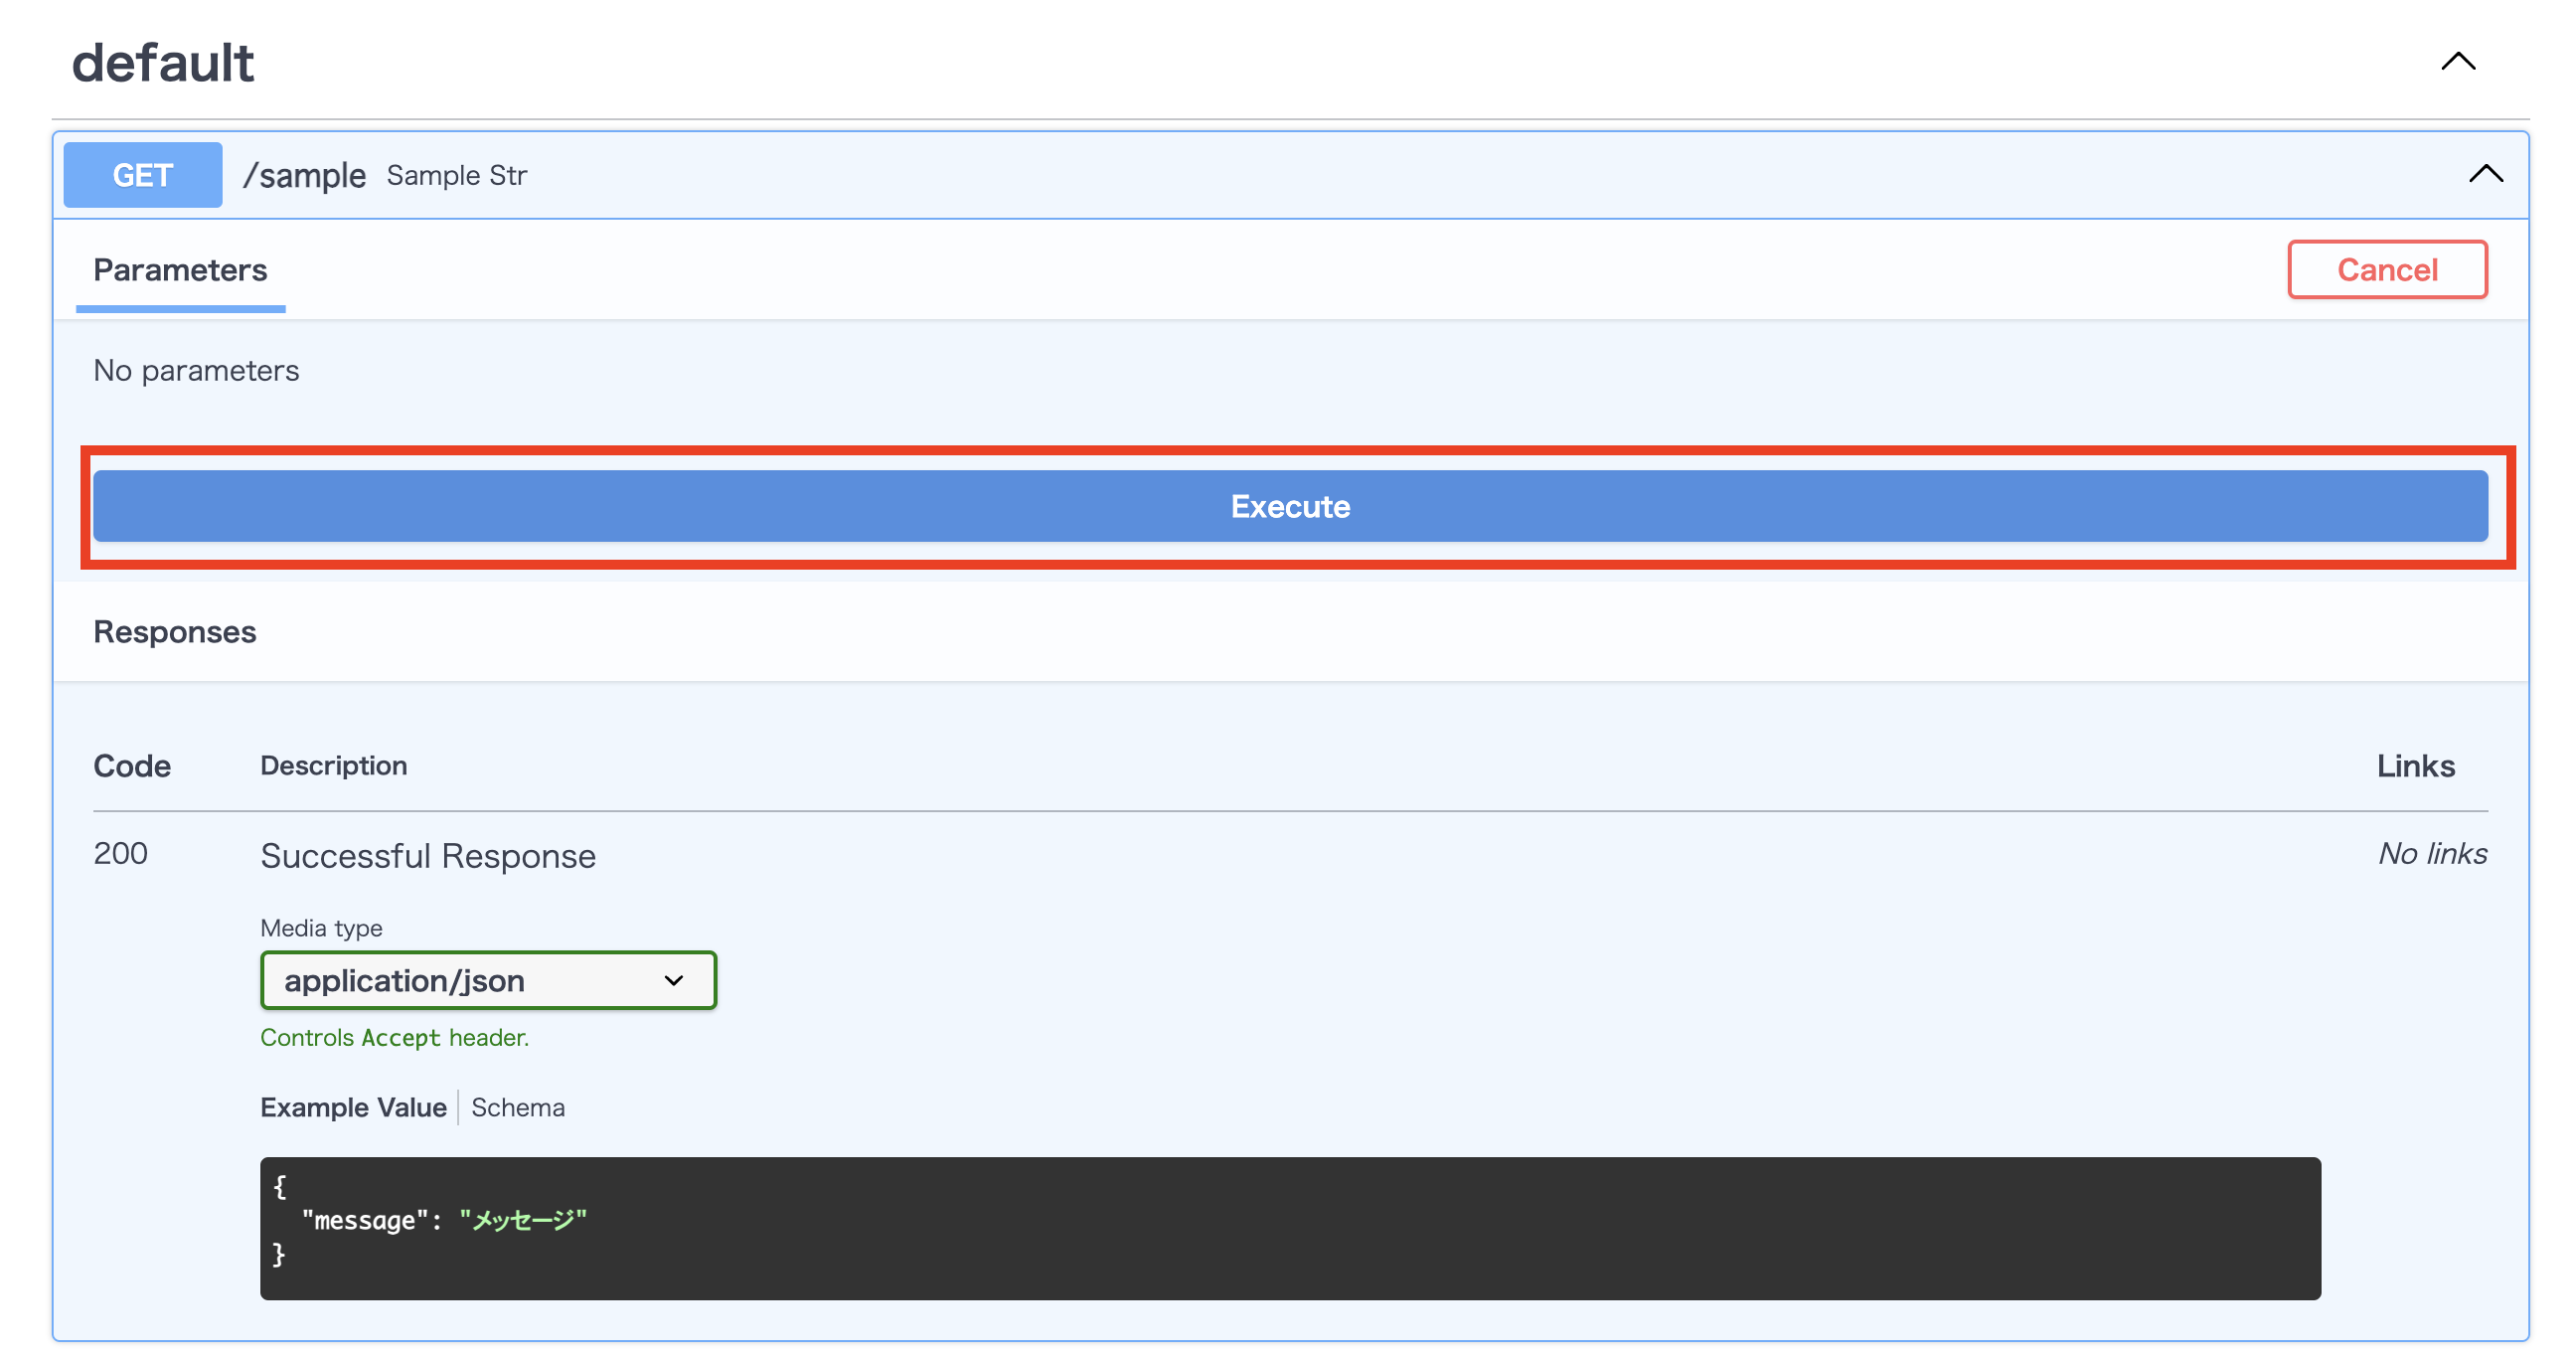
次にAPIを実行するため、「Execute」をクリックします。
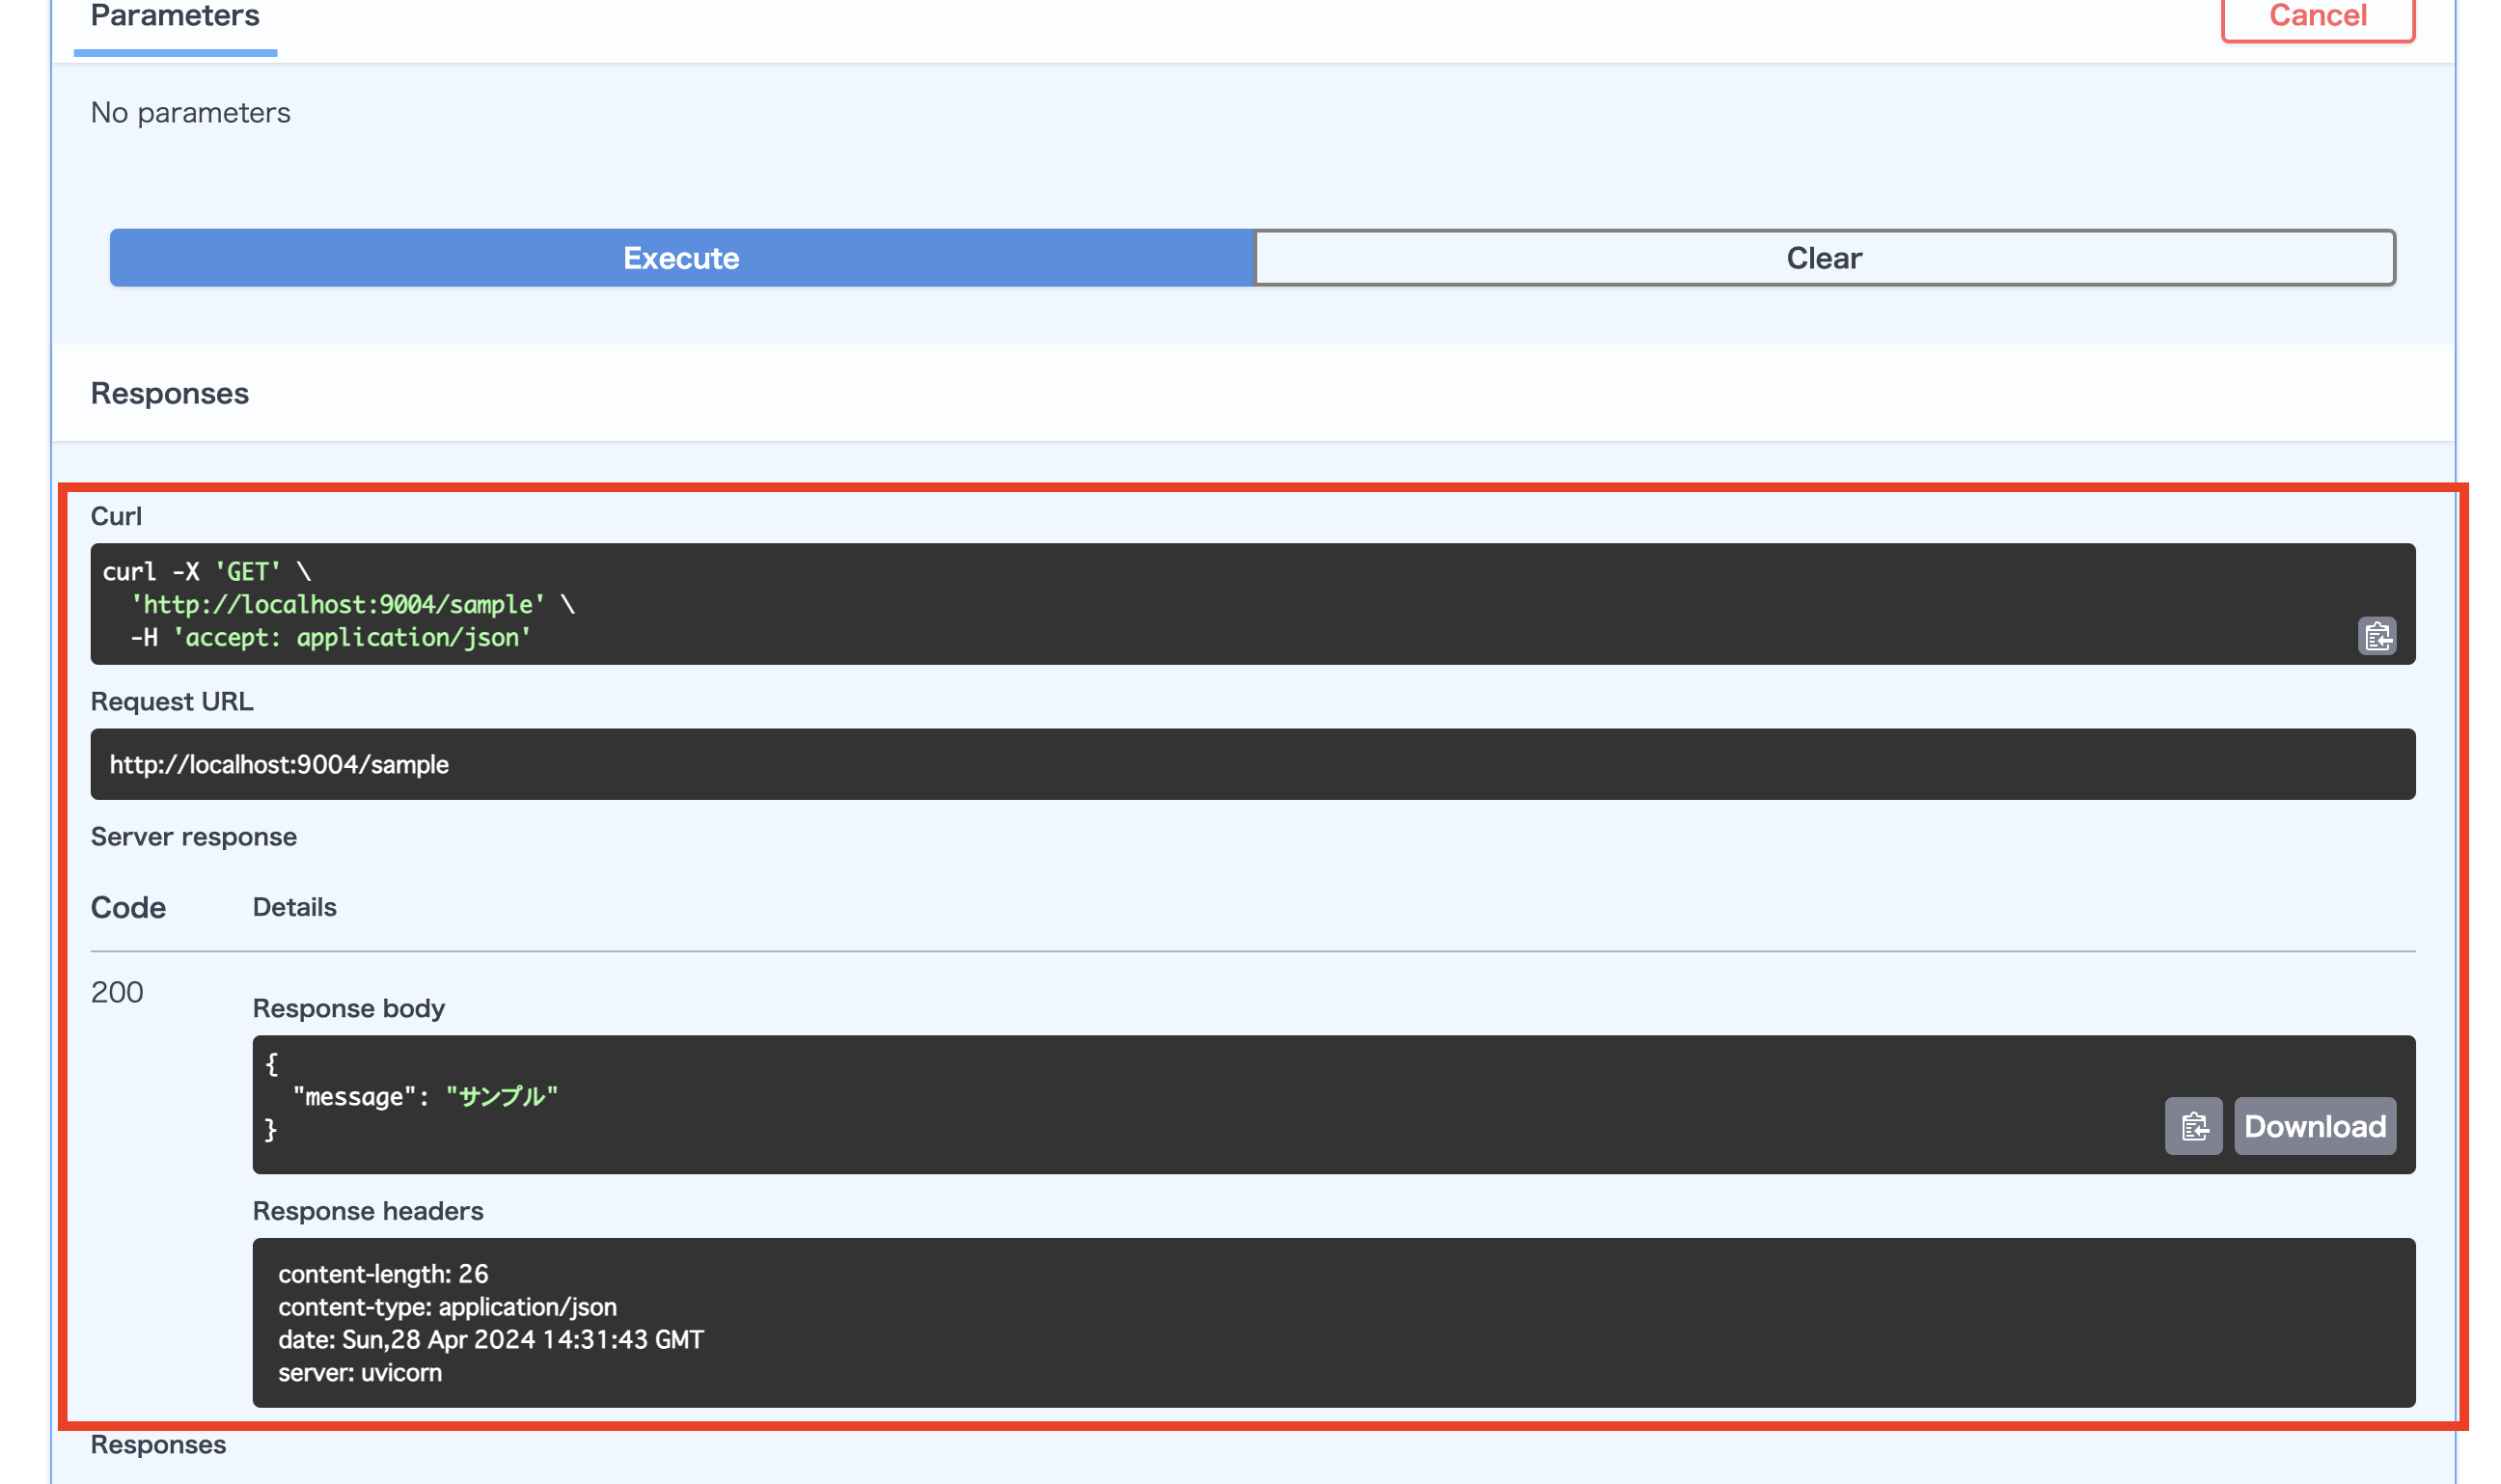
API実行後、Server responseに結果が出力されます。
環境変数の設定
次は「.env」から環境変数を読み込んで使えるようにするため、まずは以下のコマンドを実行し、poetoryで「pydantic_settings」をインストールします。
$ docker compose exec api poetry add pydantic_settings
次に以下のコマンドを実行し、各種ファイルを作成します。
$ touch .env
$ cd src
$ touch config.py
$ cd ..
次に作成した各種ファイルの内容を以下のように記述します。
ENV=local
TZ=Asia/Tokyo
MYSQL_DATABASE=fastapi_sample_db
MYSQL_USER=fastapi_sample_user
MYSQL_PASSWORD=fastapi_sample_password
MYSQL_ROOT_PASSWORD=fastapi_sample_root_password
※.envには下記のDBで使う設定を記載しておきます。
from pydantic_settings import BaseSettings

class Settings(BaseSettings):
    env: str
    tz: str
    mysql_database: str
    mysql_user: str
    mysql_password: str
    mysql_root_password: str

settings = Settings()
次にmain.pyを以下のように修正し、環境変数を確認できるようにします。
from fastapi import FastAPI
from fastapi.responses import PlainTextResponse
# ルーターのインポート
from routers import sample
# コンフィグのインポート
import config

app = FastAPI()

# ルーティング追加
app.include_router(sample.router)

@app.get("/")
def root():
    return PlainTextResponse("Hello World !!")

# 環境変数の確認
@app.get("/env")
def env():
    data = {
        "ENV": config.settings.env,
        "TZ": config.settings.tz,
        "MYSQL_DATABASE": config.settings.mysql_database,
        "MYSQL_USER": config.settings.mysql_user,
        "MYSQL_PASSWORD": config.settings.mysql_password,
        "MYSQL_ROOT_PASSWORD": config.settings.mysql_root_password,
    }
    return data
次にcompose.ymlを以下のように修正し、環境変数を読み込めるようにします。
services:
  api:
    container_name: fastapi_sample
    build:
      context: .
      dockerfile: ./docker/python/local/Dockerfile
    volumes:
      - .:/code
    ports:
      - "9004:9004"
    tty: true
    stdin_open: true
    env_file:
      - ./.env
    command: poetry run uvicorn main:app --reload --host 0.0.0.0 --port 9004
次に以下のコマンドを実行し、コンテナを再起動します。
$ docker compose doown
$ docker compose build --no-cache
$ docker compose up -d
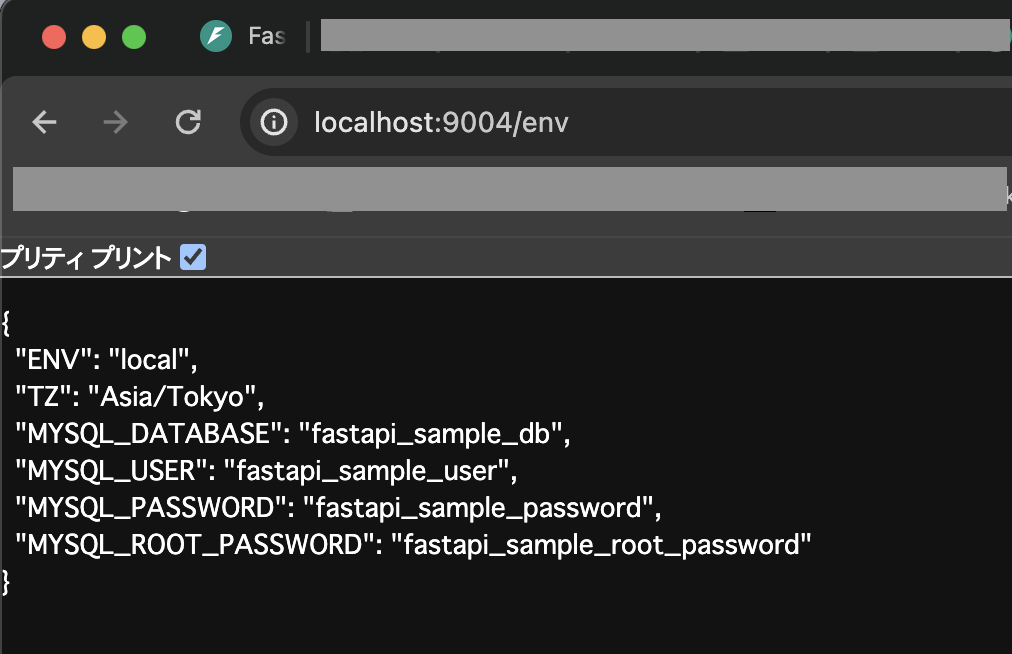
次にブラウザから「http://localhost:9004/env」にアクセスし、環境変数が想定通りに表示されればOKです。
DBの設定
次にDBとしてMySQLを使えるようにするため、まずはcompose.ymlを以下のように修正し、MySQLを使えるようにします。
services:
  api:
    container_name: fastapi_sample
    build:
      context: .
      dockerfile: ./docker/python/local/Dockerfile
    volumes:
      - .:/code
    ports:
      - "9004:9004"
    tty: true
    stdin_open: true
    env_file:
      - ./.env
    depends_on:
      - db
    command: poetry run uvicorn main:app --reload --host 0.0.0.0 --port 9004
  # DBに関する設定
  db:
    container_name: fastapi_sample_db
    image: mysql:8.0.36
    env_file:
      - ./.env
    ports:
      - 3306:3306
    volumes:
      - ./tmp/db:/var/lib/mysql
次にDBのデータをローカルに保存できるようにするため、以下のコマンドを実行して各種ディレクトリを作成します。
$ mkdir tmp
$ cd tmp
$ mkdir db
$ cd db
$ touch .keep
$ cd ../..
次に以下のコマンドを実行し、コンテナを再起動します。
$ docker compose down
$ docker compose up -d
次に以下のコマンドを実行し、DB用の各種ライブラリ(マイグレーション、MySQLドライバ、ORM、暗号化用)をインストールします。
$ docker compose exec api poetry add alembic aiomysql sqlalchemy cryptography※aiomysqlをインストールすると依存関係としてpymysqlもインストールされる
次に以下のコマンドを実行し、DBの接続設定用のファイルを作成します。
$ cd src
$ touch database.py
$ cd ..
次に作成したファイルの内容を以下のように記述します。
from sqlalchemy.ext.asyncio import create_async_engine, AsyncSession
from sqlalchemy.orm import sessionmaker, declarative_base
import config

DATABASE_URL = "{}://{}:{}@{}:{}/{}?charset={}".format(
    "mysql+aiomysql",
    config.settings.mysql_user,
    config.settings.mysql_password,
    "db",
    "3306",
    config.settings.mysql_database,
    "utf8mb4"
)

async_engine = create_async_engine(DATABASE_URL, echo=True)
async_session = sessionmaker(
    autocommit=False, autoflush=False, bind=async_engine, class_=AsyncSession
)

Base = declarative_base()

async def get_db():
    async with async_session() as session:
        yield session
※ドライバーには「mysql+aiomysql」を使う
次に以下のコマンドを実行し、サンプル用としてユーザーモデルを作成します。
$ cd src
$ mkdir models
$ cd models
$ touch __init__.py
$ touch user.py
$ cd ../..
次に作成したuser.pyの内容を以下のように記述します。
from sqlalchemy import (
    UniqueConstraint,
    Column,
    BigInteger,
    String,
    DateTime,
    event,
    orm
)
from sqlalchemy.orm import Session
from datetime import datetime
from database import Base

class User(Base):
    __tablename__ = "users"
    # 複合ユニークキーはUniqueConstraintを使う
    __table_args__ = (UniqueConstraint('email','deleted_at'),{})

    id = Column(BigInteger, primary_key=True, autoincrement=True)
    uid = Column(String(255), unique=True, index=True, nullable=False)
    name = Column(String(255), index=True, nullable=False)
    email = Column(String(255), unique=True, index=True, nullable=False)
    created_at = Column(DateTime, default=datetime.now(), nullable=False)
    updated_at = Column(DateTime, default=datetime.now(), onupdate=datetime.now(), nullable=False)
    deleted_at = Column(DateTime)

@event.listens_for(Session, "do_orm_execute")
def _add_filtering_deleted_at(execute_state):
    """
    論理削除用のfilterを自動的に適用
    論理削除データを取得したい場合は以下を使う
    db.execute().select().filter().execution_options(include_deleted=True)
    """
    if (
        execute_state.is_select
        and not execute_state.is_column_load
        and not execute_state.is_relationship_load
        and not execute_state.execution_options.get("include_deleted", False)
    ):
    execute_state.statement = execute_state.statement.options(
        orm.with_loader_criteria(
            User,
            lambda cls: cls.deleted_at.is_(None),
            include_aliases=True,
        )
    )
※プライマリーキーのidにはBigInteger型を使うが、OpenAPIでは対応していないので、シーケンスを定義する際には注意。日付項目のDateTime型も同様。
次に以下のコマンドでalembicの初期化処理を実行し、マイグレーション用の各種ファイルを作成します。
$ cd src
$ docker compose exec api poetry run alembic init ./migrations
$ cd ..
次に作成されたファイル「alembic.ini」と「env.py」をそれぞれ以下のように修正します。
・・・
# 接続情報を修正
# sqlalchemy.url = driver://user:pass@localhost/dbname
sqlalchemy.url = %(DRIVER)s://%(USER)s:%(PASSWORD)s@%(HOST)s:%(PORT)s/%(DATABASE)s?charset=%(CHARSET)s

・・・
・・


from alembic import context

# DBとコンフィグをインポート
import database
import config as src_config

# モデル追加
import models.user


・・


# 修正
# target_metadata = None
target_metadata = database.Base.metadata


・・


defrun_migrations_online() -> None:
    """Run migrations in 'online' mode.

    In this scenario we need to create an Engine
    and associate a connection with the context.

    """

    # 環境変数の設定
    # DRIVERは「mysql+pymysql」を使う
    config.set_section_option("alembic", "DRIVER", "mysql+pymysql")
    config.set_section_option("alembic", "USER", src_config.settings.mysql_user)
    config.set_section_option("alembic", "PASSWORD", src_config.settings.mysql_password)
    config.set_section_option("alembic", "HOST", "db")
    config.set_section_option("alembic", "PORT", "3306")
    config.set_section_option("alembic", "DATABASE", src_config.settings.mysql_database)
    config.set_section_option("alembic", "CHARSET", "utf8mb4")

    connectable = engine_from_config(
        config.get_section(config.config_ini_section, {}),
        prefix="sqlalchemy.",
        poolclass=pool.NullPool,
    )


・・
※ここではドライバーに「mysql+pymysql」を使うので注意
次に以下のコマンドを実行し、マイグレーションファイルを作成します。
$ docker compose exec api poetry run alembic revision --autogenerate -m "create tables"
次にマイグレーションファイル作成後、以下のコマンドを実行し、マイグレーションを行います。
$ docker compose exec api poetry run alembic upgrade head
次に以下のコマンドを実行し、MySQLにテーブルが作成されたかを確認します。
$ docker compose exec db bash
$ mysql -u root --password=fastapi_sample_root_password
$ use fastapi_sample_db
$ show full columns from users;
コマンド実行後、下図のようにテーブルが想定通り作成されていればOKです。

※確認後、exitを2回入力するとMySQLとコンテナ内から抜けれます。
尚、alembicの他のコマンド例は次の通り。
・DBの初期化
$ docker compose exec api poetry run alembic downgrade base・DBを指定のリビジョンに戻す
$ docker compose exec api poetry run alembic downgrade リビジョンID
CRUD処理を作る
次に上記で作成したテーブルに対してデータ操作を行うCRUD処理を作ってみます。
まずは以下のコマンドを実行し、各ディレクトリに「user.py」を作成します。
$ cd src
$ mkdir cruds
$ cd cruds
$ touch __init__.py
$ touch user.py
$ cd ../schemas
$ touch user.py
$ cd ../routers
$ touch user.py
$ cd ..
次に作成したファイルの内容を以下のように記述します。
from sqlalchemy.ext.asyncio import AsyncSession
from sqlalchemy import select, update
from sqlalchemy.engine import Result
from typing import List, Optional, Tuple
import models.user as user_model
import schemas.user as user_schema
from datetime import datetime

# ユーザー作成
async def create_user(
    db: AsyncSession,
    user_create: user_schema.UserCreate
) -> user_model.User:
    user = user_model.User(**user_create.model_dump())
    db.add(user)
    await db.commit()
    await db.refresh(user)
    return user

# ユーザーを1件取得
async def get_user(
    db: AsyncSession,
    user_uid: str
) -> Optional[user_model.User]:
    result: Result = await db.execute(
        select(
            user_model.User.id,
            user_model.User.uid,
            user_model.User.name,
            user_model.User.email,
            user_model.User.created_at,
            user_model.User.updated_at,
            user_model.User.deleted_at
        ).filter(
            user_model.User.uid == user_uid
        )
    )
    return result.first()

# ユーザー更新
async def update_user(
    db: AsyncSession,
    user_update: user_schema.UserUpdate,
    user_uid: str,
    original: user_model.User
):
    update_name: str
    if user_update.name:
        update_name = user_update.name
    else:
       update_name = original.name

    update_email: str
    if user_update.email:
        update_email = user_update.email
    else:
        update_email = original.email

    # 更新処理
    result = await db.execute(
        update(user_model.User)
        .values(
            name=update_name,
            email=update_email,
            updated_at=datetime.now()
        )
        .where(user_model.User.uid == user_uid)
    )
    await db.commit()

# ユーザーを論理削除
async def delete_user(
    db: AsyncSession,
    user_uid: str,
    original: user_model.User
):
    # 更新処理
    result = await db.execute(
        update(user_model.User)
        .values(
            updated_at=datetime.now(),
            deleted_at=datetime.now()
        )
        .where(user_model.User.uid == user_uid)
    )
    await db.commit()

# ユーザーを全件取得(削除済み含む)
async def get_users(
    db: AsyncSession
) -> List[user_model.User]:
    result: Result = await db.execute(
        select(
            user_model.User.id,
            user_model.User.uid,
            user_model.User.name,
            user_model.User.email,
            user_model.User.created_at,
            user_model.User.updated_at,
            user_model.User.deleted_at
        ).execution_options(include_deleted=True)
    )
    return result.all()
from pydantic import BaseModel, ConfigDict, field_validator
from typing import Optional
from datetime import datetime

# モデル定義
class User(BaseModel):
    id: Optional[int]
    uid: Optional[str]
    name: Optional[str]
    email: Optional[str]
    created_at: Optional[datetime]
    updated_at: Optional[datetime]
    deleted_at: Optional[datetime]

    # 日付のフォーマット変換
    @field_validator("created_at")
    def parse_created_at(cls, v):
        if isinstance(v, datetime):
            return v.strftime("%Y-%m-%d %H:%M:%S")
        elif isinstance(v, str):
            return datetime.strptime(v, "%Y-%m-%d %H:%M:%S")
        else:
            return None

    @field_validator("updated_at")
    def parse_updated_at(cls, v):
        if isinstance(v, datetime):
            return v.strftime("%Y-%m-%d %H:%M:%S")
        elif isinstance(v, str):
            return datetime.strptime(v, "%Y-%m-%d %H:%M:%S")
        else:
            return None

    @field_validator("deleted_at")
    def parse_deleted_at(cls, v):
        if isinstance(v, datetime):
            return v.strftime("%Y-%m-%d %H:%M:%S")
        elif isinstance(v, str):
            return datetime.strptime(v, "%Y-%m-%d %H:%M:%S")
        else:
            return None

    model_config = ConfigDict(
        # DBから取得したデータをオブジェクトに変換
        from_attributes=True,
        # exampleの定義
        json_schema_extra={
            "example": {
                "id": 1,
                "uid": "XX12YY45CC123",
                "name": "田中 太郎",
                "email": "taro123@example.com",
                "created_at": "2024-04-29 16:33:20",
                "updated_at": "2024-04-29 16:33:20",
                "deleted_at": "2024-04-29 16:33:20",
            }
        },
    )

# リクエスト定義
class UserCreate(BaseModel):
    uid: str
    name: str
    email: str

    model_config = {
        "json_schema_extra": {
            "examples": [
                {
                    "uid": "XX12YY45CC123",
                    "name": "田中 太郎",
                    "email": "taro123@example.com",
                }
            ]
        }
    }

class UserUpdate(BaseModel):
    name: Optional[str]
    email: Optional[str]

    model_config = {
        "json_schema_extra": {
            "examples": [
                {
                    "name": "田中 太郎",
                    "email": "taro123@example.com",
                }
            ]
        }
    }

# レスポンス定義
class UserNotFound(BaseModel):
    detail: str

    model_config = {
        "json_schema_extra": {
            "examples": [
                {
                    "detail": "User not found",
                }
            ]
        }
    }
from fastapi import APIRouter, Depends, HTTPException
from sqlalchemy.ext.asyncio import AsyncSession
from database import get_db
from typing import List, Optional
import models.user as user_model
import schemas.user as user_schema
import schemas.common as common_schema
import cruds.user as user_crud

router = APIRouter()

# ユーザー作成
@router.post("/user",
    status_code=201,
    responses={
        201: { "model": common_schema.OK },
    },
)
async def create_user(
    user_body: user_schema.UserCreate,
    db: AsyncSession = Depends(get_db)
):
    await user_crud.create_user(db, user_body)
    return { "message": "OK" }

# ユーザーを1件取得
@router.get("/user/{user_uid}",
    response_model=Optional[user_schema.User]
)
async def a_user(
    user_uid: str,
    db: AsyncSession = Depends(get_db)
):
    return await user_crud.get_user(db, user_uid)

# ユーザー更新
@router.put("/user/{user_uid}",
    status_code=200,
    responses={
        200: { "model": common_schema.OK },
        404: { "model": user_schema.UserNotFound },
    },
)
async def update_user(
    user_uid: str,
    user_body: user_schema.UserUpdate,
    db: AsyncSession = Depends(get_db)
):
    user = await user_crud.get_user(db, user_uid)
    if user is None:
        raise HTTPException(status_code=404, detail="User not found")

    await user_crud.update_user(db, user_body, user_uid, user)
    return { "message": "OK" }

# ユーザー削除
@router.delete("/user/{user_uid}",
    status_code=200,
    responses={
        200: { "model": common_schema.OK },
        404: { "model": user_schema.UserNotFound },
    },
)
async def delete_user(
    user_uid: str,
    db: AsyncSession = Depends(get_db)
):
    user = await user_crud.get_user(db, user_uid)
    if user is None:
        raise HTTPException(status_code=404, detail="User not found")

    await user_crud.delete_user(db, user_uid, user)
    return { "message": "OK" }

# ユーザーを全件取得
@router.get("/users",
    response_model=Optional[List[user_schema.User]]
)
async def list_users(db: AsyncSession = Depends(get_db)):
    return await user_crud.get_users(db)
次にPostmanを使ってAPIを試してみます。(ここではPostmanについての詳細は割愛させていただきます)
まずはユーザー作成用の「http://localhost:9004/user」を実行し、ステータス「201」で正常終了すればOKです。
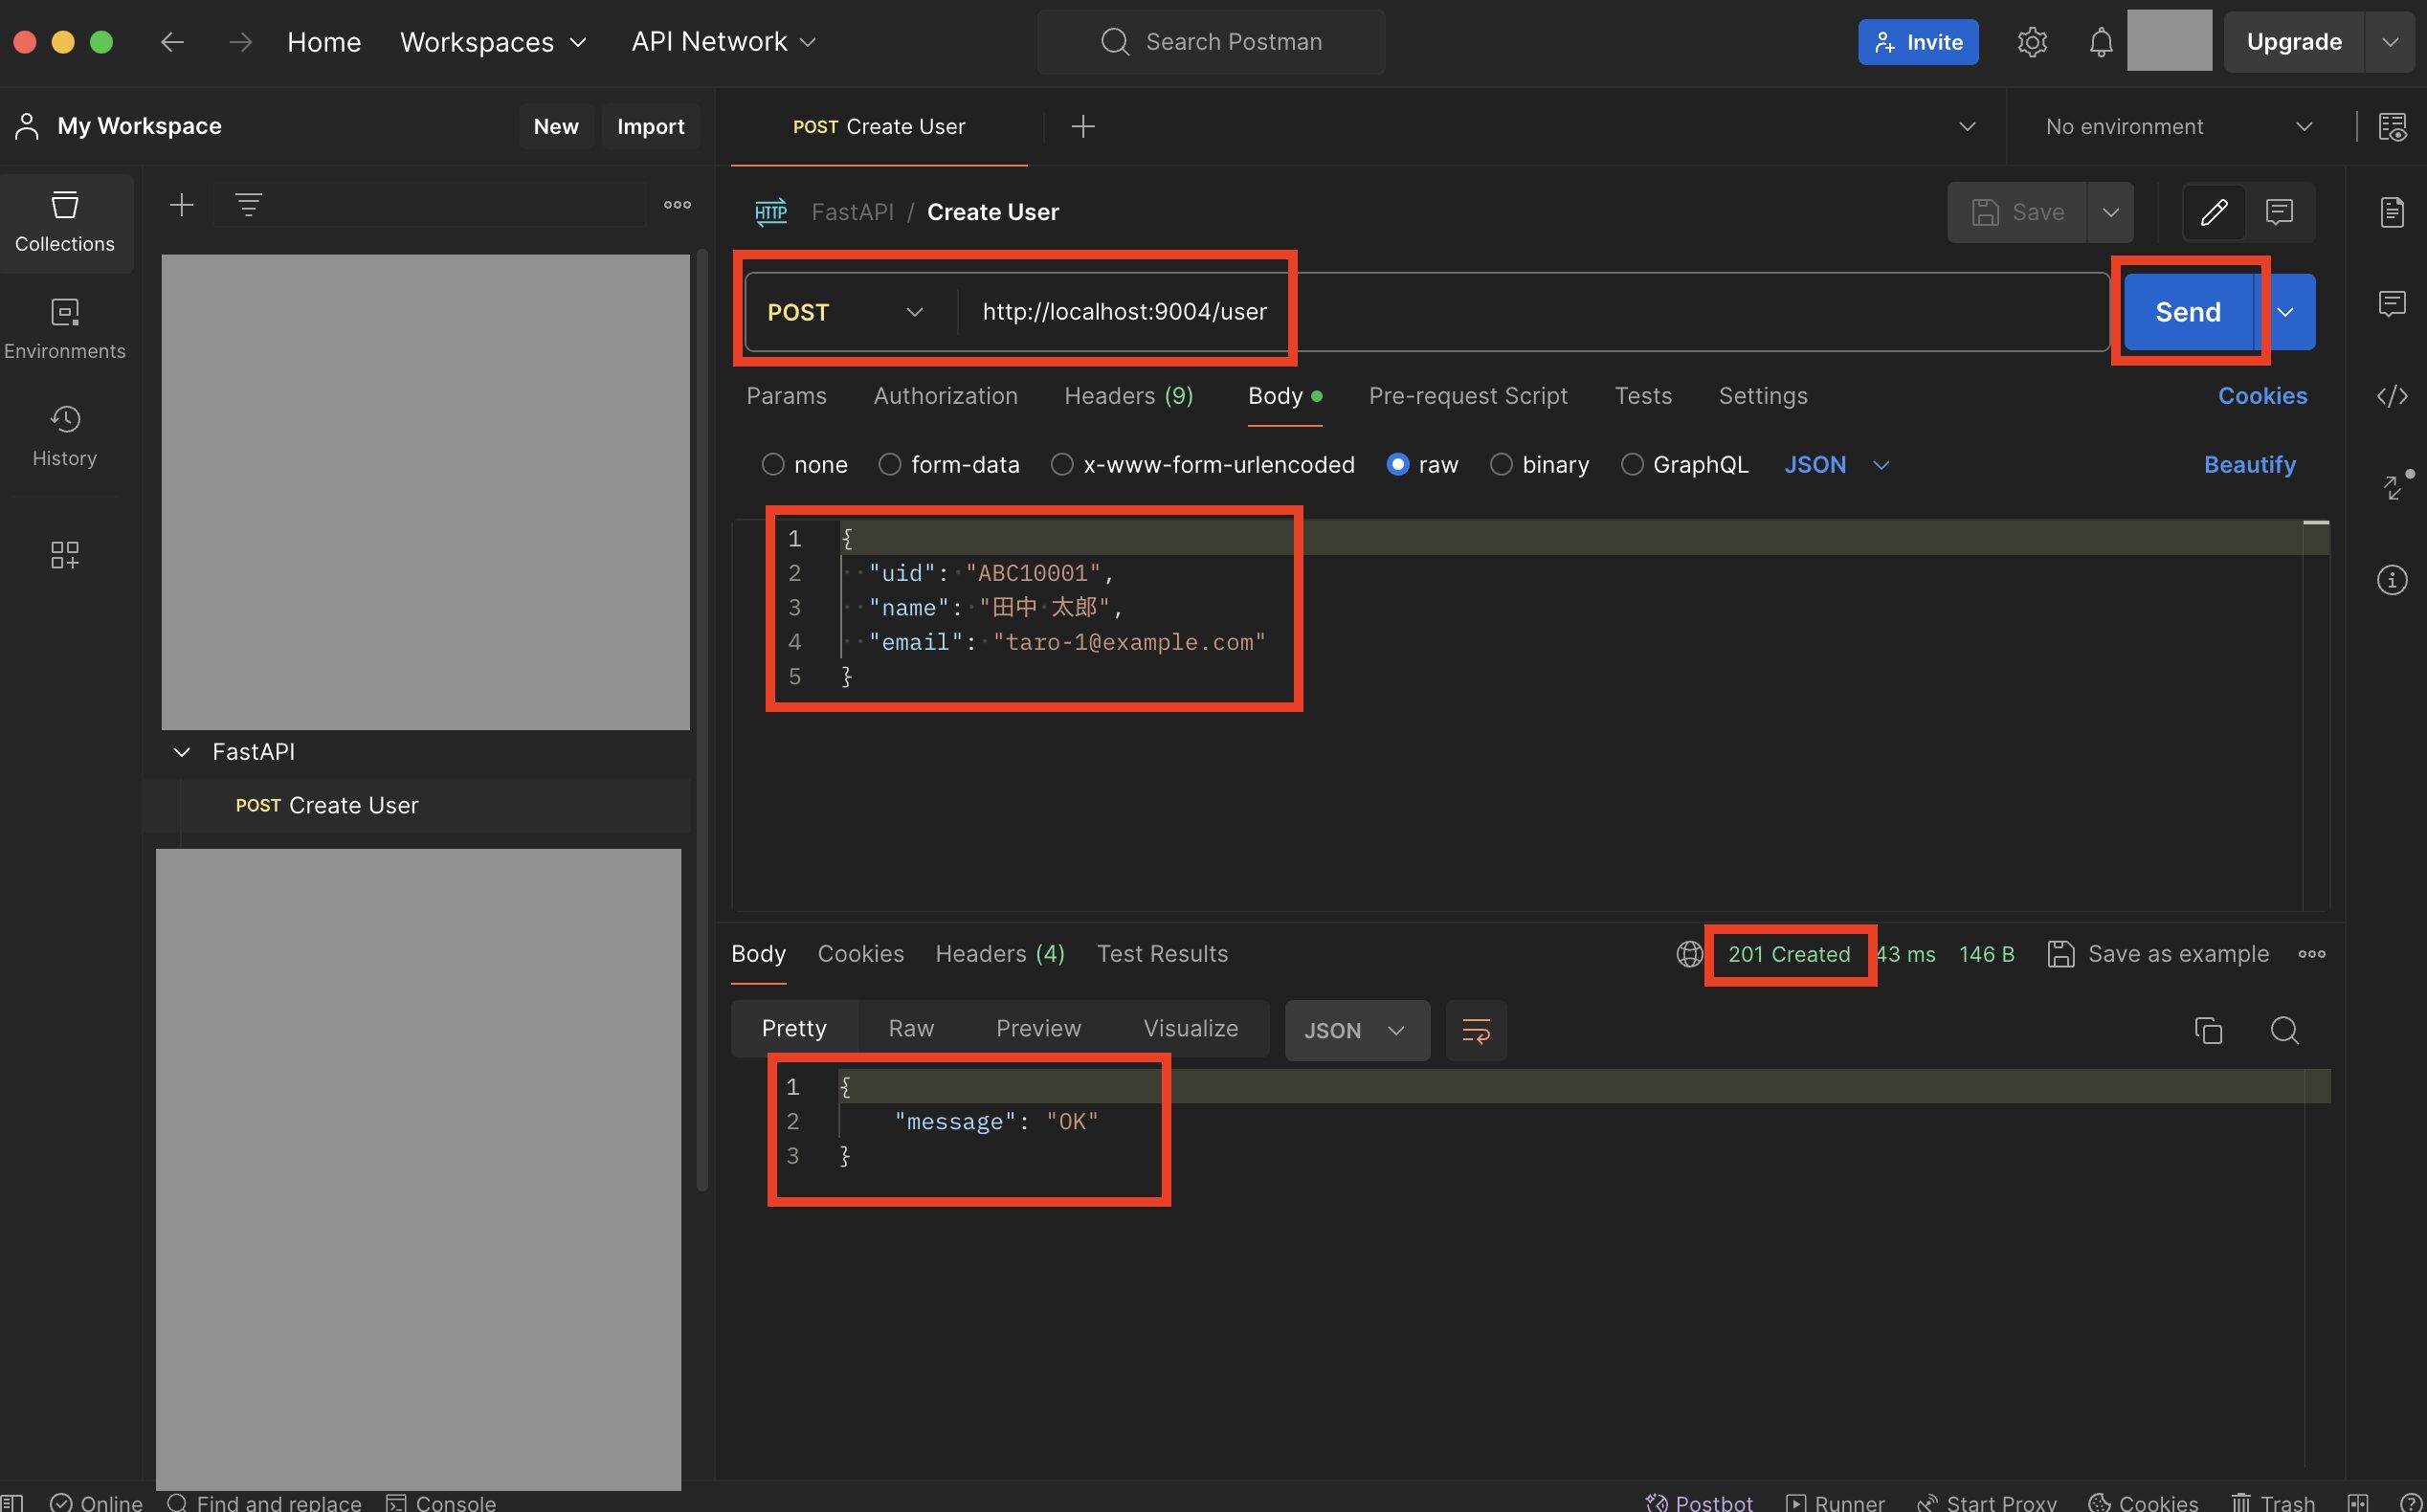
次に対象ユーザー取得用の「http://localhost:9004/user/{上記で設定したuid}」を実行し、作成したユーザーが取得できればOKです。
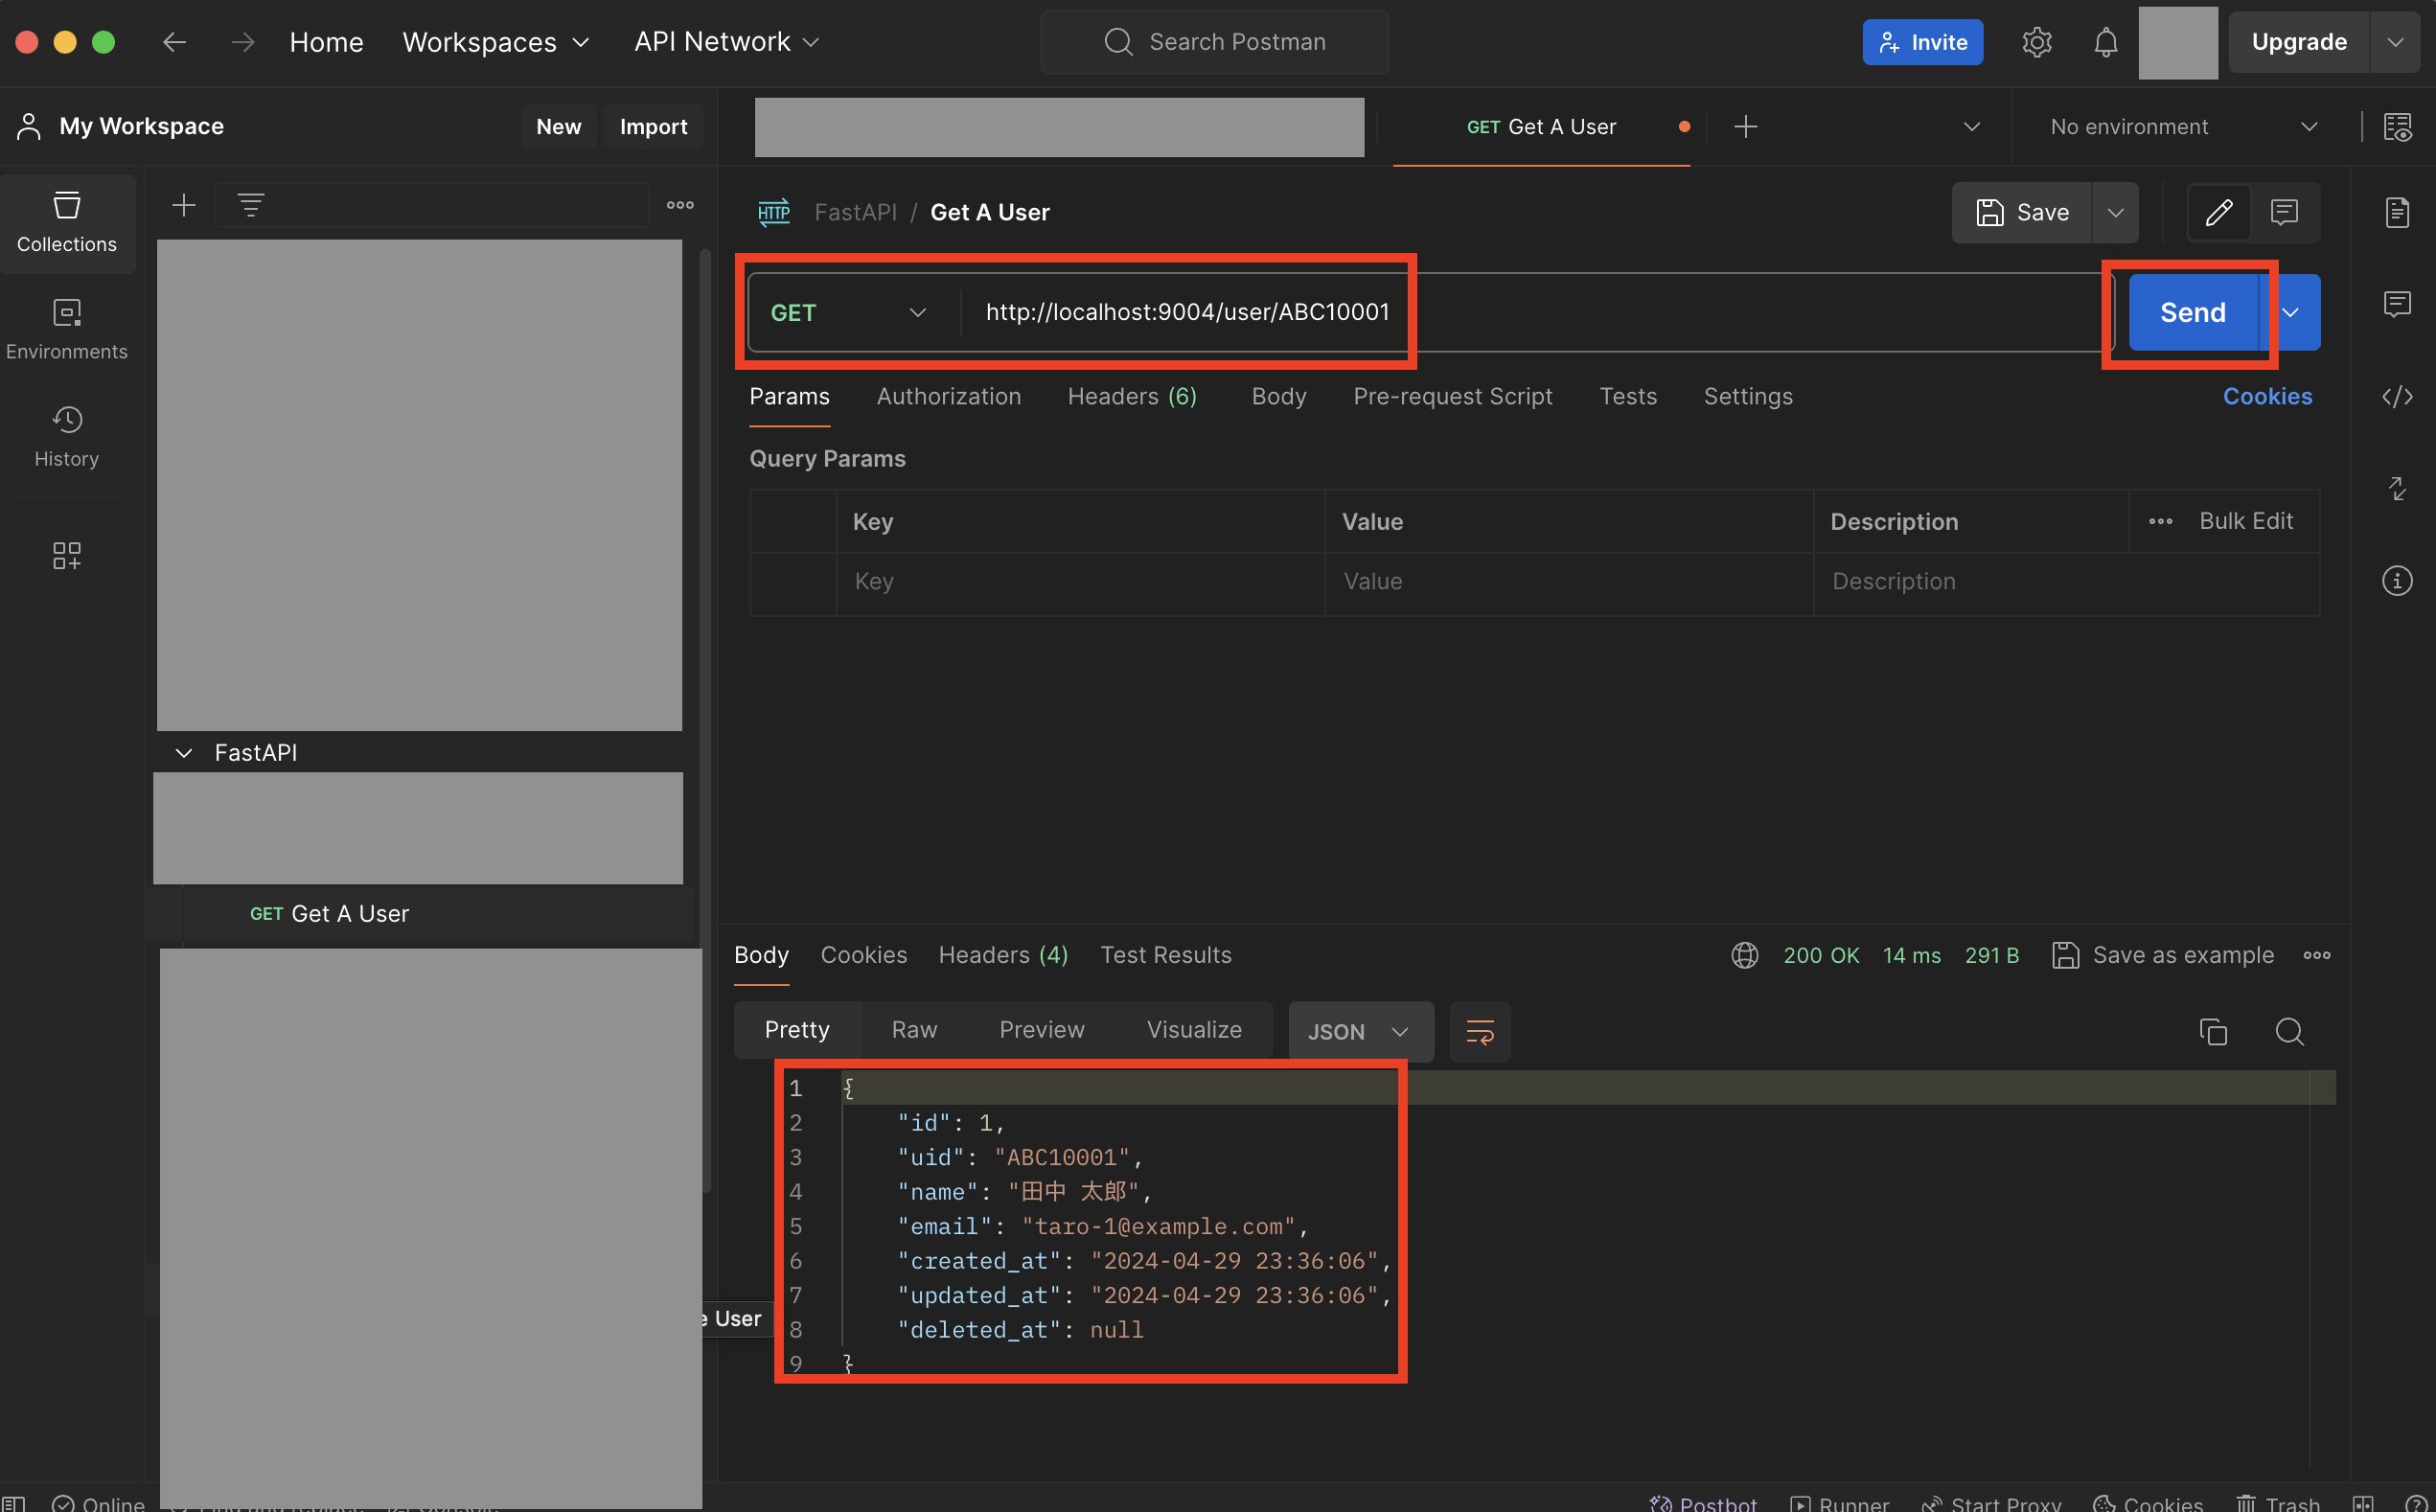
次に更新用の「http://localhost:9004/user/{上記で設定したuid}」をメソッド「PUT」で実行し、正常終了すればOKです。
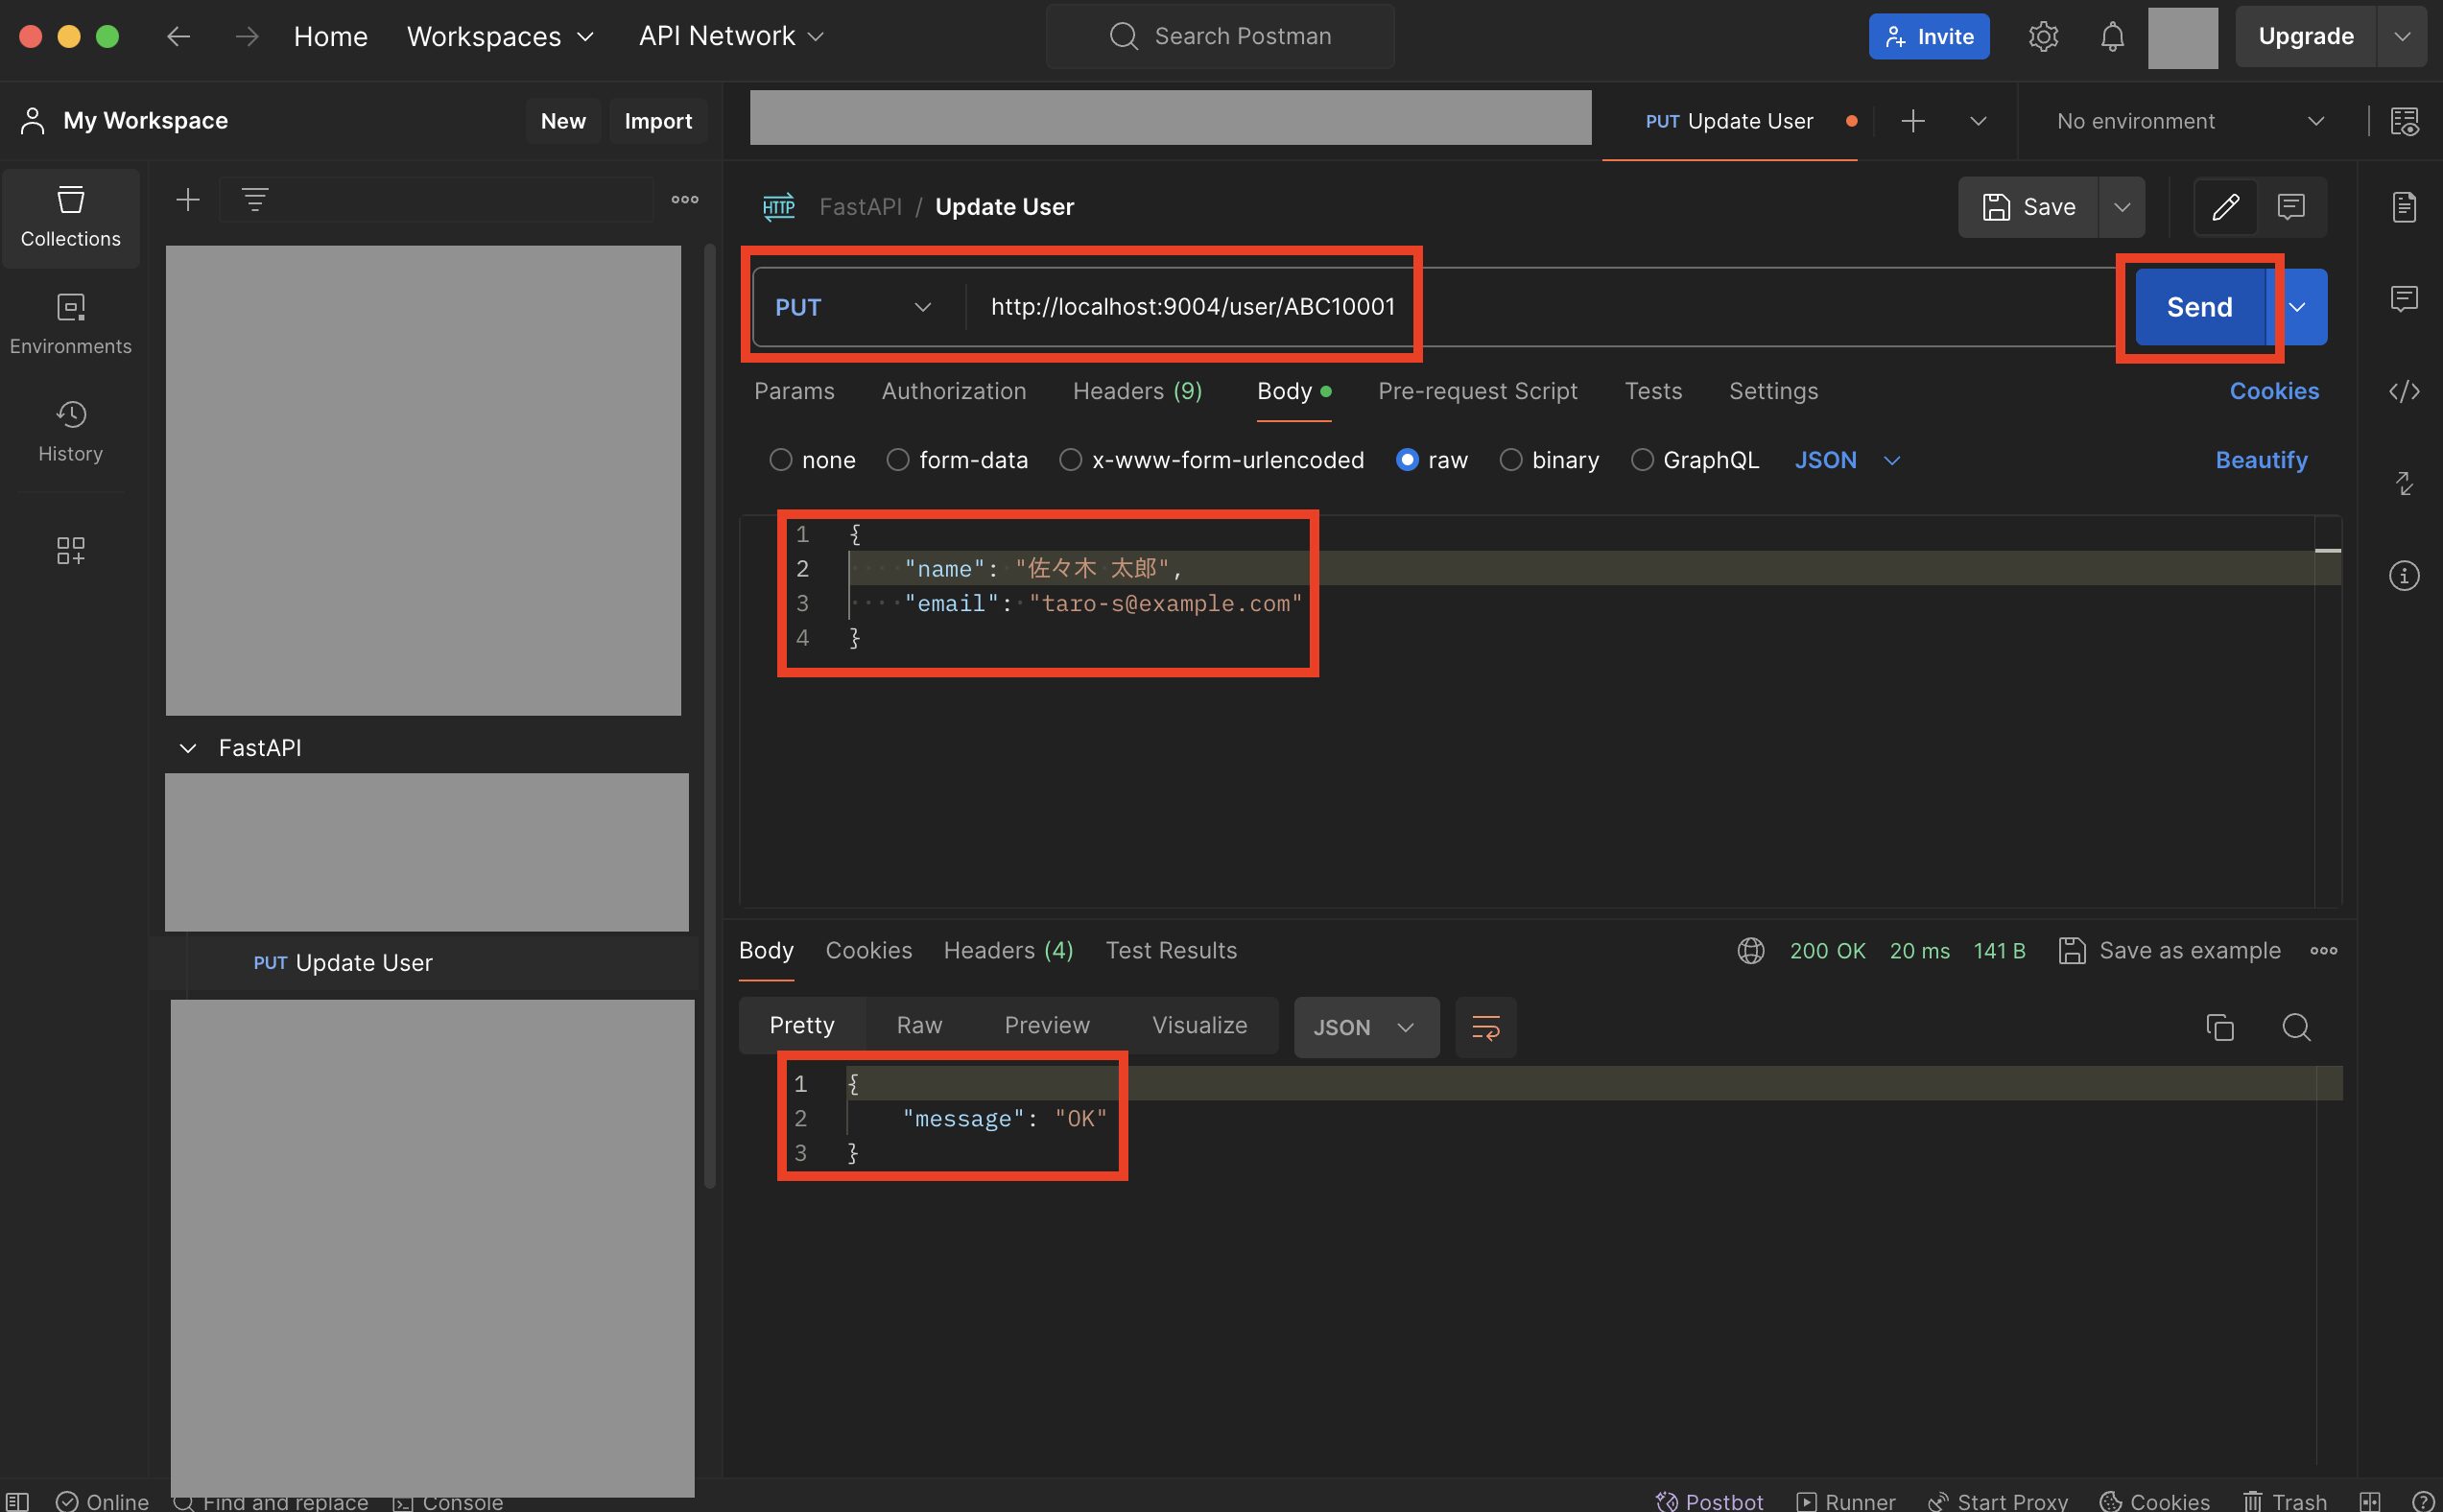
次にもう一度対象ユーザー取得用の「http://localhost:9004/user/{上記で設定したuid}」を実行し、nameとemailが更新されていればOKです。(合わせてupdated_atも更新されます)
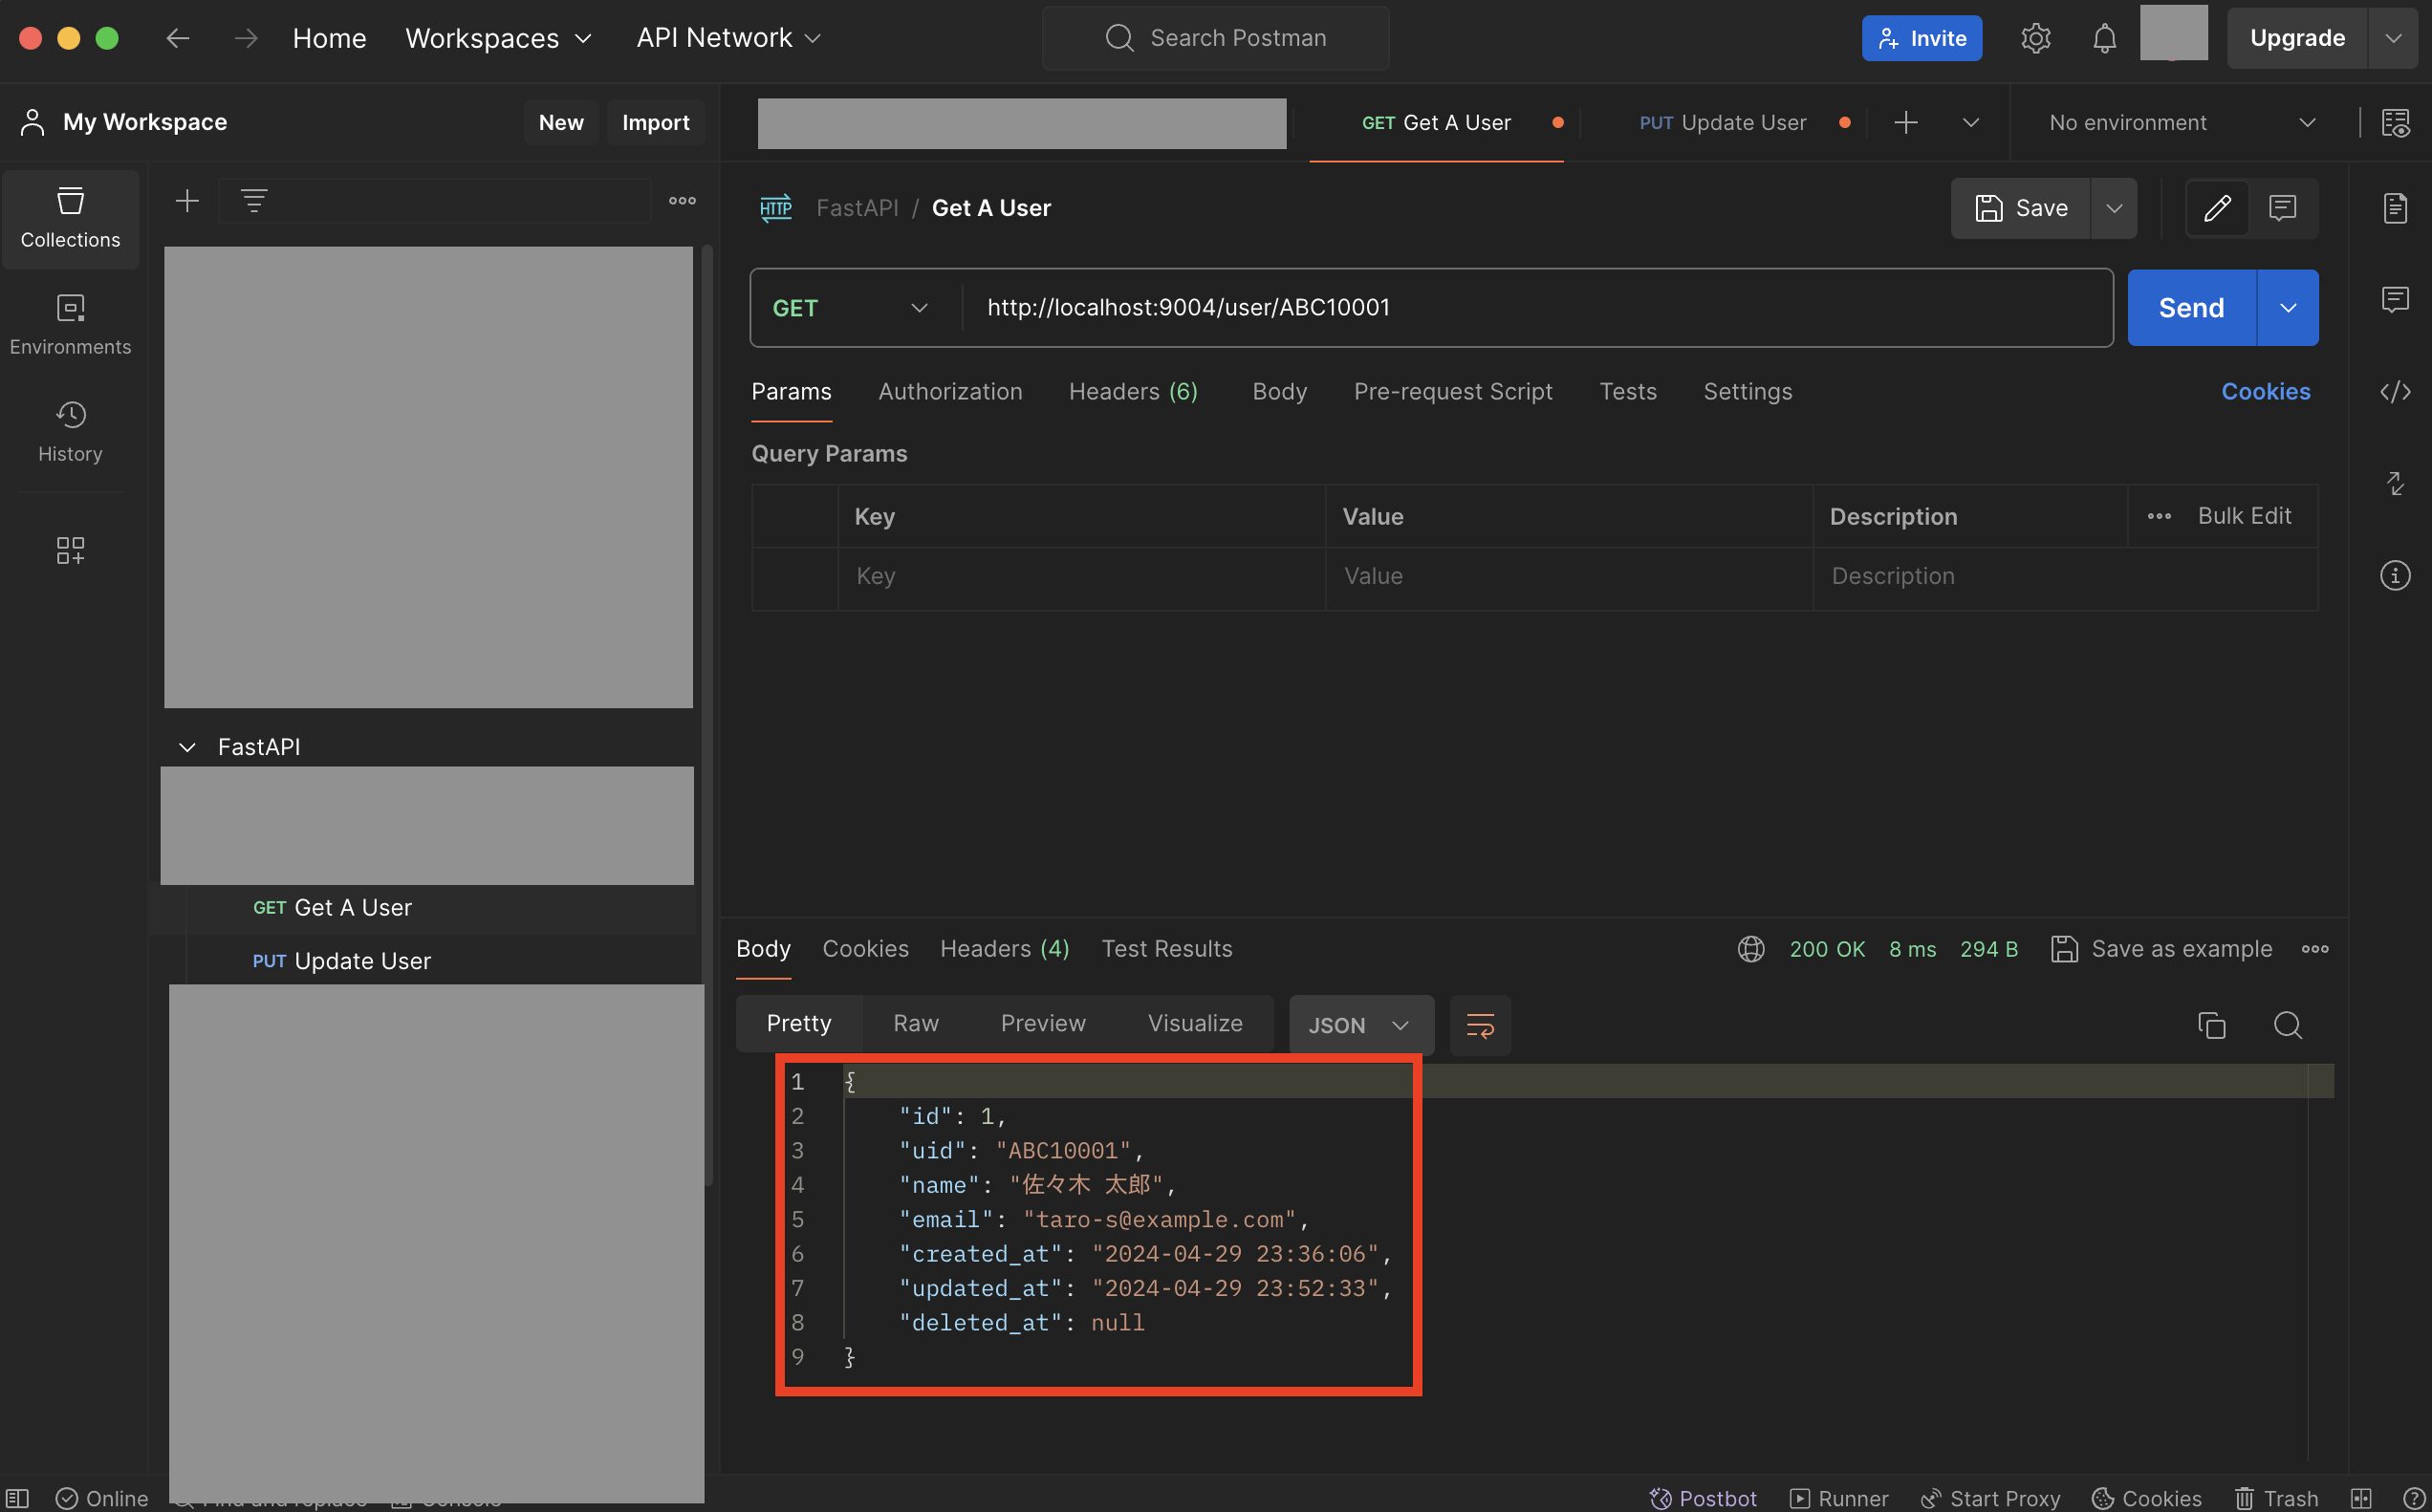
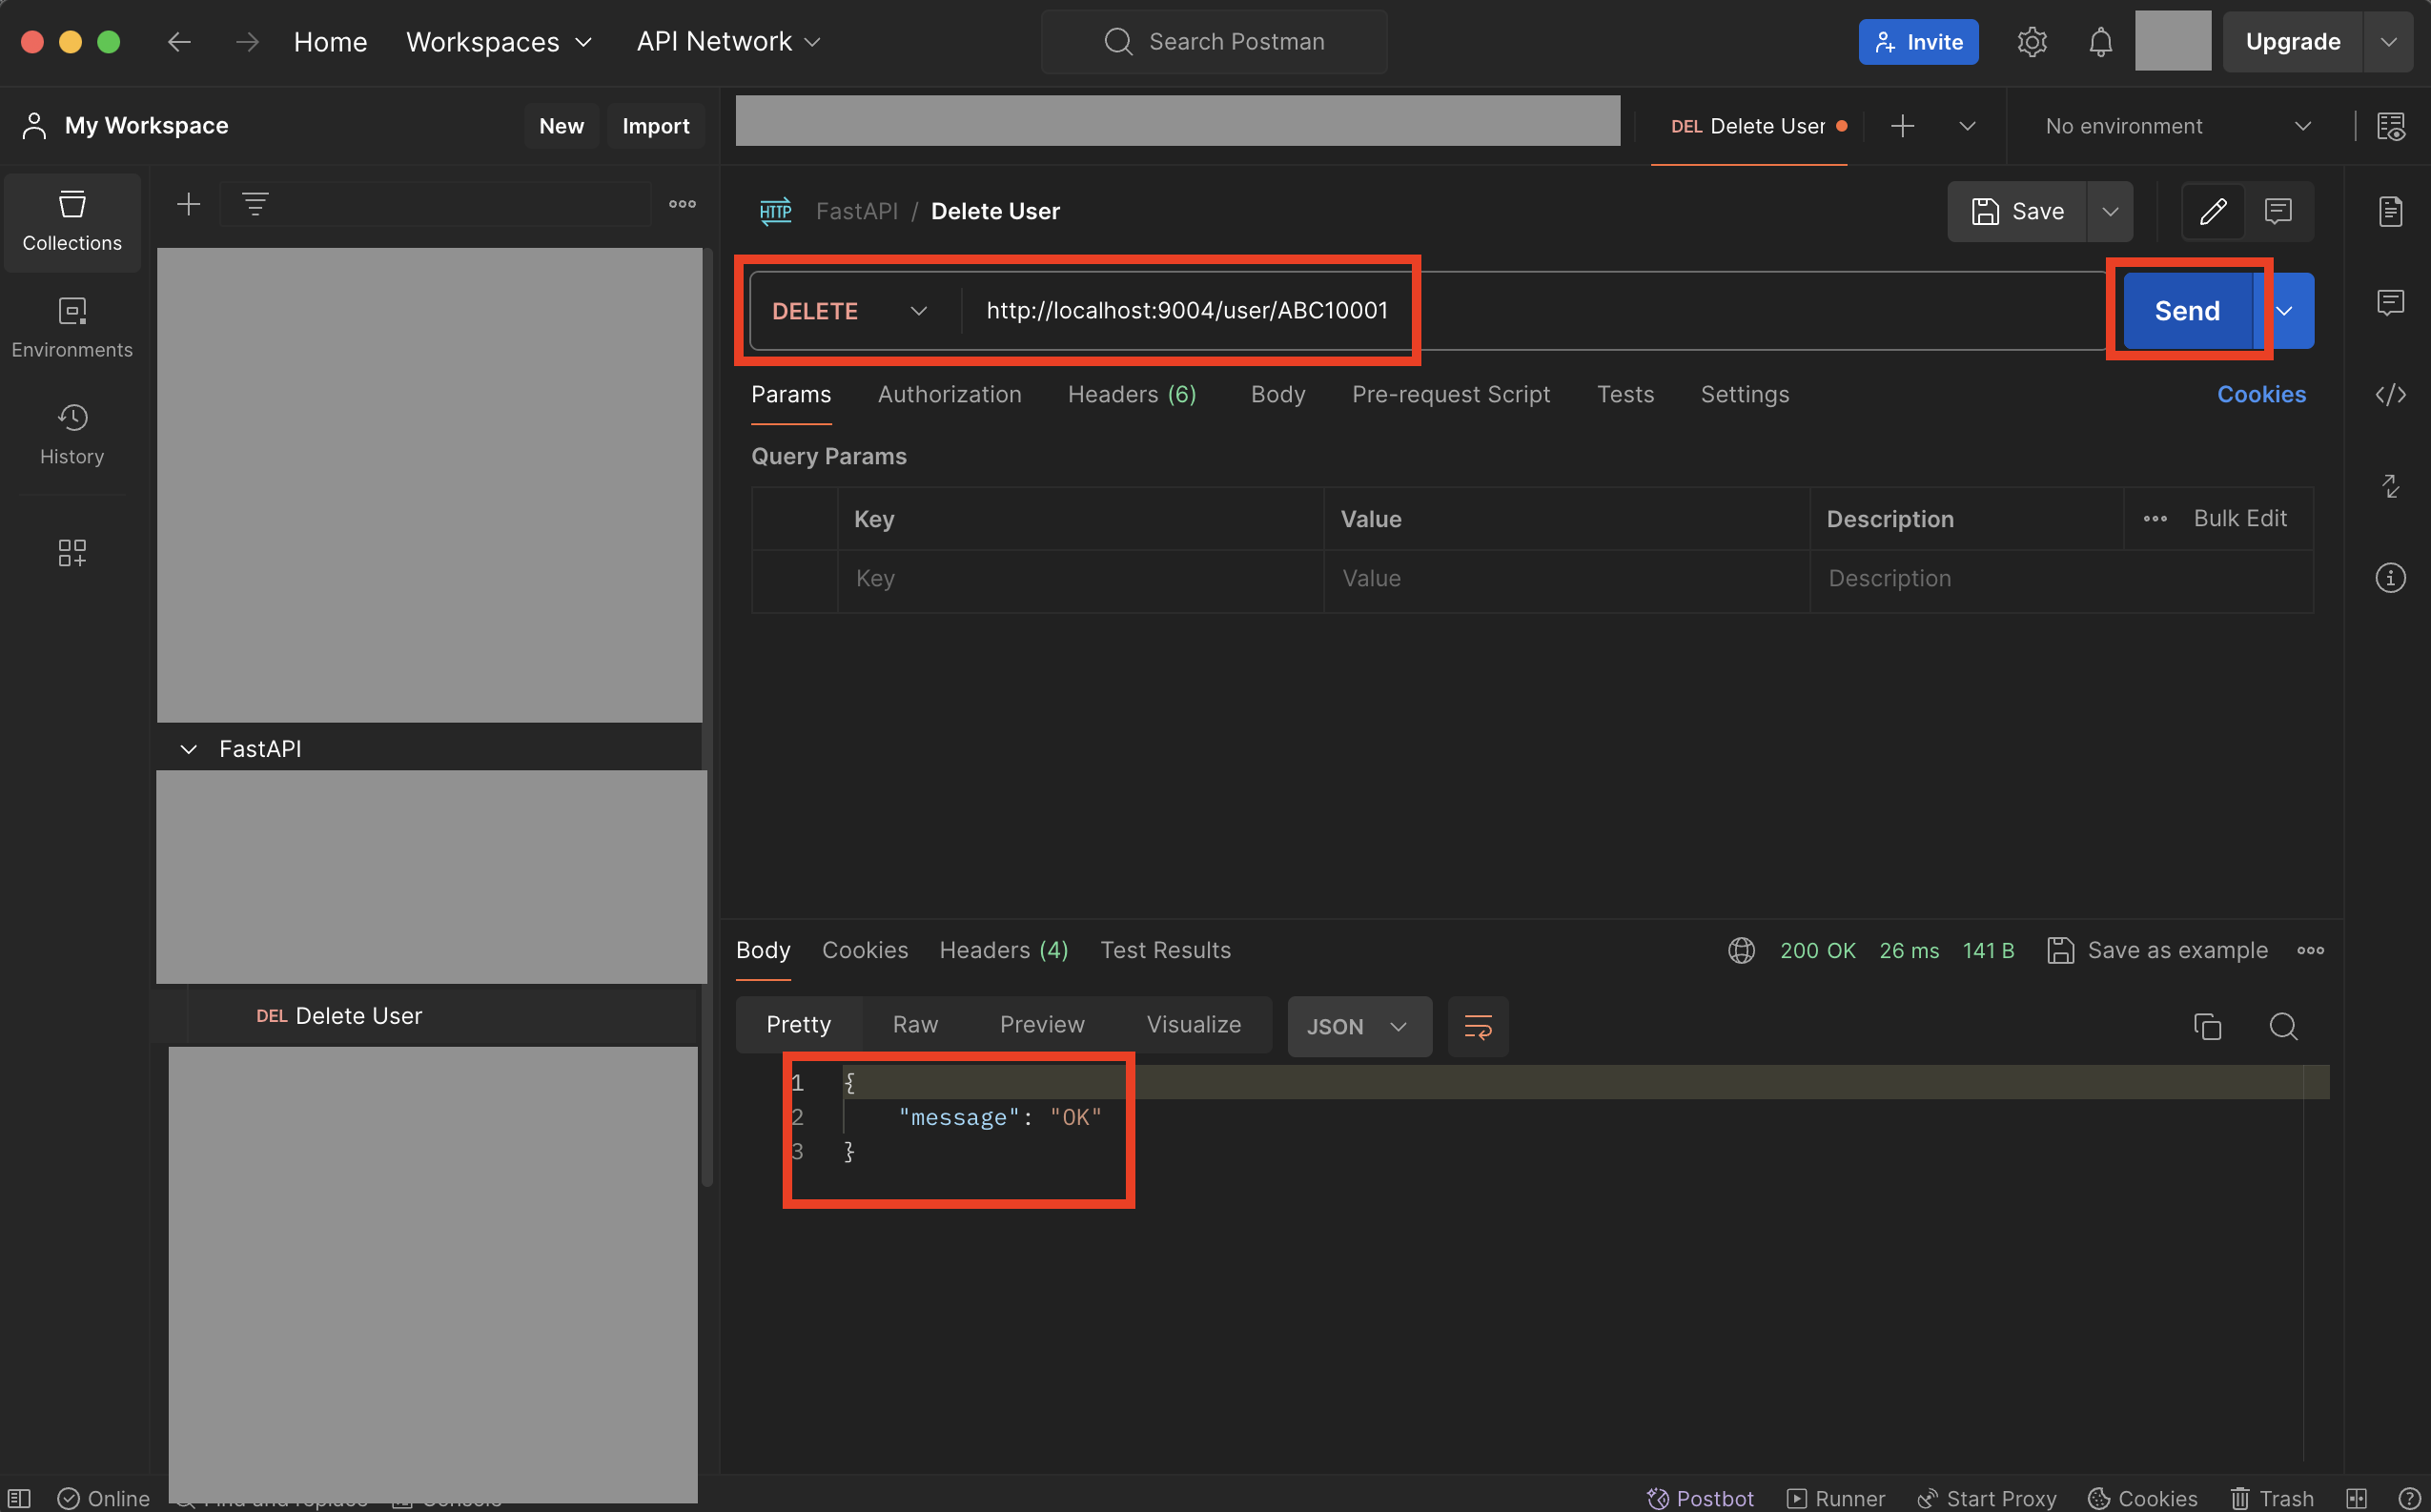
次にユーザー論理削除用の「http://localhost:9004/user/{上記で設定したuid}」をメソッド「DELETE」で実行し、正常終了すればOKです。
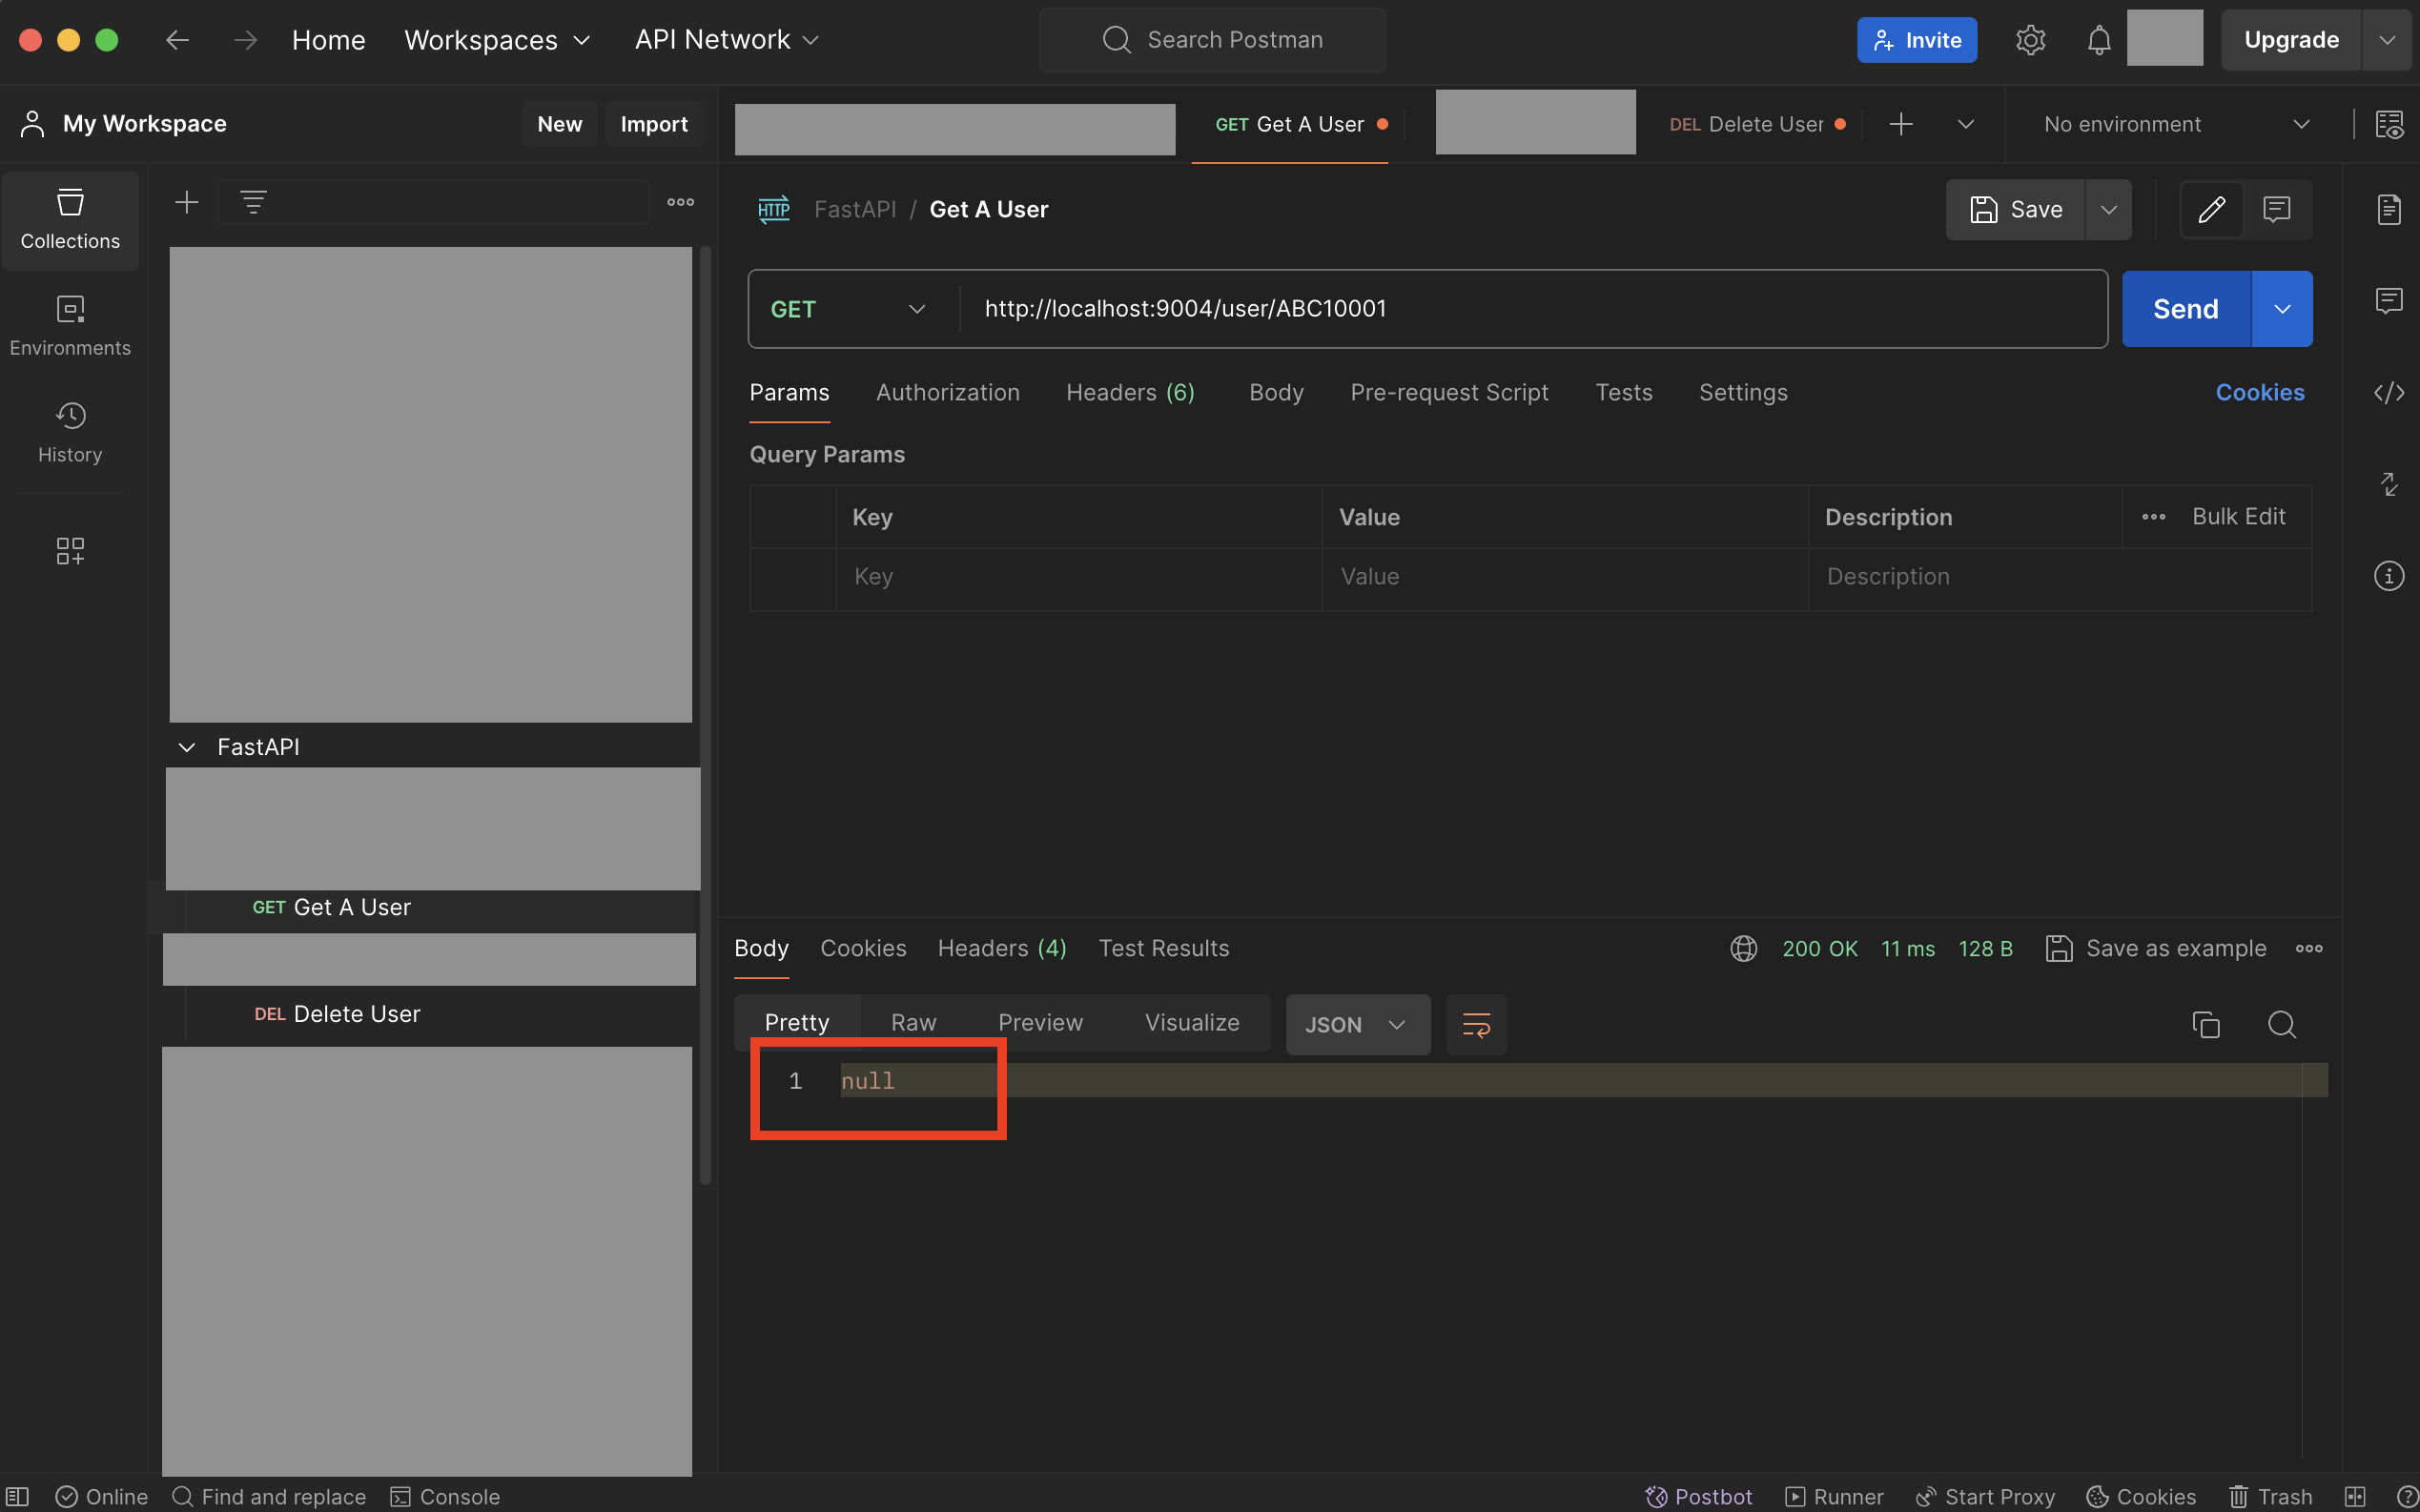
次にもう一度対象ユーザー取得用の「http://localhost:9004/user/{上記で設定したuid}」を実行し、対象データが取得できずnullになっていればOKです。
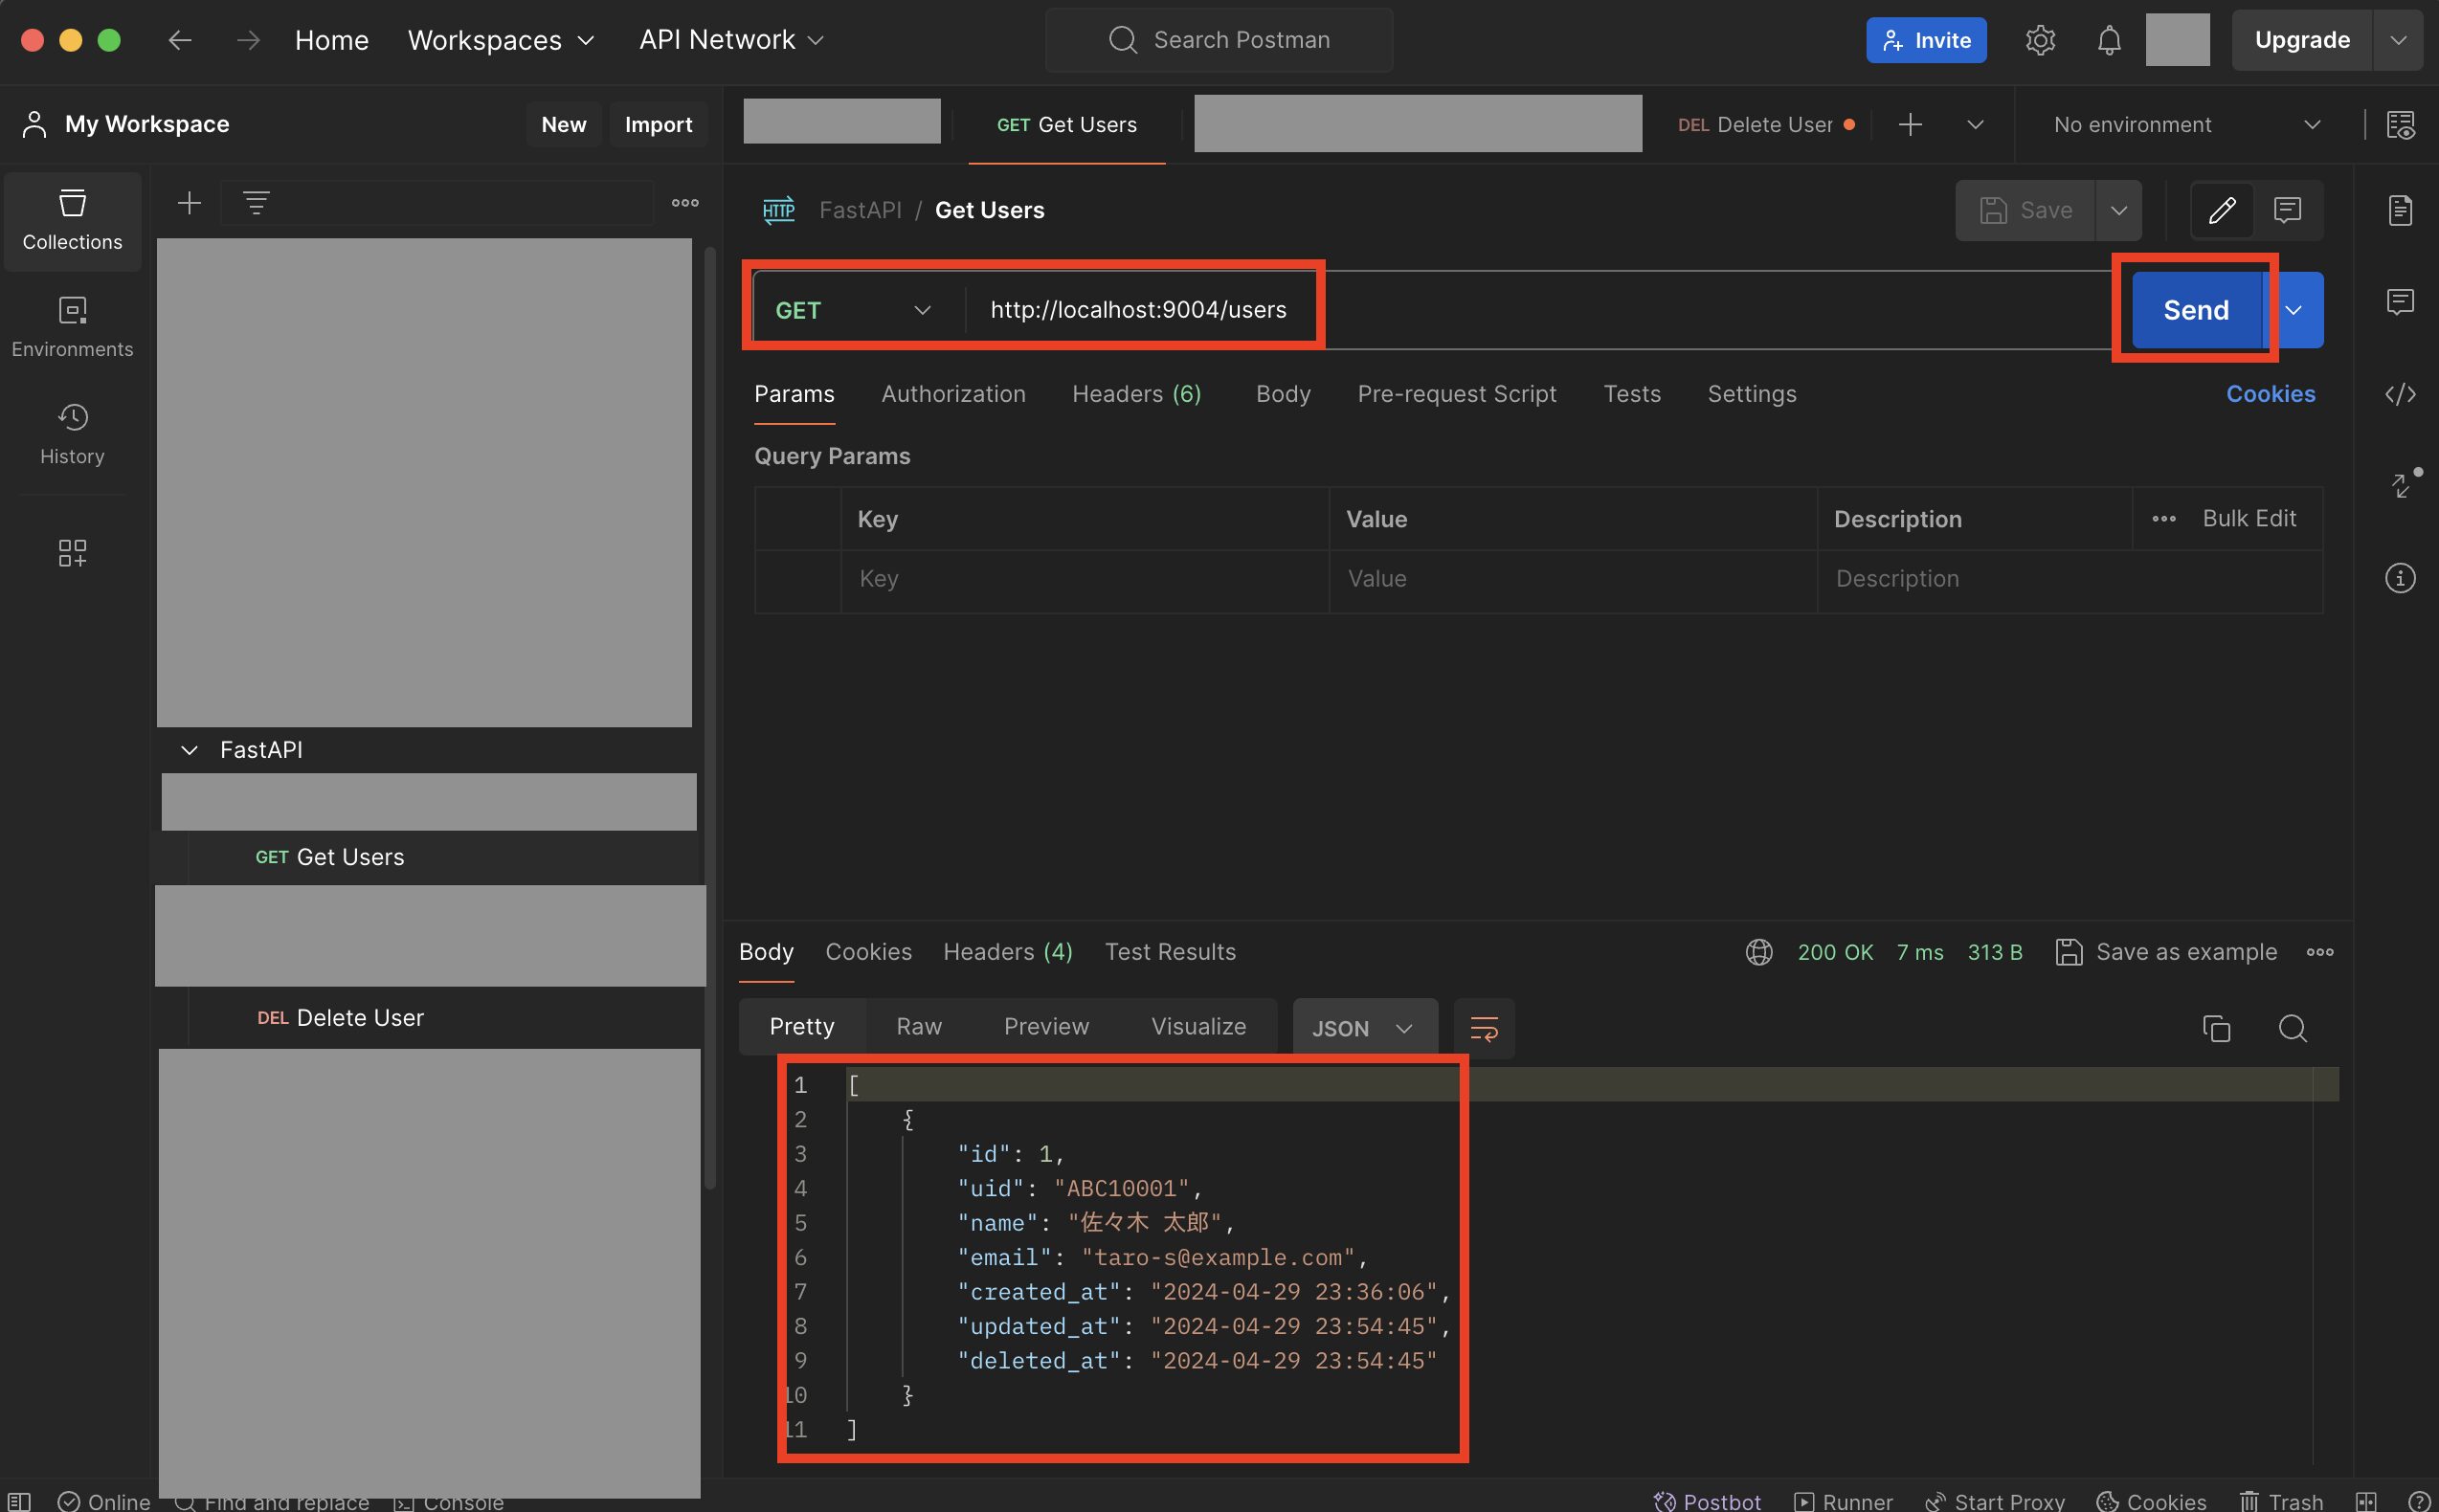
次に論理削除データも含めてユーザー全件取得用の「http://localhost:9004/users」を実行し、削除したユーザーが取得できればOKです。
テストコードの追加
次にテストコードを追加してみます。
既存のファイル「.env」と「src/alembic.ini」をコピーし、それぞれ「.env_testing」、「src/alembic_test.ini」を作成後、以下のように修正します。
ENV=testing
TZ=Asia/Tokyo
MYSQL_DATABASE=test_fastapi_sample_db
MYSQL_USER=test_fastapi_sample_user
MYSQL_PASSWORD=test_fastapi_sample_password
MYSQL_ROOT_PASSWORD=test_fastapi_sample_root_password
MYSQL_TCP_PORT=3307
・・

# .env_testingの接続情報からURLを設定
sqlalchemy.url = mysql+pymysql://test_fastapi_sample_user:test_fastapi_sample_password@test-db:3307/test_fastapi_sample_db?charset=utf8mb4

・・
次にcompose.ymlにテスト用のDBを追加するため、以下のように修正します。
services:
  api:
    container_name: fastapi_sample
    build:
      context: .
      dockerfile: ./docker/python/local/Dockerfile
    volumes:
      - .:/code
    ports:
      - "9004:9004"
    tty: true
    stdin_open: true
    env_file:
      - ./.env
    depends_on:
      - db
      - test-db
    command: poetry run uvicorn main:app --reload --host 0.0.0.0 --port 9004
  # DBに関する設定
  db:
    container_name: fastapi_sample_db
    image: mysql:8.0.36
    env_file:
      - ./.env
    ports:
      - 3306:3306
    volumes:
      - ./tmp/db:/var/lib/mysql
  # テスト用DB
  test-db:
    container_name: test_fastapi_sample_db
    image: mysql:8.0.36
    env_file:
      - ./.env_testing
    ports:
      - 3307:3307
    expose:
      - 3307
    tmpfs:
      - /var/lib/mysql
※ポート番号は3307に変更し、コンテナを停止時にデータが消えるように「tmpfs」を設定
次に以下のコマンドを実行し、コンテナを再起動してテスト用DBを立ち上げます。
$ docker compose down
$ docker compose up -d
次に以下のコマンドを実行し、テストで使用するライブラリをインストールします。
$ docker compose exec api poetry add -D pytest-asyncio httpx
次にテスト用ライブラリ「pytest」の設定を、以下のようにファイル「pyproject.toml」に追加します。
・・

[tool.pytest.ini_options]
pythonpath = "src"

・・
次に以下のコマンドを実行し、テスト用の各種ファイルを作成します。
$ cd src
$ mkdir test
$ cd test
$ touch __init__.py
$ touch test_settings.py
$ touch test_main.py
$ touch test_user.py
$ cd ../..
import pytest
import pytest_asyncio
from httpx import AsyncClient, ASGITransport
from sqlalchemy.ext.asyncio import create_async_engine, AsyncSession
from sqlalchemy.orm import sessionmaker
from src.database import Base
from src.main import app
import starlette.status
from alembic.config import Config
from alembic import command

# 各ルーターのget_dbインスタンスをインポート
from src.routers.user import get_db

ASYNC_DB_URL = "{}://{}:{}@{}:{}/{}?charset={}".format(
    "mysql+aiomysql",
    "test_fastapi_sample_user",
    "test_fastapi_sample_password",
    "test-db",
    "3307",
    "test_fastapi_sample_db",
    "utf8mb4"
)

@pytest_asyncio.fixture()
async def async_client() -> AsyncClient:
    # テスト用DBへのテーブル作成
    alembic_cfg = Config("alembic_test.ini")
    command.upgrade(alembic_cfg, "head")

    # DB設定をテスト用DBにオーバーライド
    async_engine = create_async_engine(ASYNC_DB_URL, echo=True)
    async_session = sessionmaker(
                        autocommit=False, autoflush=False, bind=async_engine, class_=AsyncSession
                    )
    async def get_test_db():
    async with async_session() as session:
        yield session
    app.dependency_overrides[get_db] = get_test_db

    # テスト用に非同期HTTPクライアントを返却
    async with AsyncClient(transport=ASGITransport(app=app), base_url="http://test") as client:
        yield client

    # セッションクローズ
    await async_engine.dispose()

    # テスト用DBのテーブル削除
    command.downgrade(alembic_cfg, "base")
※ライブラリのバージョン等で書き方が変わったりするので注意。またテストDBのデータの削除方法がわからなかったので、マイグレーションのコマンド「command.upgrade(alembic_cfg, “head”)など」で対応させました。
from .test_settings import *
import config

@pytest.mark.asyncio
async def test_main(async_client):
    response = await async_client.get("/")
    assert response.status_code == starlette.status.HTTP_200_OK
    assert response.text == "Hello World !!"

@pytest.mark.asyncio
async def test_env(async_client):
    response = await async_client.get("/env")
    assert response.status_code == starlette.status.HTTP_200_OK

    data = {
        "ENV": config.settings.env,
        "TZ": config.settings.tz,
        "MYSQL_DATABASE": config.settings.mysql_database,
        "MYSQL_USER": config.settings.mysql_user,
        "MYSQL_PASSWORD": config.settings.mysql_password,
        "MYSQL_ROOT_PASSWORD": config.settings.mysql_root_password,
    }
    assert response.json() == data
from .test_settings import *
import warnings

@pytest.mark.asyncio
async def test_create_user(async_client):
    response = await async_client.post("/user", json={
                   "uid": "ABC10001",
                   "name": "田中 太郎",
                   "email": "taro-1@example.com"
               })
    assert response.status_code == starlette.status.HTTP_201_CREATED
    assert response.json() == { "message": "OK" }

@pytest.mark.asyncio
async def test_get_user(async_client):
    await async_client.post("/user", json={
        "uid": "ABC10001",
        "name": "田中 太郎",
        "email": "taro-1@example.com"
    })

    # 日付項目のフォーマット変換部分で警告が出るので無視する
    with warnings.catch_warnings():
        warnings.simplefilter("ignore", UserWarning)
        response = await async_client.get("/user/ABC10001")

    assert response.status_code == starlette.status.HTTP_200_OK
    data = response.json()
    assert data['uid'] == "ABC10001"
    assert data['name'] == "田中 太郎"
    assert data['email'] == "taro-1@example.com"
    assert data['created_at'] != None
    assert data['updated_at'] != None
    assert data['deleted_at'] == None

@pytest.mark.asyncio
async def test_update_user(async_client):
    await async_client.post("/user", json={
        "uid": "ABC10001",
        "name": "田中 太郎",
        "email": "taro-1@example.com"
    })

    # ユーザー更新
    response = await async_client.put("/user/ABC10001", json={
                   "name": "佐々木 二郎",
                   "email": "sasaki-1@example.com"
               })

    assert response.status_code == starlette.status.HTTP_200_OK
    assert response.json() == { "message": "OK" }

    # DBのデータ確認
    with warnings.catch_warnings():
        warnings.simplefilter("ignore", UserWarning)
        response2 = await async_client.get("/user/ABC10001")

    assert response2.status_code == starlette.status.HTTP_200_OK
    data = response2.json()
    assert data['uid'] == "ABC10001"
    assert data['name'] == "佐々木 二郎"
    assert data['email'] == "sasaki-1@example.com"
    assert data['created_at'] != None
    assert data['updated_at'] != None
    assert data['deleted_at'] == None

@pytest.mark.asyncio
async def test_delete_user(async_client):
    await async_client.post("/user", json={
        "uid": "ABC10001",
        "name": "田中 太郎",
        "email": "taro-1@example.com"
    })

    # ユーザー削除
    response = await async_client.delete("/user/ABC10001")
    assert response.status_code == starlette.status.HTTP_200_OK

    # DBのデータ確認
    with warnings.catch_warnings():
        warnings.simplefilter("ignore", UserWarning)
        response2 = await async_client.get("/user/ABC10001")

    assert response2.status_code == starlette.status.HTTP_200_OK
    assert response2.json() == None

    # 削除済みデータ確認
    with warnings.catch_warnings():
        warnings.simplefilter("ignore", UserWarning)
        response3 = await async_client.get("/users")

    assert response3.status_code == starlette.status.HTTP_200_OK
    data = response3.json()[0]
    assert data['uid'] == "ABC10001"
    assert data['name'] == "田中 太郎"
    assert data['email'] == "taro-1@example.com"
    assert data['created_at'] != None
    assert data['updated_at'] != None
    assert data['deleted_at'] != None

@pytest.mark.asyncio
async def test_get_users(async_client):
    await async_client.post("/user", json={
        "uid": "ABC10001",
        "name": "田中 太郎",
        "email": "taro-1@example.com"
    })
    await async_client.post("/user", json={
        "uid": "ABC10002",
        "name": "佐藤 三郎",
        "email": "sato-3@example.com"
    })

    # DBのデータ確認
    with warnings.catch_warnings():
        warnings.simplefilter("ignore", UserWarning)
        response = await async_client.get("/users")

    data1 = response.json()[0]
    data2 = response.json()[1]

    assert data1['uid'] == "ABC10001"
    assert data1['name'] == "田中 太郎"
    assert data1['email'] == "taro-1@example.com"
    assert data1['created_at'] != None
    assert data1['updated_at'] != None
    assert data1['deleted_at'] == None

    assert data2['uid'] == "ABC10002"
    assert data2['name'] == "佐藤 三郎"
    assert data2['email'] == "sato-3@example.com"
    assert data2['created_at'] != None
    assert data2['updated_at'] != None
    assert data2['deleted_at'] == None
次に以下のコマンドを実行し、テストを行います。
$ docker compose exec api poetry run pytest ../test
テスト実行後、全てPASSすればOKです。

最後に
今回はFastAPIでAPIを開発する方法についてまとめました。
実際に試してみるとググっても古い情報が多く、ライブラリのバージョンが上がっていて書き方を修正する必要があるところが多かったので、そこが非常に苦労しました。。
※APIを実行したり、テストを実行した際に警告などが出て、適宜修正しました。。
ただこれから生成AI関連のプロダクトを開発する機会が増えるのは間違いなく、その際には軽量なFastAPIが使われることが多くなりそうではあるので、興味がある方は今のうちから触っておくとよさそうです。(現状、生成AI機能のコア部分はライブラリの関係でPythonで開発することになる)
今後もまたライブラリのバージョンが上がって書き方を修正する必要がでる可能性がありますが、2024年5月時点の情報で十分な場合は、ぜひ参考にしてみて下さい。
各種SNSなど、チャンネル登録やフォローをしていただけると励みになるので、よければぜひお願いします!
Tomoyuki
最新記事 by Tomoyuki (全て見る)
- PythonのDjangoで管理画面を開発する方法まとめ - 2025年12月24日
- PythonのFastAPIでDDD(ドメイン駆動設計)構成のバックエンドAPIを開発する方法まとめ - 2025年12月6日
- ITエンジニア採用は難しい!?現役Web系エンジニア視点における問題点と解決策まとめ - 2025年9月15日




コメントを残す