

こんにちは。Tomoyuki(@tomoyuki65)です。
中規模以上のWebサービスになってくるとフロントエンドとバックエンド通信の最適化のため、BFF(Backend for Frontend)と呼ばれる中間層のアプリケーションを置くことがあります。
具体的にはサービスの機能拡張に比例してバックエンドAPIの数が増えたりすると、各種フロントエンド側へ渡すデータのカスタマイズ等が複雑になってしまうため、それらを緩和してフロントエンド側の負担を減らすためにBFFが必要になってきます。
そんなBFFを開発する際はパフォーマンス重視ならGo言語で開発するのがいいようですが、一般的な開発のしやすさではNest.js(TypeScript)というフレームワークが使われていたりするでしょう。
ということでこの記事では、そんなNest.jsの使い方について解説します。
目次
Nest.jsでGraphQLなどのBFF(Backend for Frontend)を開発する方法まとめ
まずNest.jsの開発を始めるには事前にNode.jsのインストールが必要になるため、もしまだNode.jsが使えない方は、voltaなどのパッケージ管理ツールを利用してインストールをして下さい。
※この記事で利用しているNode.jsのバージョンはv22.13です。
事前準備完了後、以下のコマンドを実行し、Nest.jsのCLIをインストールします。
$ npm i -g @nestjs/cli
次に以下のコマンドを実行し、新しいプロジェクトを作成します。
$ mkdir nest-sample && cd nest-sample
$ nest new rest
$ cd rest
※nest newコマンドを実行すると利用するパッケージ管理ツールを聞かれますが、この記事ではnpmを使います。
次にNest.jsにはデフォルトでフォーマット用のPrettierとコード解析用のESLintが入っていて使えますが、ESLintは自動でコード修正するオプション「–fix」が邪魔なのと、フォーマットとコード解析を同時に行いたいため、package.jsonを以下のように修正します。
{
  "scripts": {

    ・・・

    "lint": "eslint \"{src,apps,libs,test}/**/*.ts\"",
    "fix": "prettier --write \"src/**/*.ts\" \"test/**/*.ts\" && eslint \"{src,apps,libs,test}/**/*.ts\"",

    ・・・

  }

}
そしてテストコードではESLintのチェックを無効化したいので、「rest/eslint.config.mjs」のignoresに「**/*.spec.ts」を追加してspecファイルをチェック対象外にします。
// @ts-check
import eslint from '@eslint/js';
import eslintPluginPrettierRecommended from 'eslint-plugin-prettier/recommended';
import globals from 'globals';
import tseslint from 'typescript-eslint';

export default tseslint.config(
  {
    ignores: ['eslint.config.mjs', '**/*.spec.ts'],
  },
  eslint.configs.recommended,
  ...tseslint.configs.recommendedTypeChecked,
  eslintPluginPrettierRecommended,

・・・
次に環境変数を使えるようにするため、以下のコマンドを実行してライブラリをインストールします。
$ npm i @nestjs/config
次に以下のコマンドを実行し、環境変数用のファイルを作成します。
$ touch .env
次に作成した環境変数用のファイルを以下のように記述します。
NODE_ENV=development
ENV=local
PORT=3000
次に環境変数を使えるようにするため、「rest/src/main.ts」および「rest/src/app.module.ts」をそれぞれ以下のように修正します。
import { NestFactory } from '@nestjs/core';
import { AppModule } from './app.module';
import { ConfigService } from '@nestjs/config';

async function bootstrap() {
  const app = await NestFactory.create(AppModule);
  const configService = app.get(ConfigService);
  const port = configService.get<number>('PORT') ?? 3000;

  await app.listen(port);
}
void bootstrap();
※デフォルトでは環境変数の利用にprocess.envを利用していますが、私が試した時点(2025年2月)ではビルドするとエラーが発生していたので、@nestjs/configを使った方法が最適なようです。また、デフォルトでは「bootstrap()」の部分でESLintの警告が出ていたので、前に「void」を付けています。
import { Module } from '@nestjs/common';
import { AppController } from './app.controller';
import { AppService } from './app.service';
import { ConfigModule } from '@nestjs/config';

@Module({
  imports: [ConfigModule.forRoot({ isGlobal: true })],
  controllers: [AppController],
  providers: [AppService],
})
export class AppModule {}
次に環境変数が利用できることを確認するため、「rest/src/app.service.ts」と「rest/src/app.controller.spec.ts」をそれぞれ以下のように修正します。
import { Injectable } from '@nestjs/common';
import { ConfigService } from '@nestjs/config';

@Injectable()
export class AppService {
  constructor(private configService: ConfigService) {}

  getHello(): string {
    const port = this.configService.get<number>('PORT');
    const nodeEnv = this.configService.get<string>('NODE_ENV');
    const env = this.configService.get<string>('ENV');

    return `Hello World !! [PORT: ${port}, NODE_ENV: ${nodeEnv}, ENV: ${env}]`;
  }
}
import { Test, TestingModule } from '@nestjs/testing';
import { AppController } from './app.controller';
import { AppService } from './app.service';
import { ConfigModule, ConfigService } from '@nestjs/config';

describe('AppController', () => {
  let appController: AppController;
  let configService: ConfigService;

  beforeEach(async () => {
    const app: TestingModule = await Test.createTestingModule({
      imports: [ConfigModule.forRoot({ isGlobal: true })],
      controllers: [AppController],
      providers: [AppService],
    }).compile();

    appController = app.get<AppController>(AppController);
    configService = app.get<ConfigService>(ConfigService);
  });

  describe('root', () => {
    it('should return text', () => {
      const port = configService.get<number>('PORT');
      const nodeEnv = 'test'; // テスト実行時はNODE_ENVがtestになる
      const env = configService.get<string>('ENV');

      expect(appController.getHello()).toBe(
        `Hello World !! [PORT: ${port}, NODE_ENV: ${nodeEnv}, ENV: ${env}]`,
      );
    });
  });
});
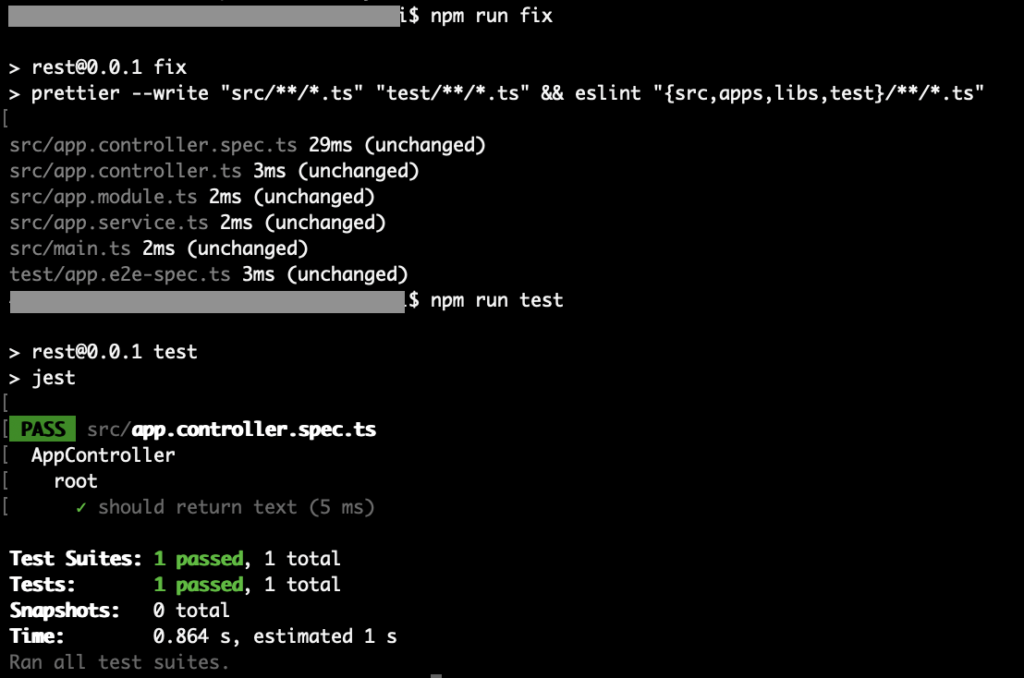
次に以下のコマンドを実行し、コードチェックおよびテストコードを実行します。
$ npm run fix
$ npm run test
コマンド実行後、以下のようになればOKです。
次に以下のコマンドを実行し、ローカルサーバーを起動します。
$ npm run start:dev※start:devを使うとホットリロード(コード修正が即時反映)が有効になる
次にブラウザで「http://localhost:3000」を開き、以下のように表示されればOKです。
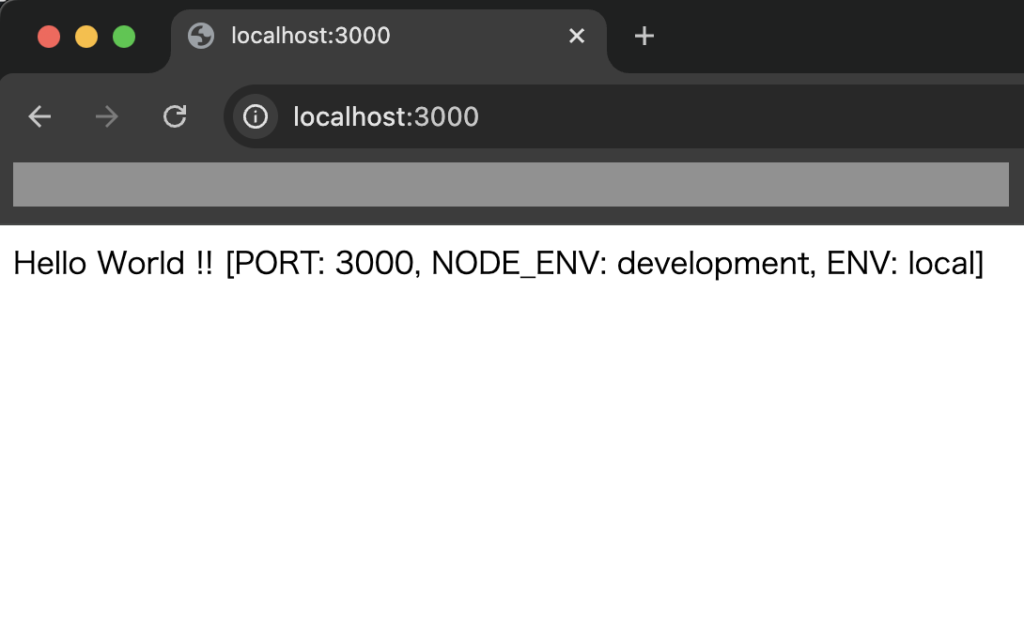
これで基本的な初期設定が完了したので、ショートカットキー「control + c」などでローカルサーバーを止めて下さい。
以降ではBFFをREST APIで作る場合と、GraphQLで作る場合に分けて解説します。
尚、両者の違いについては、作りやすいのはREST APIで、学習コストは高いですが、フロント側から実行する際に柔軟性が高いのがGraphQLです。
BFFをREST APIで作る場合
まずREST APIで作る場合について、以下のコマンドを実行し、新規API追加用の各種ファイルを作成します。
$ nest g module sample
$ nest g service sample --no-spec
$ nest g controller sample
$ cd src/sample
$ touch sample.dto.ts
$ touch sample.repo.ts
$ cd ../..
次に作成したファイルをそれぞれ以下のように修正します。
import { Module } from '@nestjs/common';
import { SampleService } from './sample.service';
import { SampleController } from './sample.controller';
import { SampleRepository } from './sample.repo';

@Module({
  providers: [SampleService, SampleRepository],
  controllers: [SampleController],
})
export class SampleModule {}
// リクエストパラメータやレスポンスの型を定義
export interface GetSampleResponse {
  id: number;
  text: string;
}

export class GetSampleResponseDto implements GetSampleResponse {
  id: number;
  text: string;
}

export interface PostSampleRequestBody {
  text: string;
}

export class PostSampleRequestBodyDto implements PostSampleRequestBody {
  text: string;
}

export interface PostSampleResponse {
  upperText: string;
  lowerText: string;
  textLength: number;
}

export class PostSampleResponseDto implements PostSampleResponse {
  upperText: string;
  lowerText: string;
  textLength: number;
}
※dto(Data Transfer Object)はデザインパターンの一つで、データ受け渡し専用クラスを指します。また、今回は省略していますが、クラスの方を使えばライブラリ「class-validator」を使ってバリデーションチェックなども入れられます。
// 外部APIを呼び出す処理を記述する想定
import { Injectable } from '@nestjs/common';
import { PostSampleResponse } from './sample.dto';

@Injectable()
export class SampleRepository {
  // eslint-disable-next-line
  async textProcessing(text: string): Promise<any> {
    const upperText = text.toUpperCase();
    const lowerText = text.toLowerCase();
    const textLength = text.length;
    const data: PostSampleResponse = {
      upperText,
      lowerText,
      textLength,
    };
    const response = { data: data };

    return response;
  }
}
import { Injectable } from '@nestjs/common';
import {
  GetSampleResponse,
  PostSampleRequestBody,
  PostSampleResponse,
} from './sample.dto';
import { SampleRepository } from './sample.repo';
import { HttpException, HttpStatus } from '@nestjs/common';

@Injectable()
export class SampleService {
  constructor(private readonly sampleRepo: SampleRepository) {}

  getService(): GetSampleResponse {
    return { id: 1, text: 'sample' } as GetSampleResponse;
  }

  async postService(body: PostSampleRequestBody): Promise<PostSampleResponse> {
    try {
      // eslint-disable-next-line
      const res = await this.sampleRepo.textProcessing(body.text);

      // eslint-disable-next-line
      return res.data;
    } catch (error) {
      console.error(error);
      throw new HttpException(
        'Internal Server Error',
        HttpStatus.INTERNAL_SERVER_ERROR,
      );
    }
  }
}
import { Controller, Get, Post, Body, HttpCode } from '@nestjs/common';
import {
  GetSampleResponse,
  PostSampleRequestBody,
  PostSampleResponse,
} from './sample.dto';
import { SampleService } from './sample.service';

@Controller('api/v1/sample')
export class SampleController {
  constructor(private readonly sampleService: SampleService) {}

  @Get('get')
  getSample(): GetSampleResponse {
    return this.sampleService.getService();
  }

  @Post('post')
  @HttpCode(200)
  async postSample(
    @Body() body: PostSampleRequestBody,
  ): Promise<PostSampleResponse> {
    return await this.sampleService.postService(body);
  }
}
import { Test, TestingModule } from '@nestjs/testing';
import { SampleController } from './sample.controller';
import { SampleService } from './sample.service';
import { SampleRepository } from './sample.repo';
import { GetSampleResponse, PostSampleResponse } from './sample.dto';
import { HttpException, HttpStatus } from '@nestjs/common';

describe('SampleController', () => {
  let originalConsoleLog: any;
  let controller: SampleController;
  let repository: SampleRepository;

  beforeEach(async () => {
    const module: TestingModule = await Test.createTestingModule({
      providers: [SampleService, SampleRepository],
      controllers: [SampleController],
    })
      // 外部APIの実行を想定し、モック化したいクラスがある場合
      .overrideProvider(SampleRepository)
      .useValue({
        textProcessing: jest.fn(),
      })
      .compile();

    controller = module.get<SampleController>(SampleController);
    repository = module.get<SampleRepository>(SampleRepository);

    // ログ出力のモック化
    originalConsoleLog = console.error;
    console.error = jest.fn();
  });

  afterEach(() => {
    // ログ出力のモック化解除
    console.error = originalConsoleLog;
  });

  it('should be defined', () => {
    expect(controller).toBeDefined();
  });

  it('should return GetSampleResponse', () => {
    const data: GetSampleResponse = { id: 1, text: 'sample' };
    expect(controller.getSample()).toEqual(data);
  });

  it('should return PostSampleResponse', async () => {
    const body = { text: 'abCde' };
    const data: PostSampleResponse = {
      upperText: 'ABCDE',
      lowerText: 'abcde',
      textLength: 5,
    };

    // モックの戻り値を設定
    (repository.textProcessing as jest.Mock).mockReturnValue({ data: data });

    const res = await controller.postSample(body);

    expect(res).toEqual(data);
  });

  it('should throw error', async () => {
    const body = { text: 'abCde' };

    // モックの戻り値を設定
    const error = new HttpException('Internal Server Error', HttpStatus.INTERNAL_SERVER_ERROR);
    (repository.textProcessing as jest.Mock).mockRejectedValue(error);

    try {
      await controller.postSample(body);
    } catch (error) {
      expect(error).toBeInstanceOf(HttpException);
      expect(error.message).toBe('Internal Server Error');
      expect(error.status).toBe(HttpStatus.INTERNAL_SERVER_ERROR);
    }
  });
});
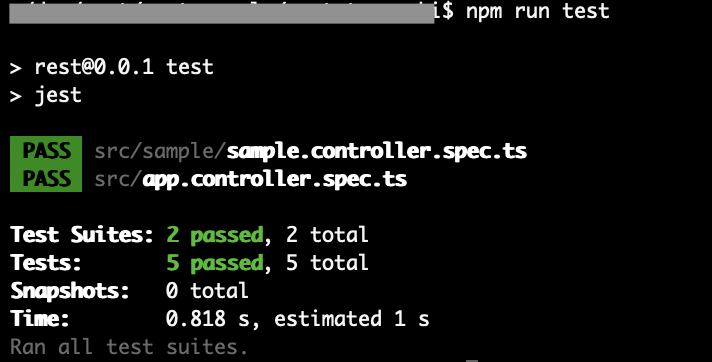
次に以下のコマンドを実行し、テストを実行します。
$ npm run fix
$ npm run test
テスト実行後、以下のようになればOKです。
次に以下のコマンドを実行し、再度ローカルサーバーを起動します。
$ npm run start:dev
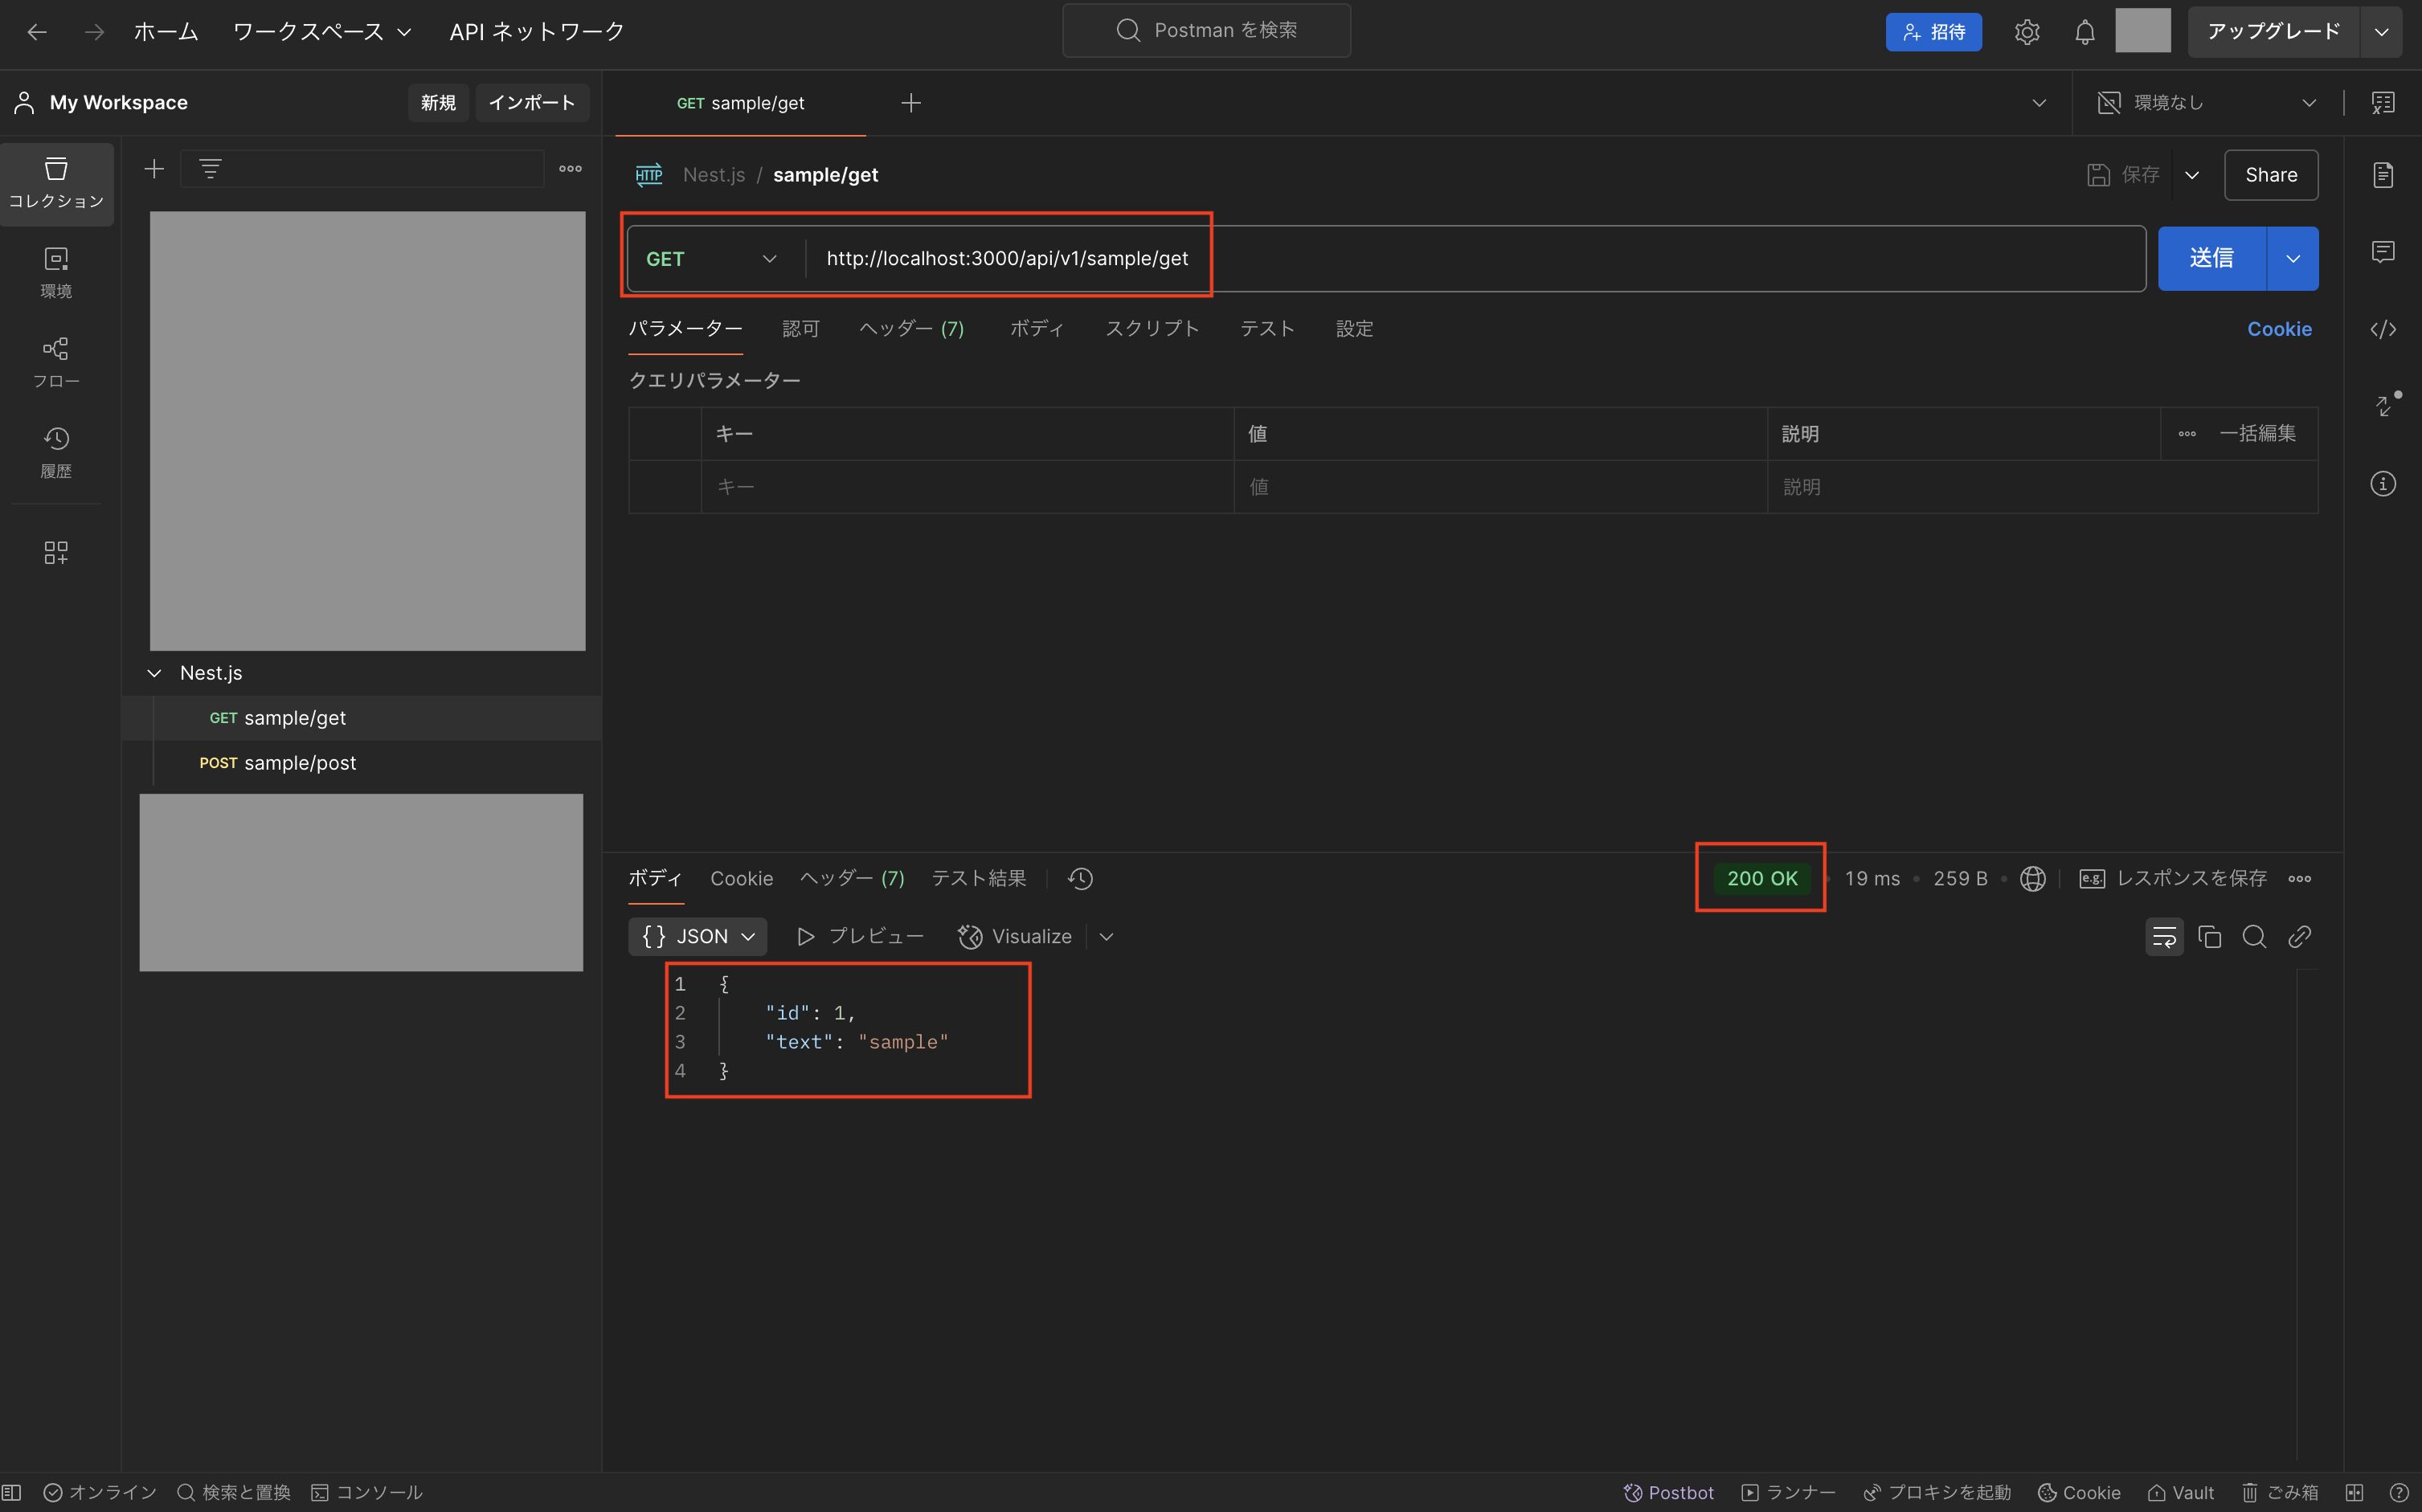
次に追加したAPIを試すため、API実行用ツールのPostmanを使って実行してみます。
まずGETメソッドのAPIを実行し、以下のように想定通りのレスポンス結果が返ってこればOKです。
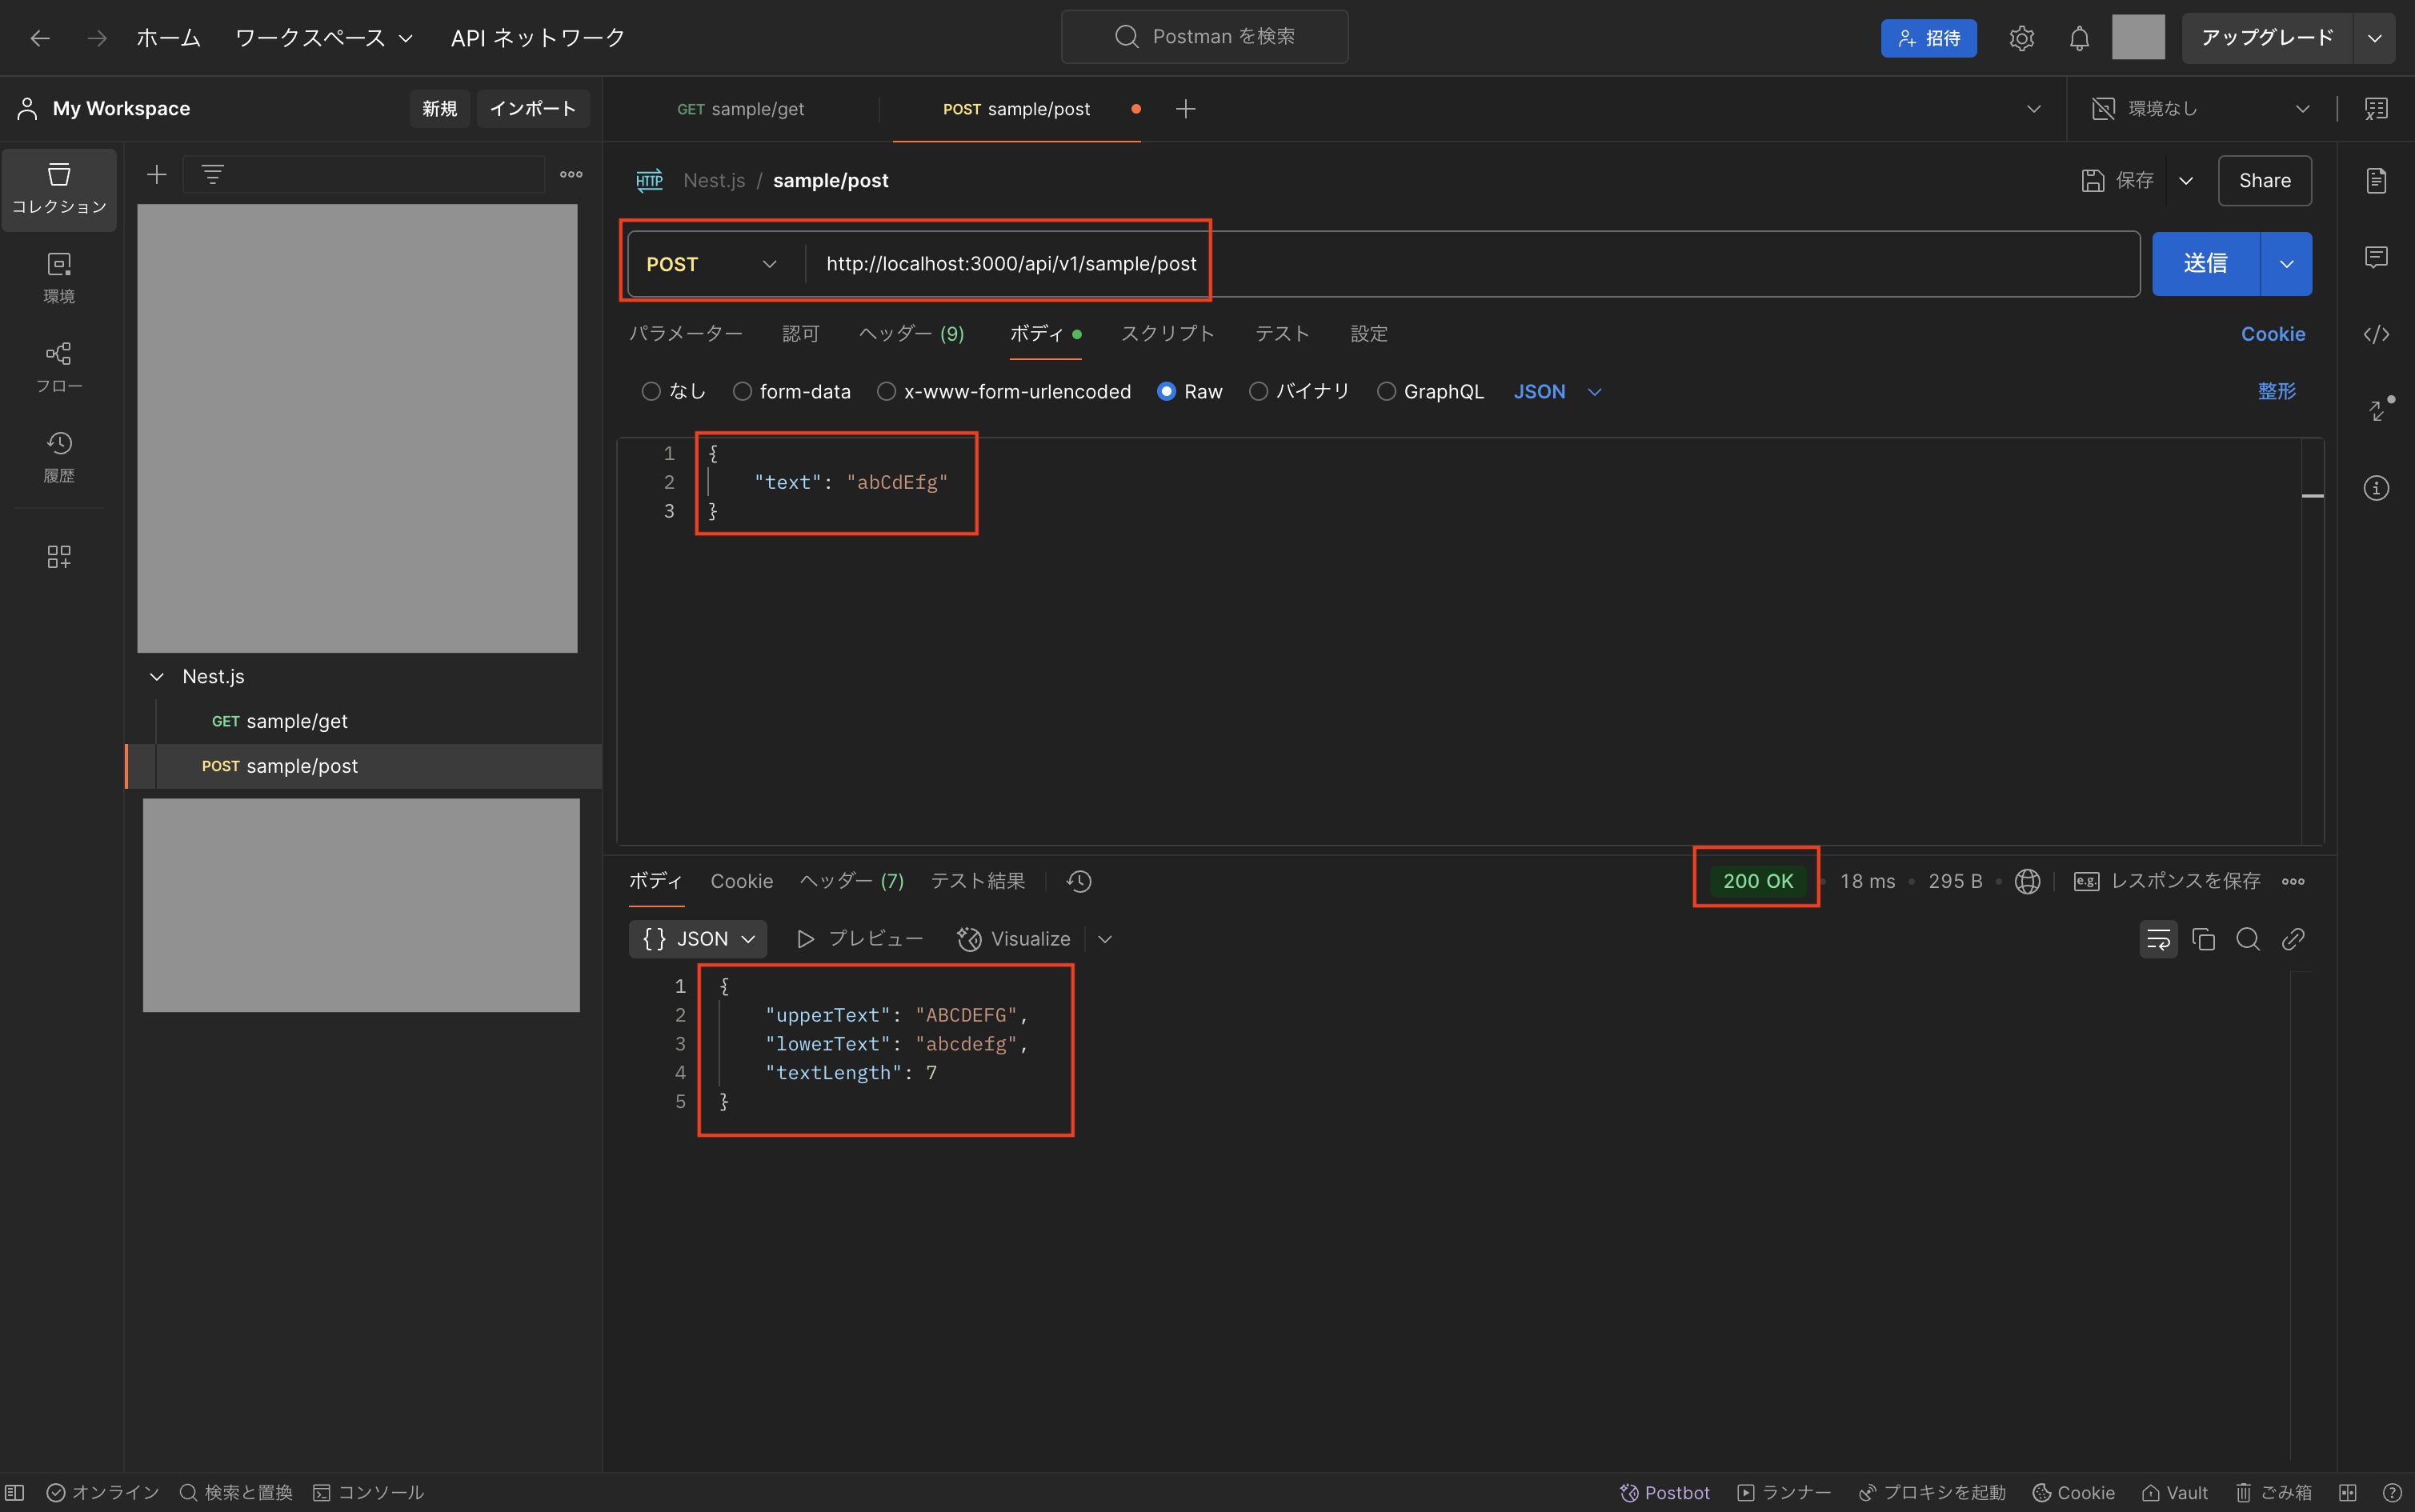
次にPOSTメソッドのAPIを実行し、以下のように想定通りのレスポンス結果が返ってこればOKです。
外部APIを実行したい場合
今回は省略していますが、もしBFFから外部APIを実行したい場合は、以下のコマンドでAxiosのライブラリをインストールして下さい。
$ npm i @nestjs/axios axios※Axios単体ではなく、Nest.jsに組み込まれている機能を使って実装していきます。(Axios単体でも実装できますが、基本的にはNest.jsの機能を使った方がいいようです。)
次に「rest/src/sample/sample.module.ts」などの対象のモジュールファイルで「HttpModule」をインポートします。
import { Module } from '@nestjs/common';
import { SampleService } from './sample.service';
import { SampleController } from './sample.controller';
import { SampleRepository } from './sample.repo';
import { HttpModule } from '@nestjs/axios';

@Module({
  imports: [HttpModule],
  providers: [SampleService, SampleRepository],
  controllers: [SampleController],
})
export class SampleModule {}
次に「rest/src/sample/sample.repo.ts」などの切り出したリポジトリ用のファイルを使って、以下のような感じで「firstValueFrom」を使って外部APIを実行して下さい。
// 外部APIを呼び出す処理を記述する想定
import { Injectable } from '@nestjs/common';
import { HttpService } from '@nestjs/axios';
import { firstValueFrom } from 'rxjs';

@Injectable()
export class SampleRepository {
  constructor(private httpService: HttpService) {}

  async execExternalApi(): Promise<any> {
    const url = "https://api.thecatapi.com/v1/images/search";

    try {
      const res = await firstValueFrom(
        this.httpService.get<any>(url),
      );

      return res.data;
    } catch (error) {
      console.error(error);
    }
  }
}
※このように外部APIの実行部分を別ファイルに切り出せば、テストコードでモック化するのが容易になります。
OpenAPIのAPI仕様書を作りたい場合
次にNest.jsでは簡単にOpenAPIのAPI仕様書を実装できるので、作りたい場合は以下のコマンドを実行して下さい。
$ npm i @nestjs/swagger
$ npm i fs-extra @types/fs-extra
$ npm i -D openapi-to-md
$ mkdir openapi
※「fs-extra」、「@types/fs-extra」、「openapi-to-md」はファイルに出力するために使います。尚、私が試した時点ではビルド時に標準の「fs」が使えなかったので、npmライブラリの「fs-extra」を使うことで問題を解消できました。
次に「rest/src/main.ts」を以下のように修正します。
import { NestFactory } from '@nestjs/core';
import { AppModule } from './app.module';
import { ConfigService } from '@nestjs/config';
import { SwaggerModule, DocumentBuilder } from '@nestjs/swagger';
import * as fs from 'fs-extra';

async function bootstrap() {
  const app = await NestFactory.create(AppModule);
  const configService = app.get(ConfigService);
  const port = configService.get<number>('PORT') ?? 3000;
  const nodeEnv = configService.get<string>('NODE_ENV') ?? 'development';

  // 開発環境のみOpenAPIを有効化
  if (nodeEnv != 'production') {
    const config = new DocumentBuilder()
      .setTitle('SampleのAPI仕様書')
      .setDescription('Nest.jsで作成したAPIの仕様書です。')
      .setVersion('1.0')
      .build();
    const documentFactory = () => SwaggerModule.createDocument(app, config);

    SwaggerModule.setup('api', app, documentFactory);

    // OpenAPIのJSONファイルを出力
    const outputFilePath = './openapi/openapi.json';
    await fs.writeFile(
      outputFilePath,
      JSON.stringify(documentFactory(), null, 2),
    );
  }
  await app.listen(port);
}
void bootstrap();
次に「rest/src/sample/sample.dto.ts」や「rest/src/sample/sample.controller.ts」などの対象のdtoファイルやコントローラーファイルにOpenAPI用の設定を追加します。
// リクエストパラメータやレスポンスの型を定義
import { ApiProperty } from '@nestjs/swagger';
export interface GetSampleResponse {
  id: number;
  text: string;
}

export class GetSampleResponseDto implements GetSampleResponse {
  @ApiProperty()
  id: number;

  @ApiProperty()
  text: string;
}

export interface PostSampleRequestBody {
  text: string;
}

export class PostSampleRequestBodyDto implements PostSampleRequestBody {
  @ApiProperty()
  text: string;
}
export interface PostSampleResponse {
  upperText: string;
  lowerText: string;
  textLength: number;
}

export class PostSampleResponseDto implements PostSampleResponse {
  @ApiProperty()
  upperText: string;

  @ApiProperty()
  lowerText: string;

  @ApiProperty()
  textLength: number;
}
import { Controller, Get, Post, Body, HttpCode } from '@nestjs/common';
import {
  GetSampleResponse,
  GetSampleResponseDto,
  PostSampleRequestBody,
  PostSampleRequestBodyDto,
  PostSampleResponse,
  PostSampleResponseDto,
} from './sample.dto';
import { SampleService } from './sample.service';
import { ApiOperation, ApiResponse, ApiBody } from '@nestjs/swagger';

@Controller('api/v1/sample')
export class SampleController {
  constructor(private readonly sampleService: SampleService) {}

  @Get('get')
  @ApiOperation({ description: 'GETメソッドのサンプルAPI' })
  @ApiResponse({
    status: 200,
    description: 'APIが正常終了',
    type: GetSampleResponseDto,
  })
  getSample(): GetSampleResponse {
    return this.sampleService.getService();
  }

  @Post('post')
  @HttpCode(200)
  @ApiOperation({ description: 'POSTメソッドのサンプルAPI' })
  @ApiBody({ type: PostSampleRequestBodyDto })
  @ApiResponse({
    status: 200,
    description: 'APIが正常終了',
    type: PostSampleResponseDto,
  })
  @ApiResponse({
    status: 500,
    description: 'Internal Server Error',
  })
  async postSample(
    @Body() body: PostSampleRequestBody,
  ): Promise<PostSampleResponse> {
    return await this.sampleService.postService(body);
  }
}
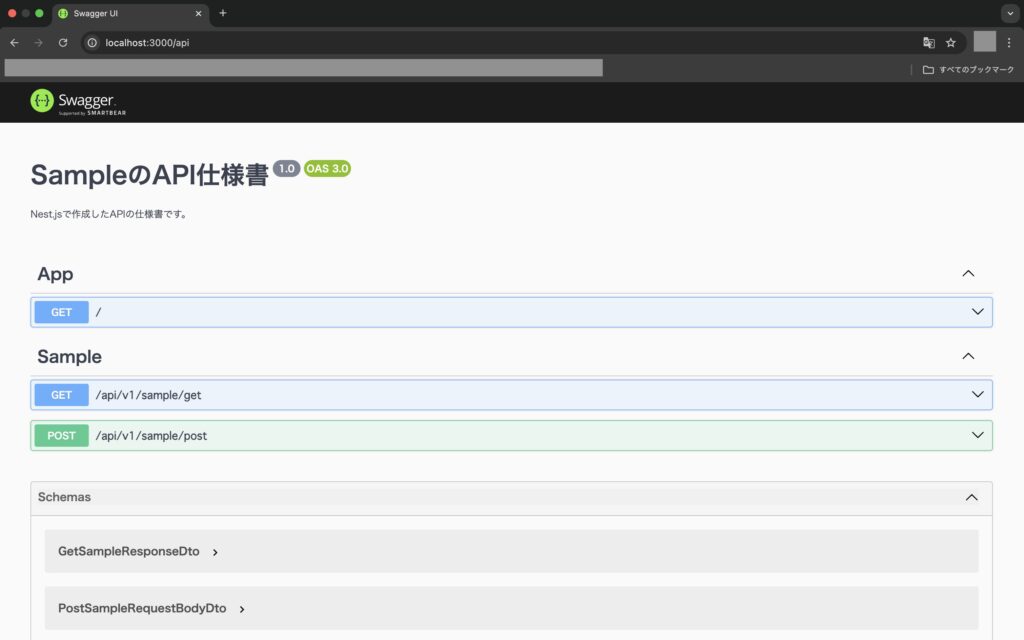
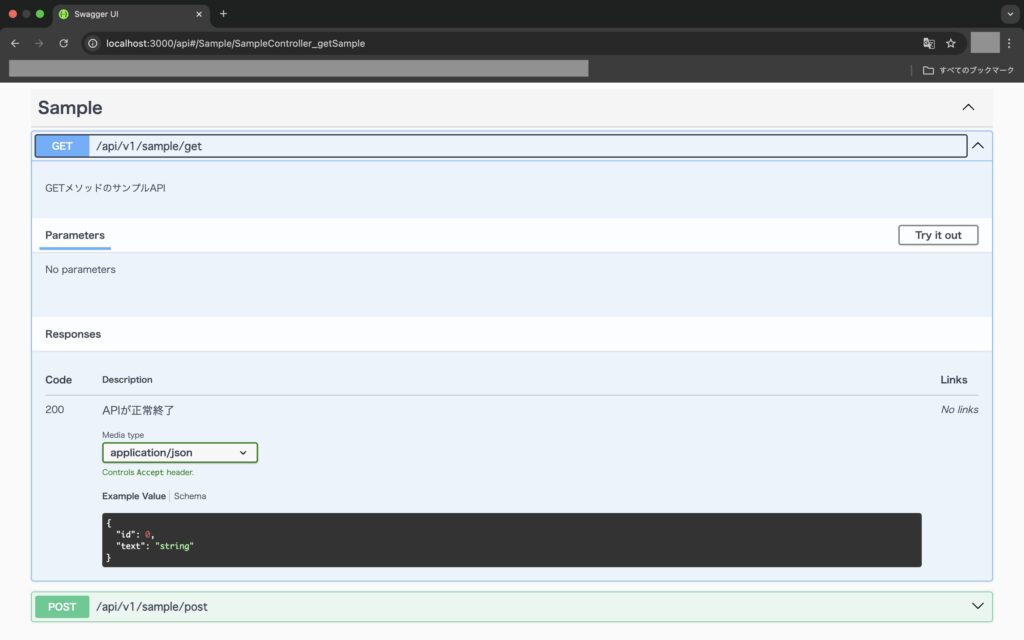
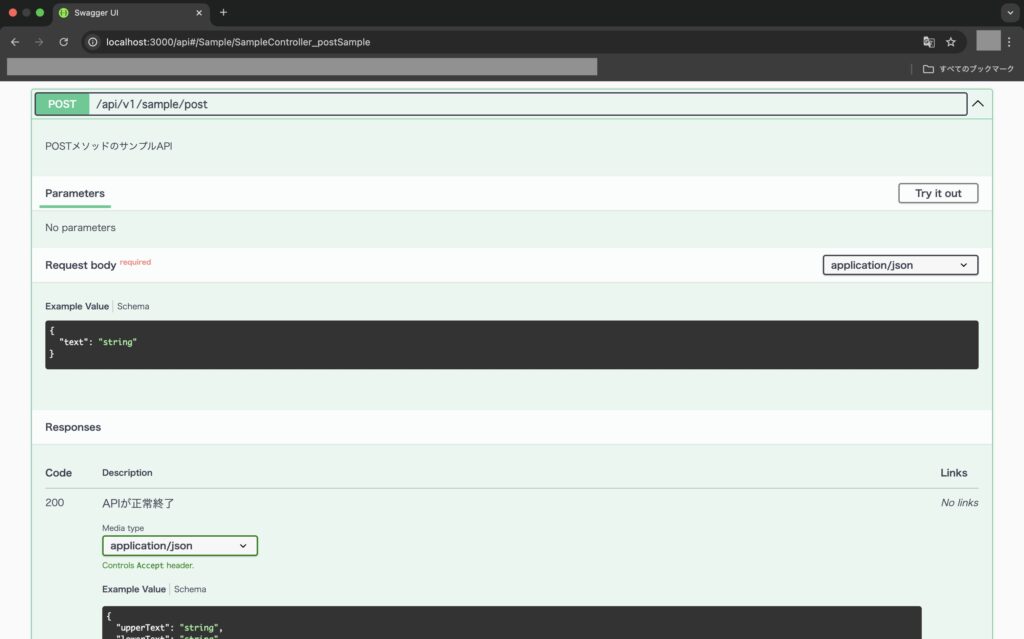
次にローカルサーバーを起動後、ブラウザで「http://localhost:3000/api」を開き、以下のようにOpenAPIのAPI仕様書を確認できればOKです。
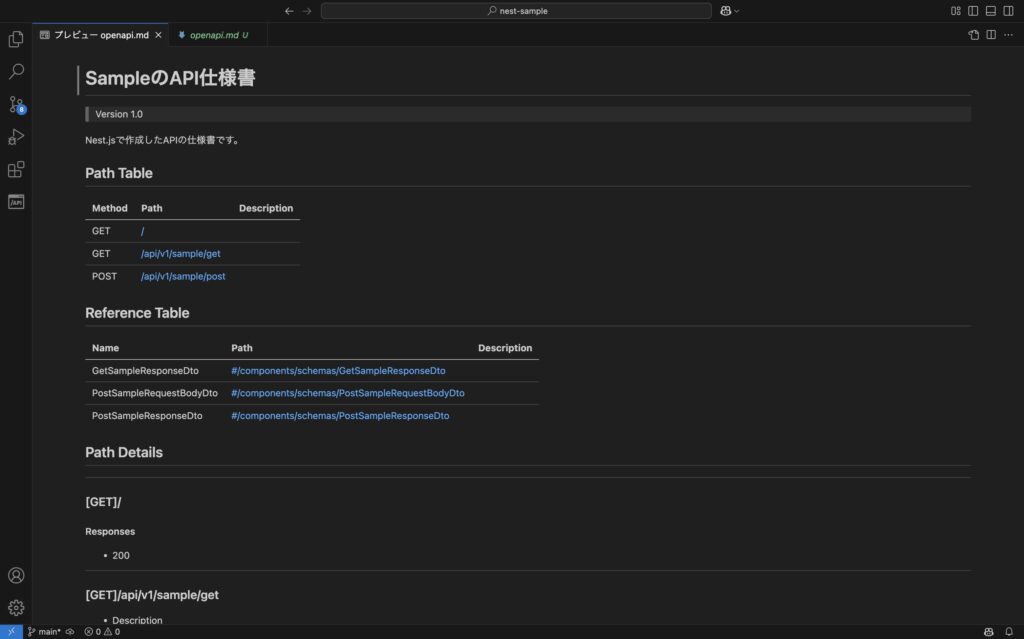
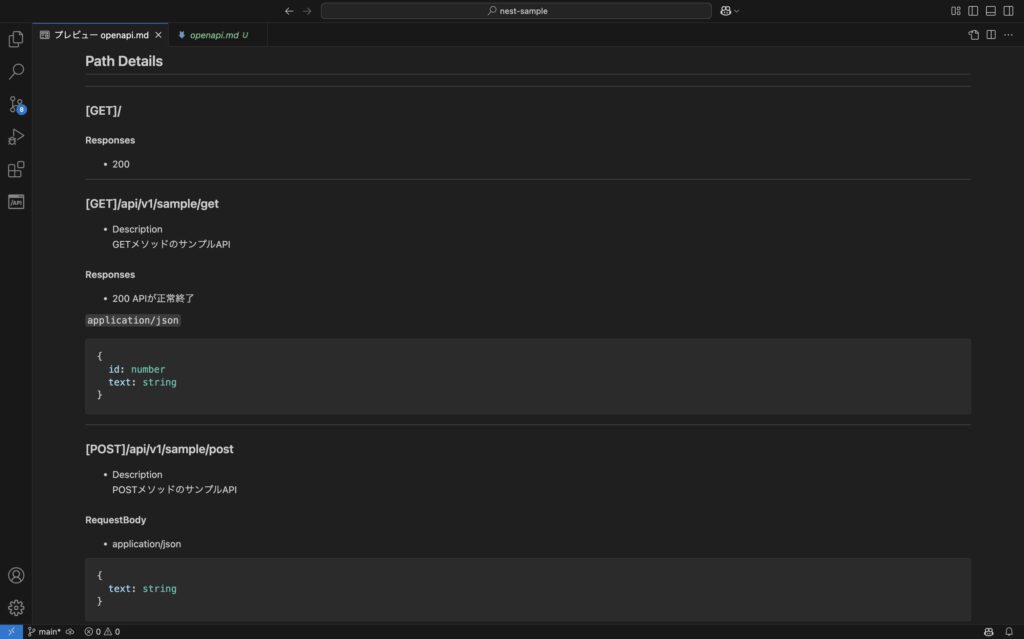
そして「rest/openapi/openapi.json」にjson形式のファイルが作成されていると思いますが、md形式に変換したい場合は以下のコマンドを実行して下さい。
$ npx openapi-to-md
md形式に変換すると、例えばテキストエディタやGitHubから直接見れるようになります。
BFFをGraphQLで作る場合
次にもう一つの方法として、BFFをGraphQLで作る場合について解説していきますが、上記のREST APIを作る前までは同じです。
まずは以下のコマンドを実行し、必要なライブラリをインストールします。
$ npm i @nestjs/graphql @nestjs/apollo @apollo/server graphql
次に「src/app.module.ts」を以下のように修正します。
import { Module } from '@nestjs/common';
import { AppController } from './app.controller';
import { AppService } from './app.service';
import { ConfigModule } from '@nestjs/config';
import { GraphQLModule } from '@nestjs/graphql';
import { ApolloDriver, ApolloDriverConfig } from '@nestjs/apollo';
import { join } from 'path';
import { ConfigService } from '@nestjs/config';
import { SampleModule } from './sample/sample.module';

// 開発環境のみPlaygroundを使えるようにするためのフラグを設定
const configService = new ConfigService();
const nodeEnv = configService.get<string>('NODE_ENV') ?? 'development';
const playgroundFlag = nodeEnv != 'production';

@Module({
  imports: [
    ConfigModule.forRoot({ isGlobal: true }),
    GraphQLModule.forRoot<ApolloDriverConfig>({
      driver: ApolloDriver,
      autoSchemaFile: join(process.cwd(), 'src/schema.gql'),
      playground: playgroundFlag,
    }),
    SampleModule,
  ],
  controllers: [AppController],
  providers: [AppService],
})
export class AppModule {}
次に以下のコマンドを実行し、GraphQLのAPIを作るための各種ファイルを作成します。
$ nest g module sample
$ nest g service sample --no-spec
$ nest g resolver sample
$ cd src/sample
$ touch sample.model.ts
$ cd ../..
次に作成したファイルについて、それぞれ以下のように記述します。
// GraphQLのスキーマにおける型の定義
import { Field, Int, ObjectType } from '@nestjs/graphql';

@ObjectType()
export class SampleModel {
  @Field(() => Int)
  id: number;

  @Field()
  title: string;

  @Field()
  description: string;

  @Field()
  createdAt: Date;

  @Field()
  updatedAt: Date;

  @Field(() => Date, { nullable: true })
  deletedAt: Date | null;
}
※本来はスキーマ定義でバリデーションチェックを入れると思いますが、今回は省略しています。
import { Injectable } from '@nestjs/common';
import { SampleModel } from './sample.model';

@Injectable()
export class SampleService {
  /**
  * サンプルデータの取得
  * @returns サンプルデータ
  */
  // eslint-disable-next-line
  async getSampleData(): Promise<SampleModel[]> {
    const data = [
      {
        id: 1,
        title: 'タイトル1',
        description: '説明1',
        createdAt: new Date(),
        updatedAt: new Date(),
        deletedAt: null,
      },
      {
        id: 2,
        title: 'タイトル2',
        description: '説明2',
        createdAt: new Date(),
        updatedAt: new Date(),
        deletedAt: null,
      },
    ];

    return data;
  }
}
import { Resolver } from '@nestjs/graphql';
import { Query } from '@nestjs/graphql';
import { SampleModel } from './sample.model';
import { SampleService } from './sample.service';

@Resolver()
export class SampleResolver {
  constructor(private readonly sampleService: SampleService) {}

  /**
  * サンプルクエリ
  * @returns サンプルモデル[]
  */
  @Query(() => [SampleModel], { nullable: true })
  async getSample(): Promise<SampleModel[]> {
    return await this.sampleService.getSampleData();
  }
}
import { Test, TestingModule } from '@nestjs/testing';
import { SampleResolver } from './sample.resolver';
import { SampleService } from './sample.service';
import { AppModule } from '../app.module';
import { INestApplication } from '@nestjs/common';
import * as request from 'supertest';

describe('SampleResolver', () => {
  let resolver: SampleResolver;
  let app: INestApplication;

  beforeEach(async () => {
    const module: TestingModule = await Test.createTestingModule({
      imports: [AppModule],
      providers: [SampleResolver, SampleService],
    }).compile();

    app = module.createNestApplication();
    await app.init();
    resolver = module.get<SampleResolver>(SampleResolver);
  });

  // 全テスト終了後の処理
  afterAll(async () => {
    await app.close();
  });

  it('should be defined', () => {
    expect(resolver).toBeDefined();
  });

  it('should return getSample all data', async () => {
    const query = `
      query TestGetSampleQuery {
        getSample {
          id
          title
          description
          createdAt
          updatedAt
          deletedAt
        }
      }
    `;

    const res = await request(app.getHttpServer())
      .post('/graphql')
      .send({ query });

    expect(res.body.data.getSample).toBeDefined();
    expect(res.body.data.getSample).toBeInstanceOf(Array);
    expect(res.body.data.getSample.length).toBeGreaterThan(0);
    // 1件目のデータを確認
    expect(res.body.data.getSample[0].id).toBe(1);
    expect(res.body.data.getSample[0].title).toBe('タイトル1');
    expect(res.body.data.getSample[0].description).toBe('説明1');
    expect(res.body.data.getSample[0].createdAt).toBeDefined();
    expect(res.body.data.getSample[0].updatedAt).toBeDefined();
    expect(res.body.data.getSample[0].deletedAt).toBeNull();
    // 2件目のデータを確認
    expect(res.body.data.getSample[1].id).toBe(2);
    expect(res.body.data.getSample[1].title).toBe('タイトル2');
    expect(res.body.data.getSample[1].description).toBe('説明2');
    expect(res.body.data.getSample[1].createdAt).toBeDefined();
    expect(res.body.data.getSample[1].updatedAt).toBeDefined();
    expect(res.body.data.getSample[1].deletedAt).toBeNull();
  });

  it('should return getSample selection field', async () => {
    const query = `
      query TestGetSampleQuery {
        getSample {
          id
          title
          description
        }
      }
    `;

    const res = await request(app.getHttpServer())
      .post('/graphql')
      .send({ query });

    expect(res.body.data.getSample).toBeDefined();
    expect(res.body.data.getSample).toBeInstanceOf(Array);
    expect(res.body.data.getSample.length).toBeGreaterThan(0);
    // 1件目のデータを確認
    expect(res.body.data.getSample[0].id).toBe(1);
    expect(res.body.data.getSample[0].title).toBe('タイトル1');
    expect(res.body.data.getSample[0].description).toBe('説明1');
    expect(res.body.data.getSample[0].createdAt).toBeUndefined();
    expect(res.body.data.getSample[0].updatedAt).toBeUndefined();
    expect(res.body.data.getSample[0].deletedAt).toBeUndefined();
    // 2件目のデータを確認
    expect(res.body.data.getSample[1].id).toBe(2);
    expect(res.body.data.getSample[1].title).toBe('タイトル2');
    expect(res.body.data.getSample[1].description).toBe('説明2');
    expect(res.body.data.getSample[1].createdAt).toBeUndefined();
    expect(res.body.data.getSample[1].updatedAt).toBeUndefined();
    expect(res.body.data.getSample[1].deletedAt).toBeUndefined();
  });
});
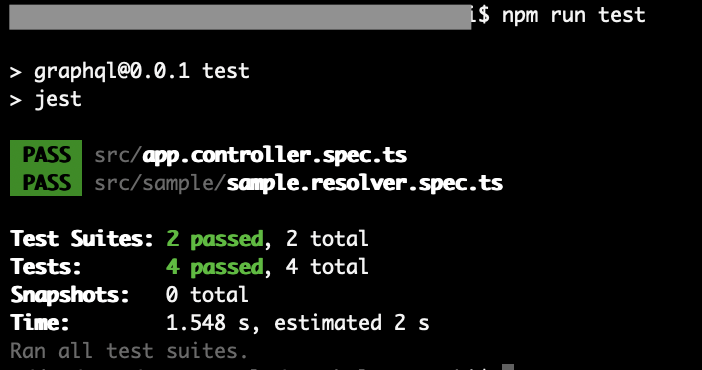
次に以下のコマンドを実行し、テストコードを実行して確認します。
$ npm run fix
$ npm run test
テスト実行後、以下のようになればOKです。
次に以下のコマンドを実行し、ローカルサーバーを起動します。
$ npm run start:dev
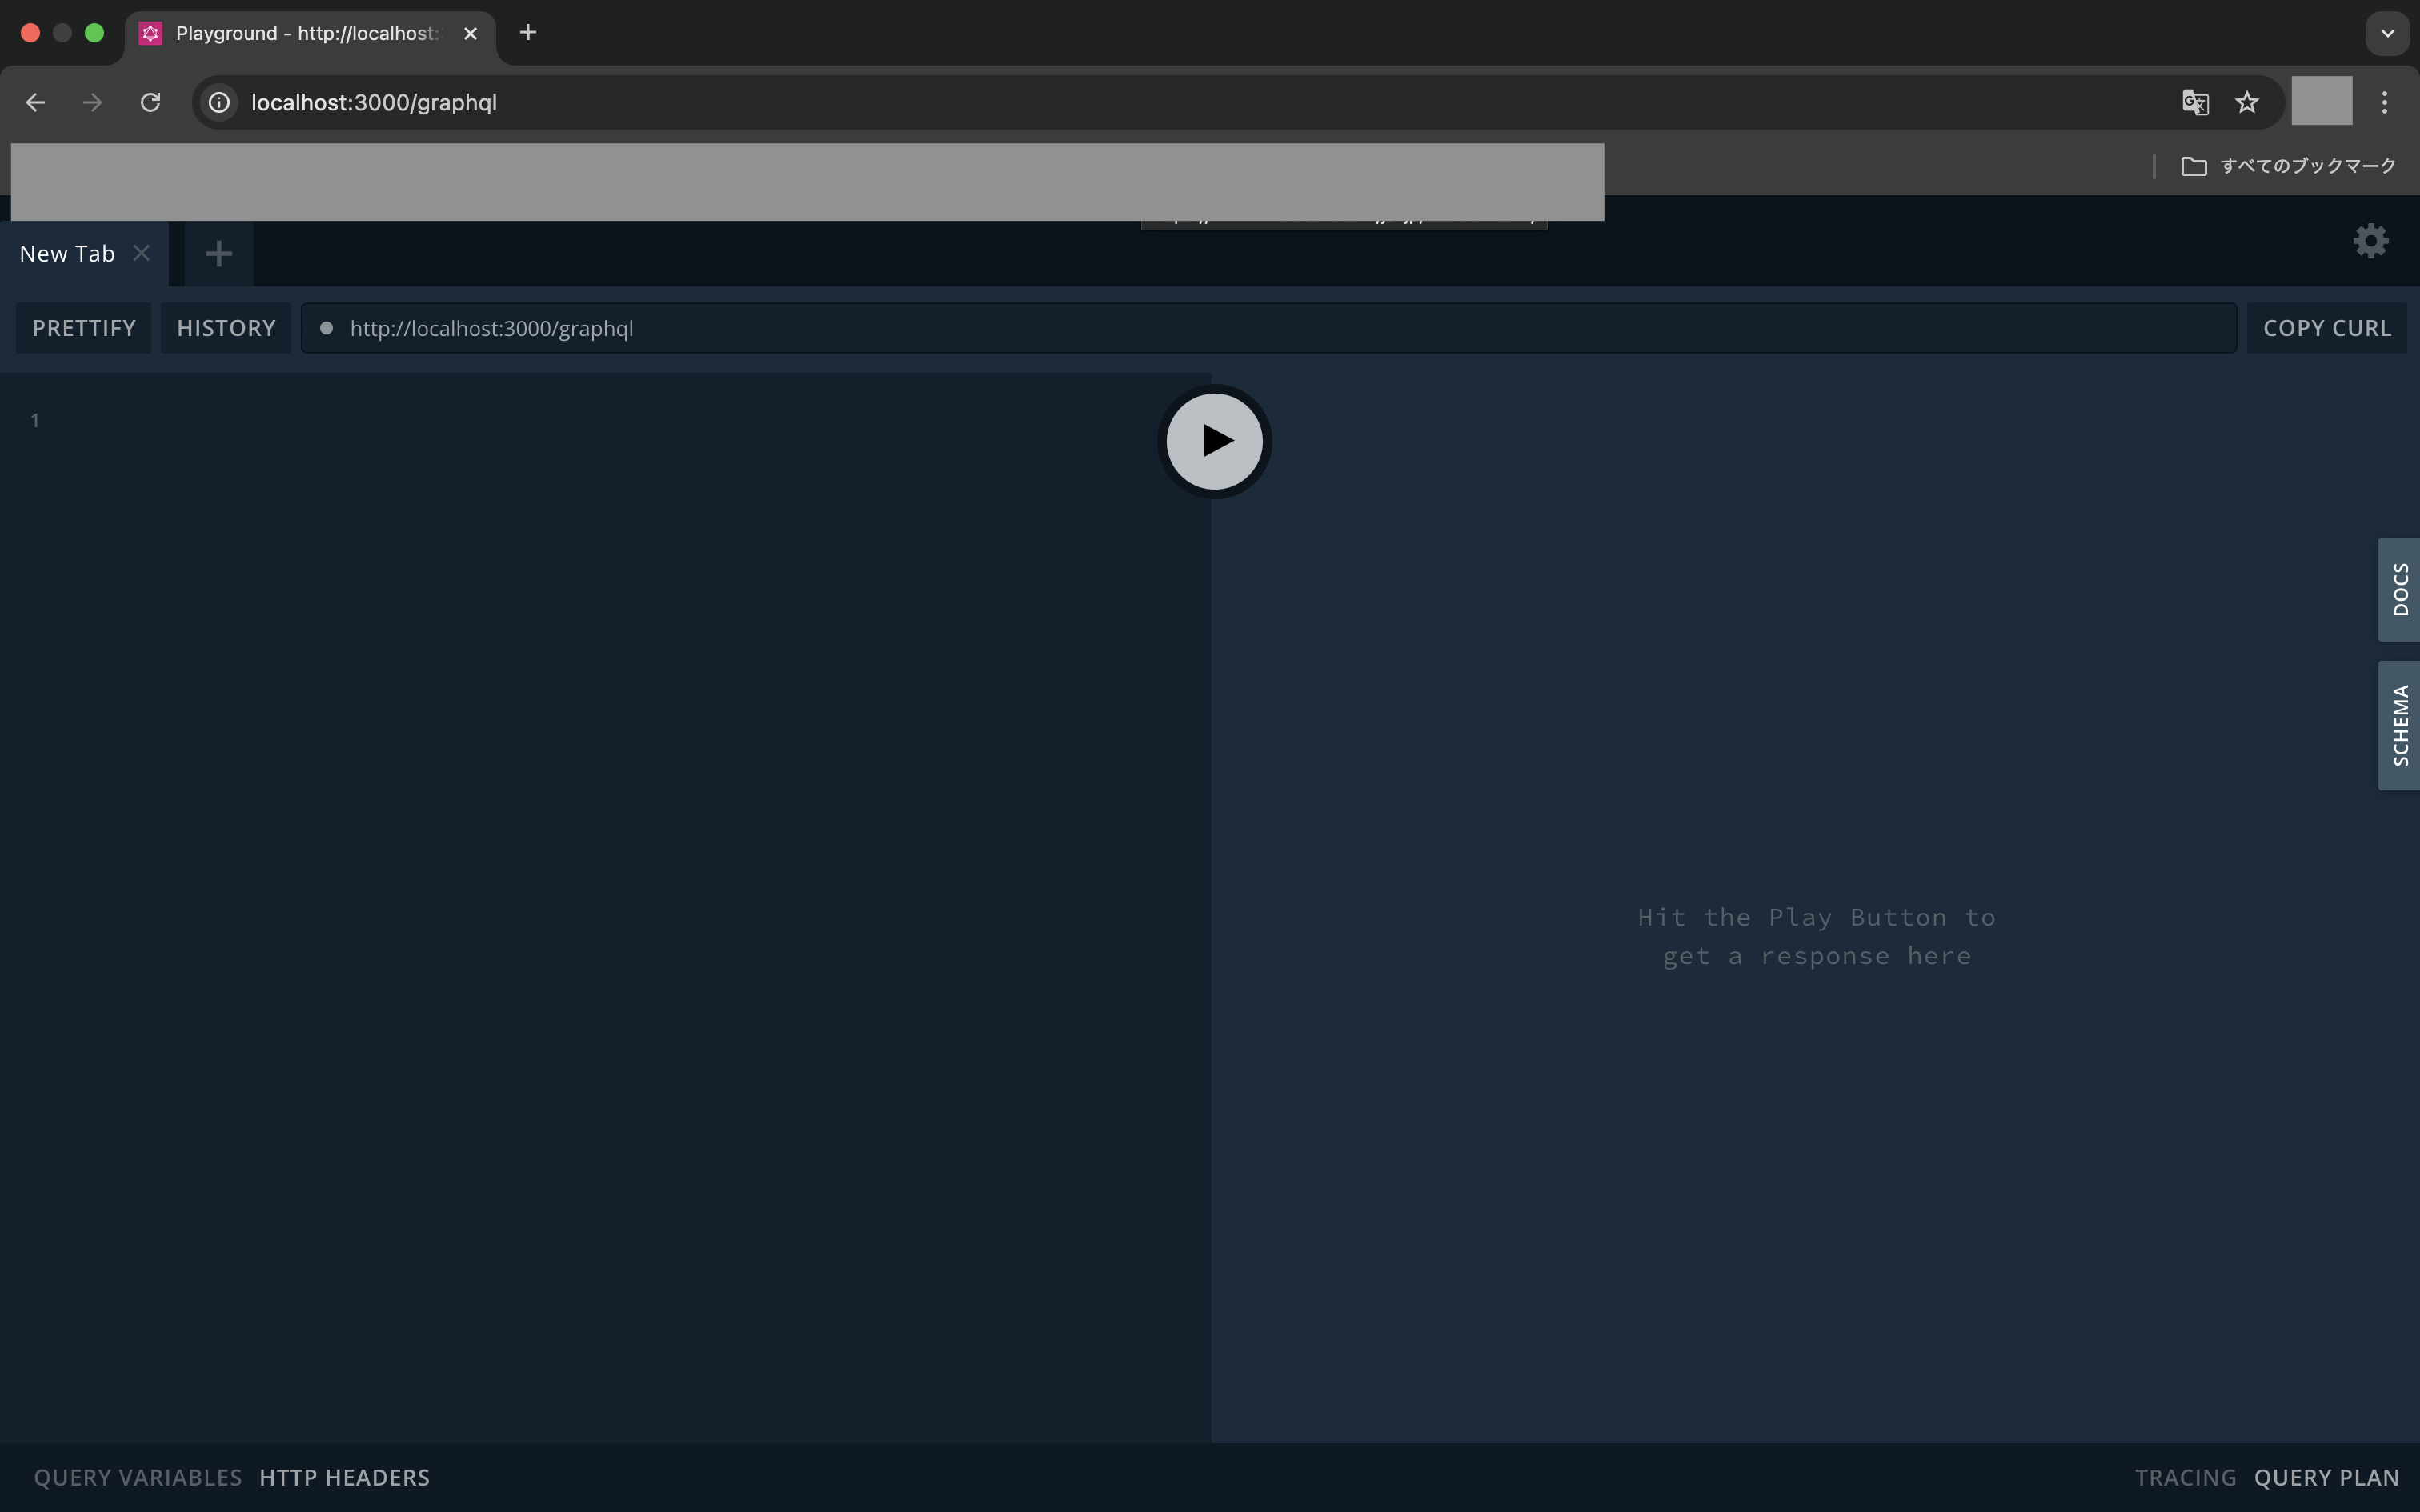
次にブラウザで「http://localhost:3000/graphql」を開き、GraphQLのPlaygroundが表示されればOKです。
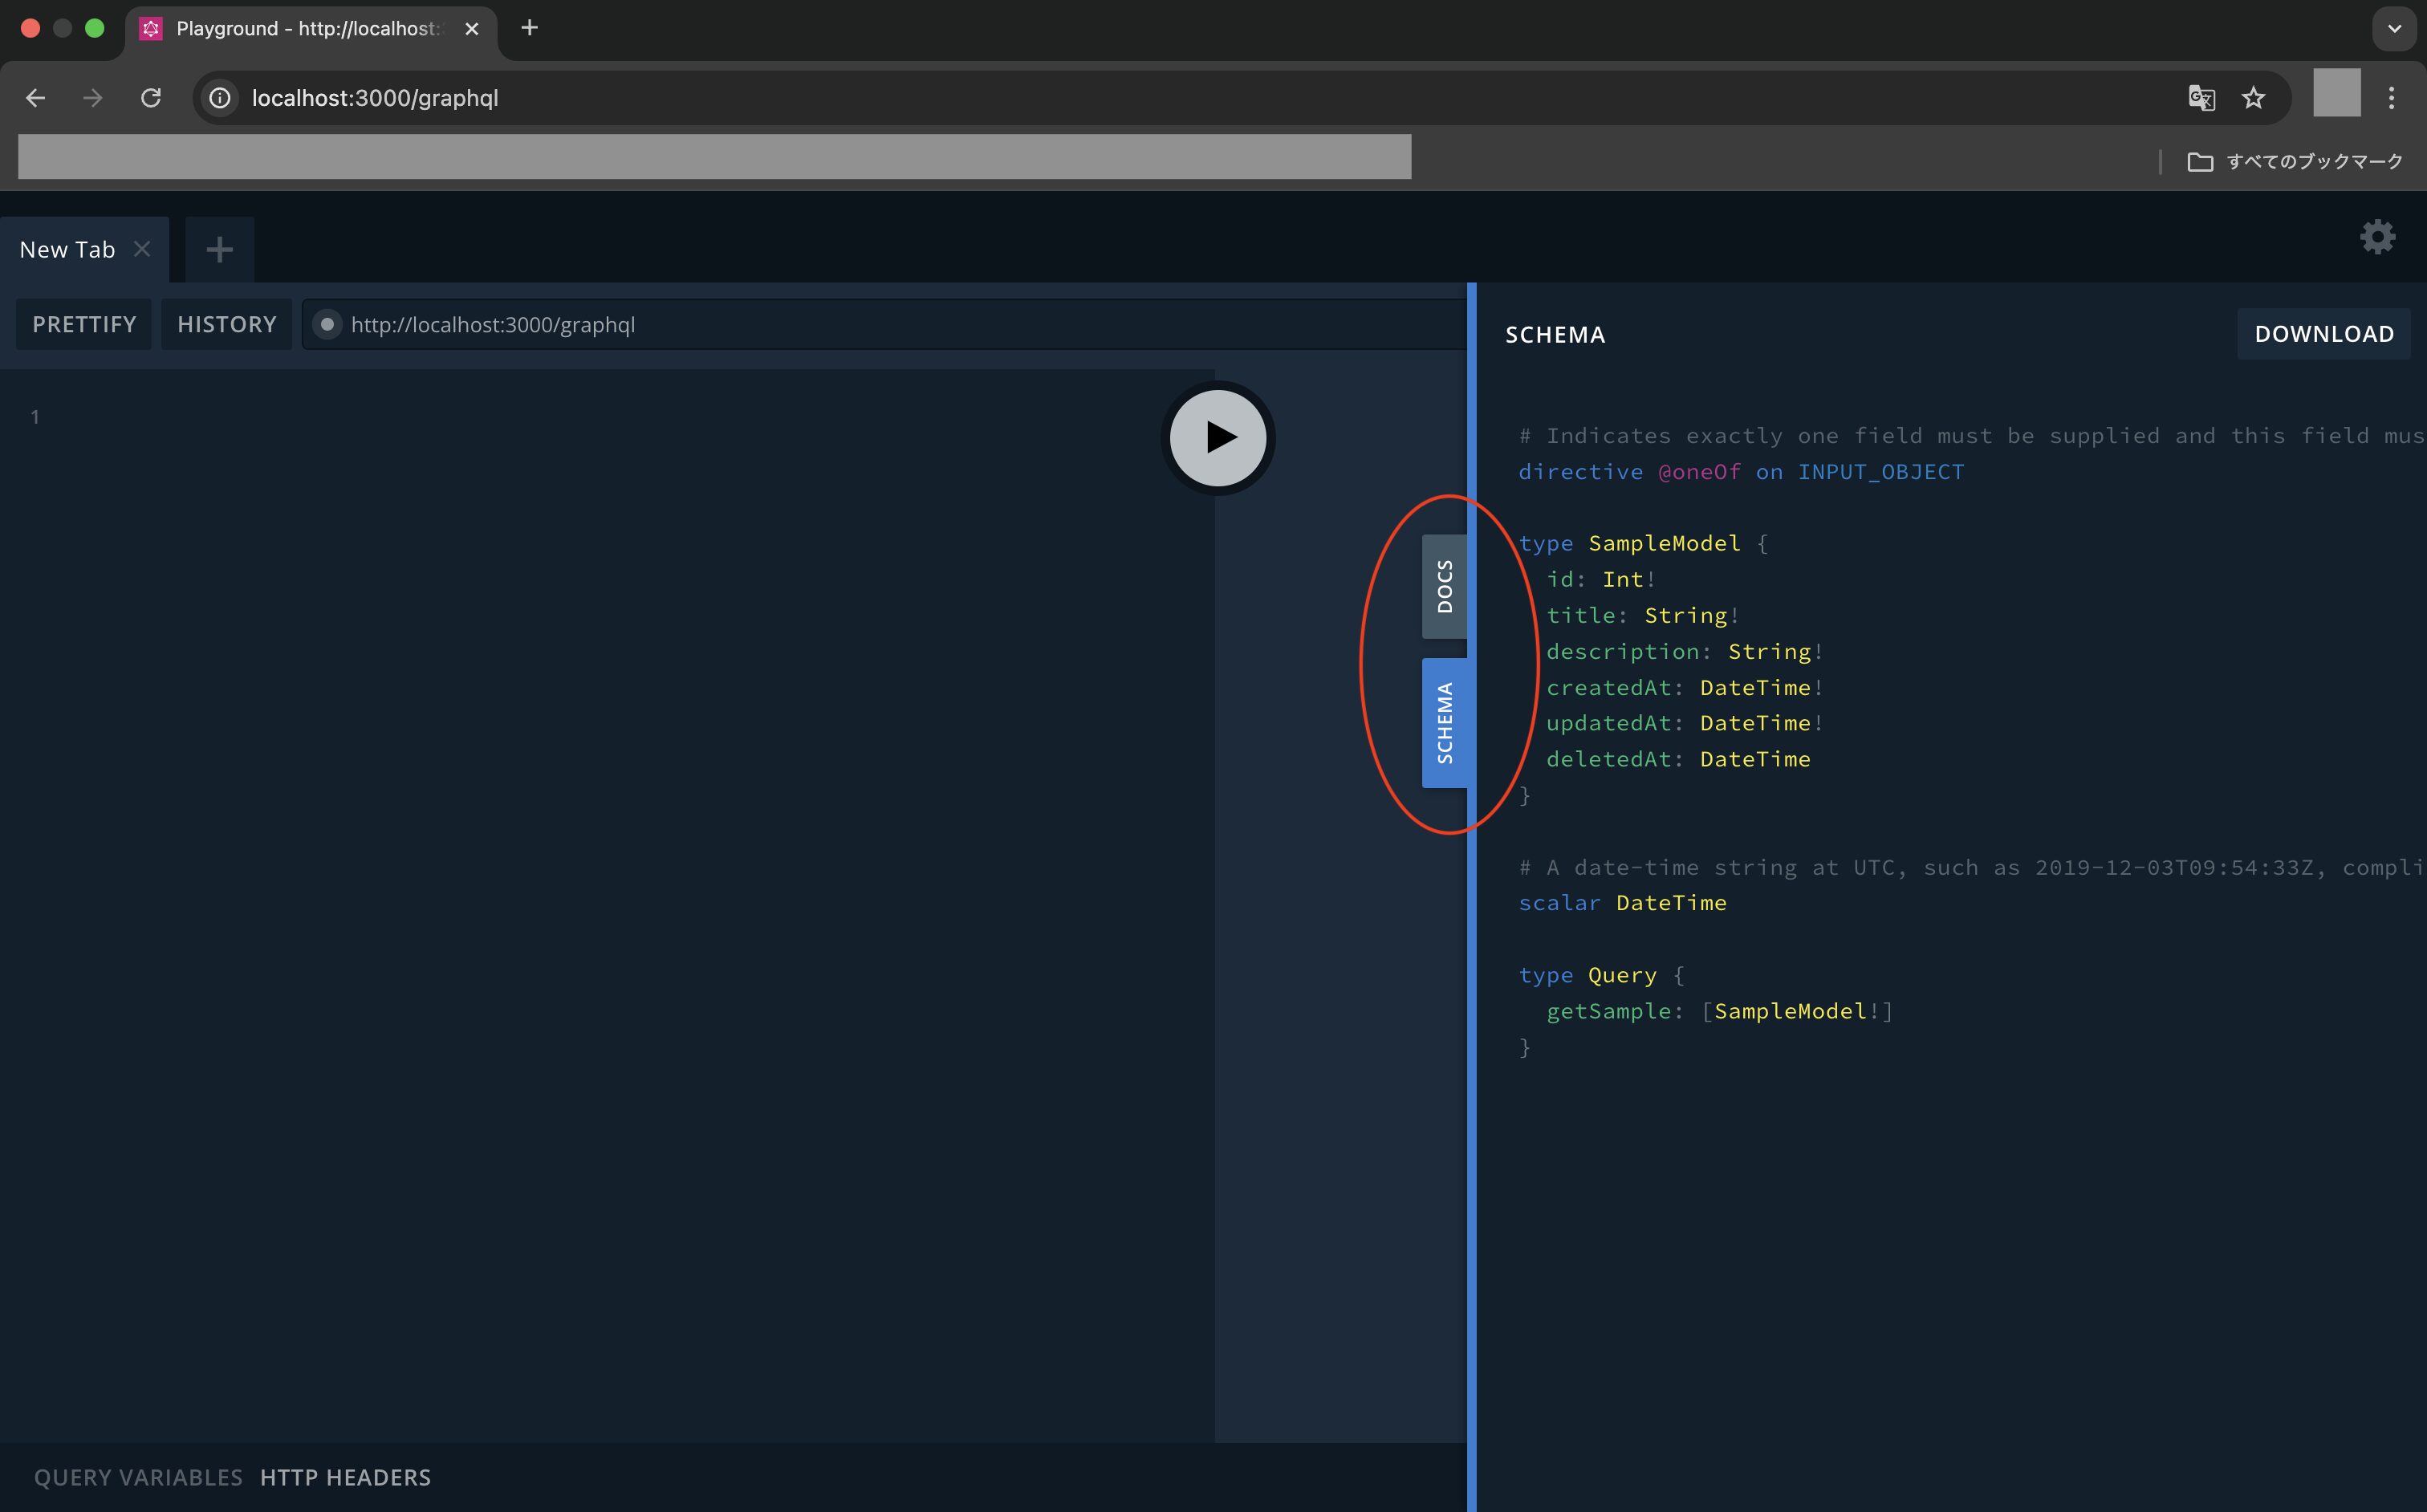
Playgroundでは画面右側の「SCHEMA」や「DOCS」のタブをクリックすると、それぞれドキュメントが確認できます。
次に画面の左側の入力フィールドに以下のクエリを記述し、画面中央のボタンを押してGraphQLのAPIを実行して下さい。
query GetSampleData {
  getSample {
    id
    title
    description
    createdAt
    updatedAt
    deletedAt
  }
}
クエリ実行後、以下のように画面右側にデータが取得できればOKです。
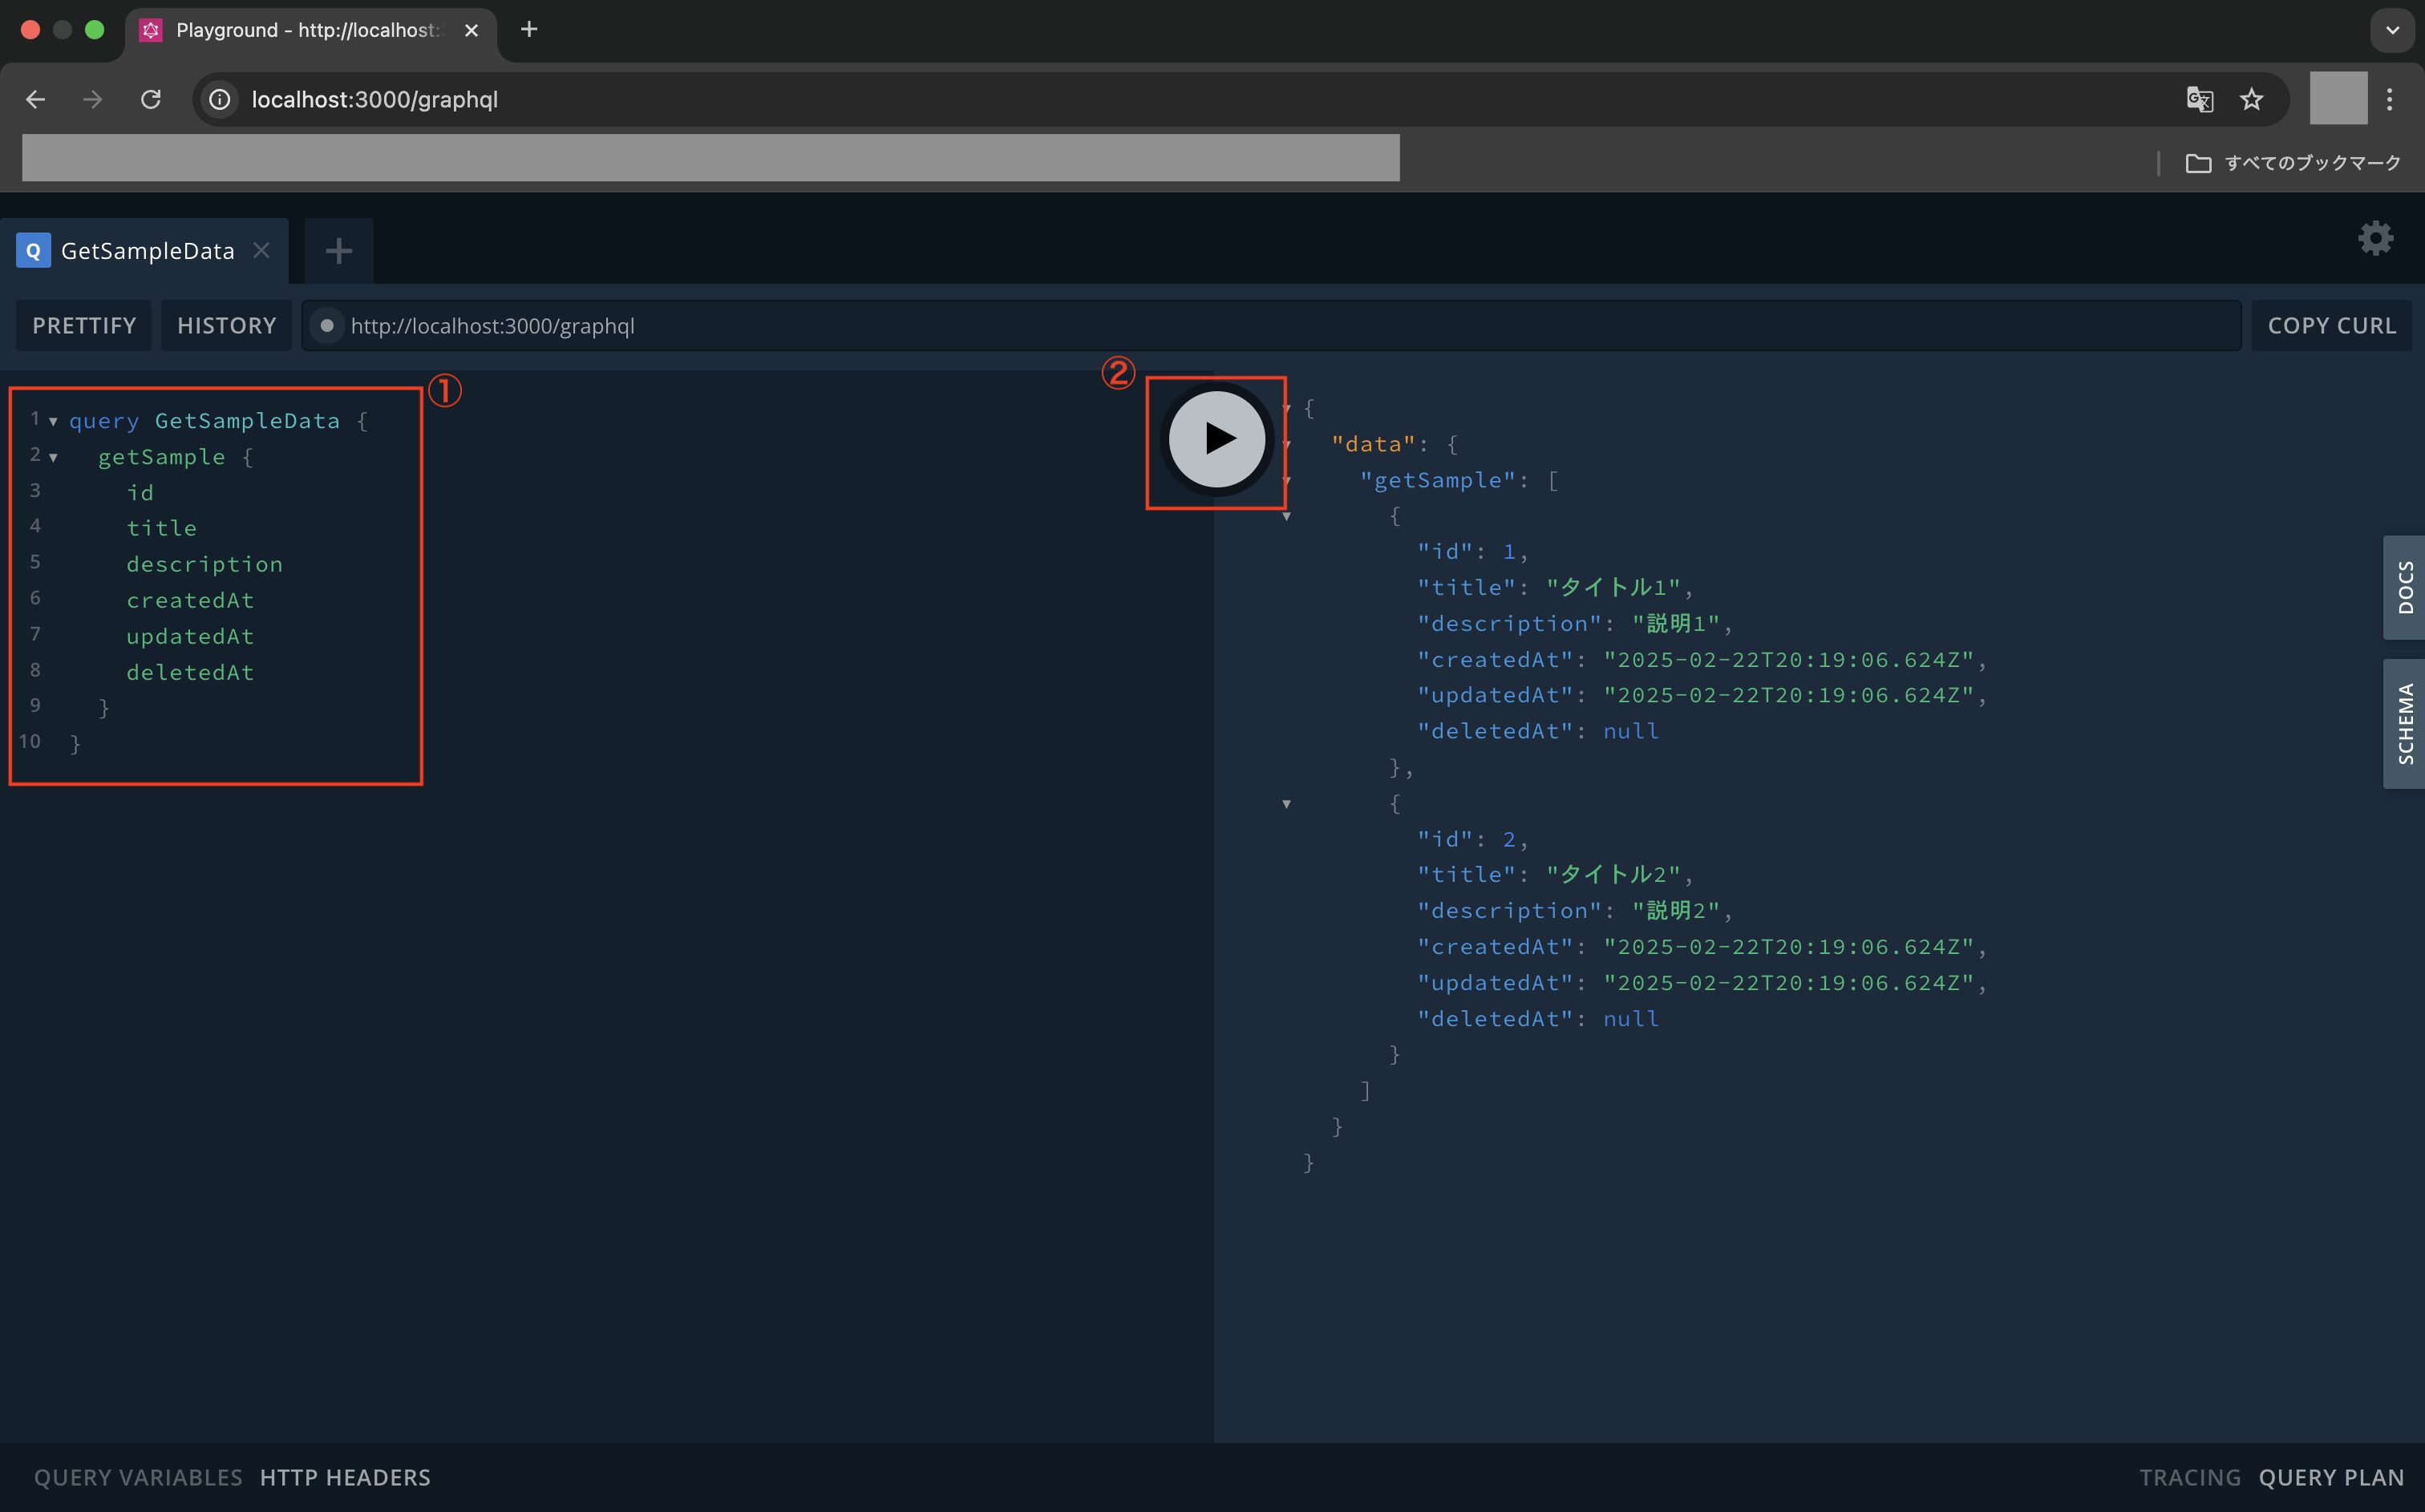
※GraphQLのレスポンスのステータスコードは基本的に200を返す仕様のため、フロント側でエラーチェックをするにはエラー時のレスポンス結果にステータスコードなどを含める必要があるのはご注意下さい。
次にクエリを以下のように修正して再実行して下さい。
query GetSampleData {
  getSample {
    id
    title
    description
  }
}
クエリ実行後、以下のように指定したフィールドのみ取得できていればOKです。
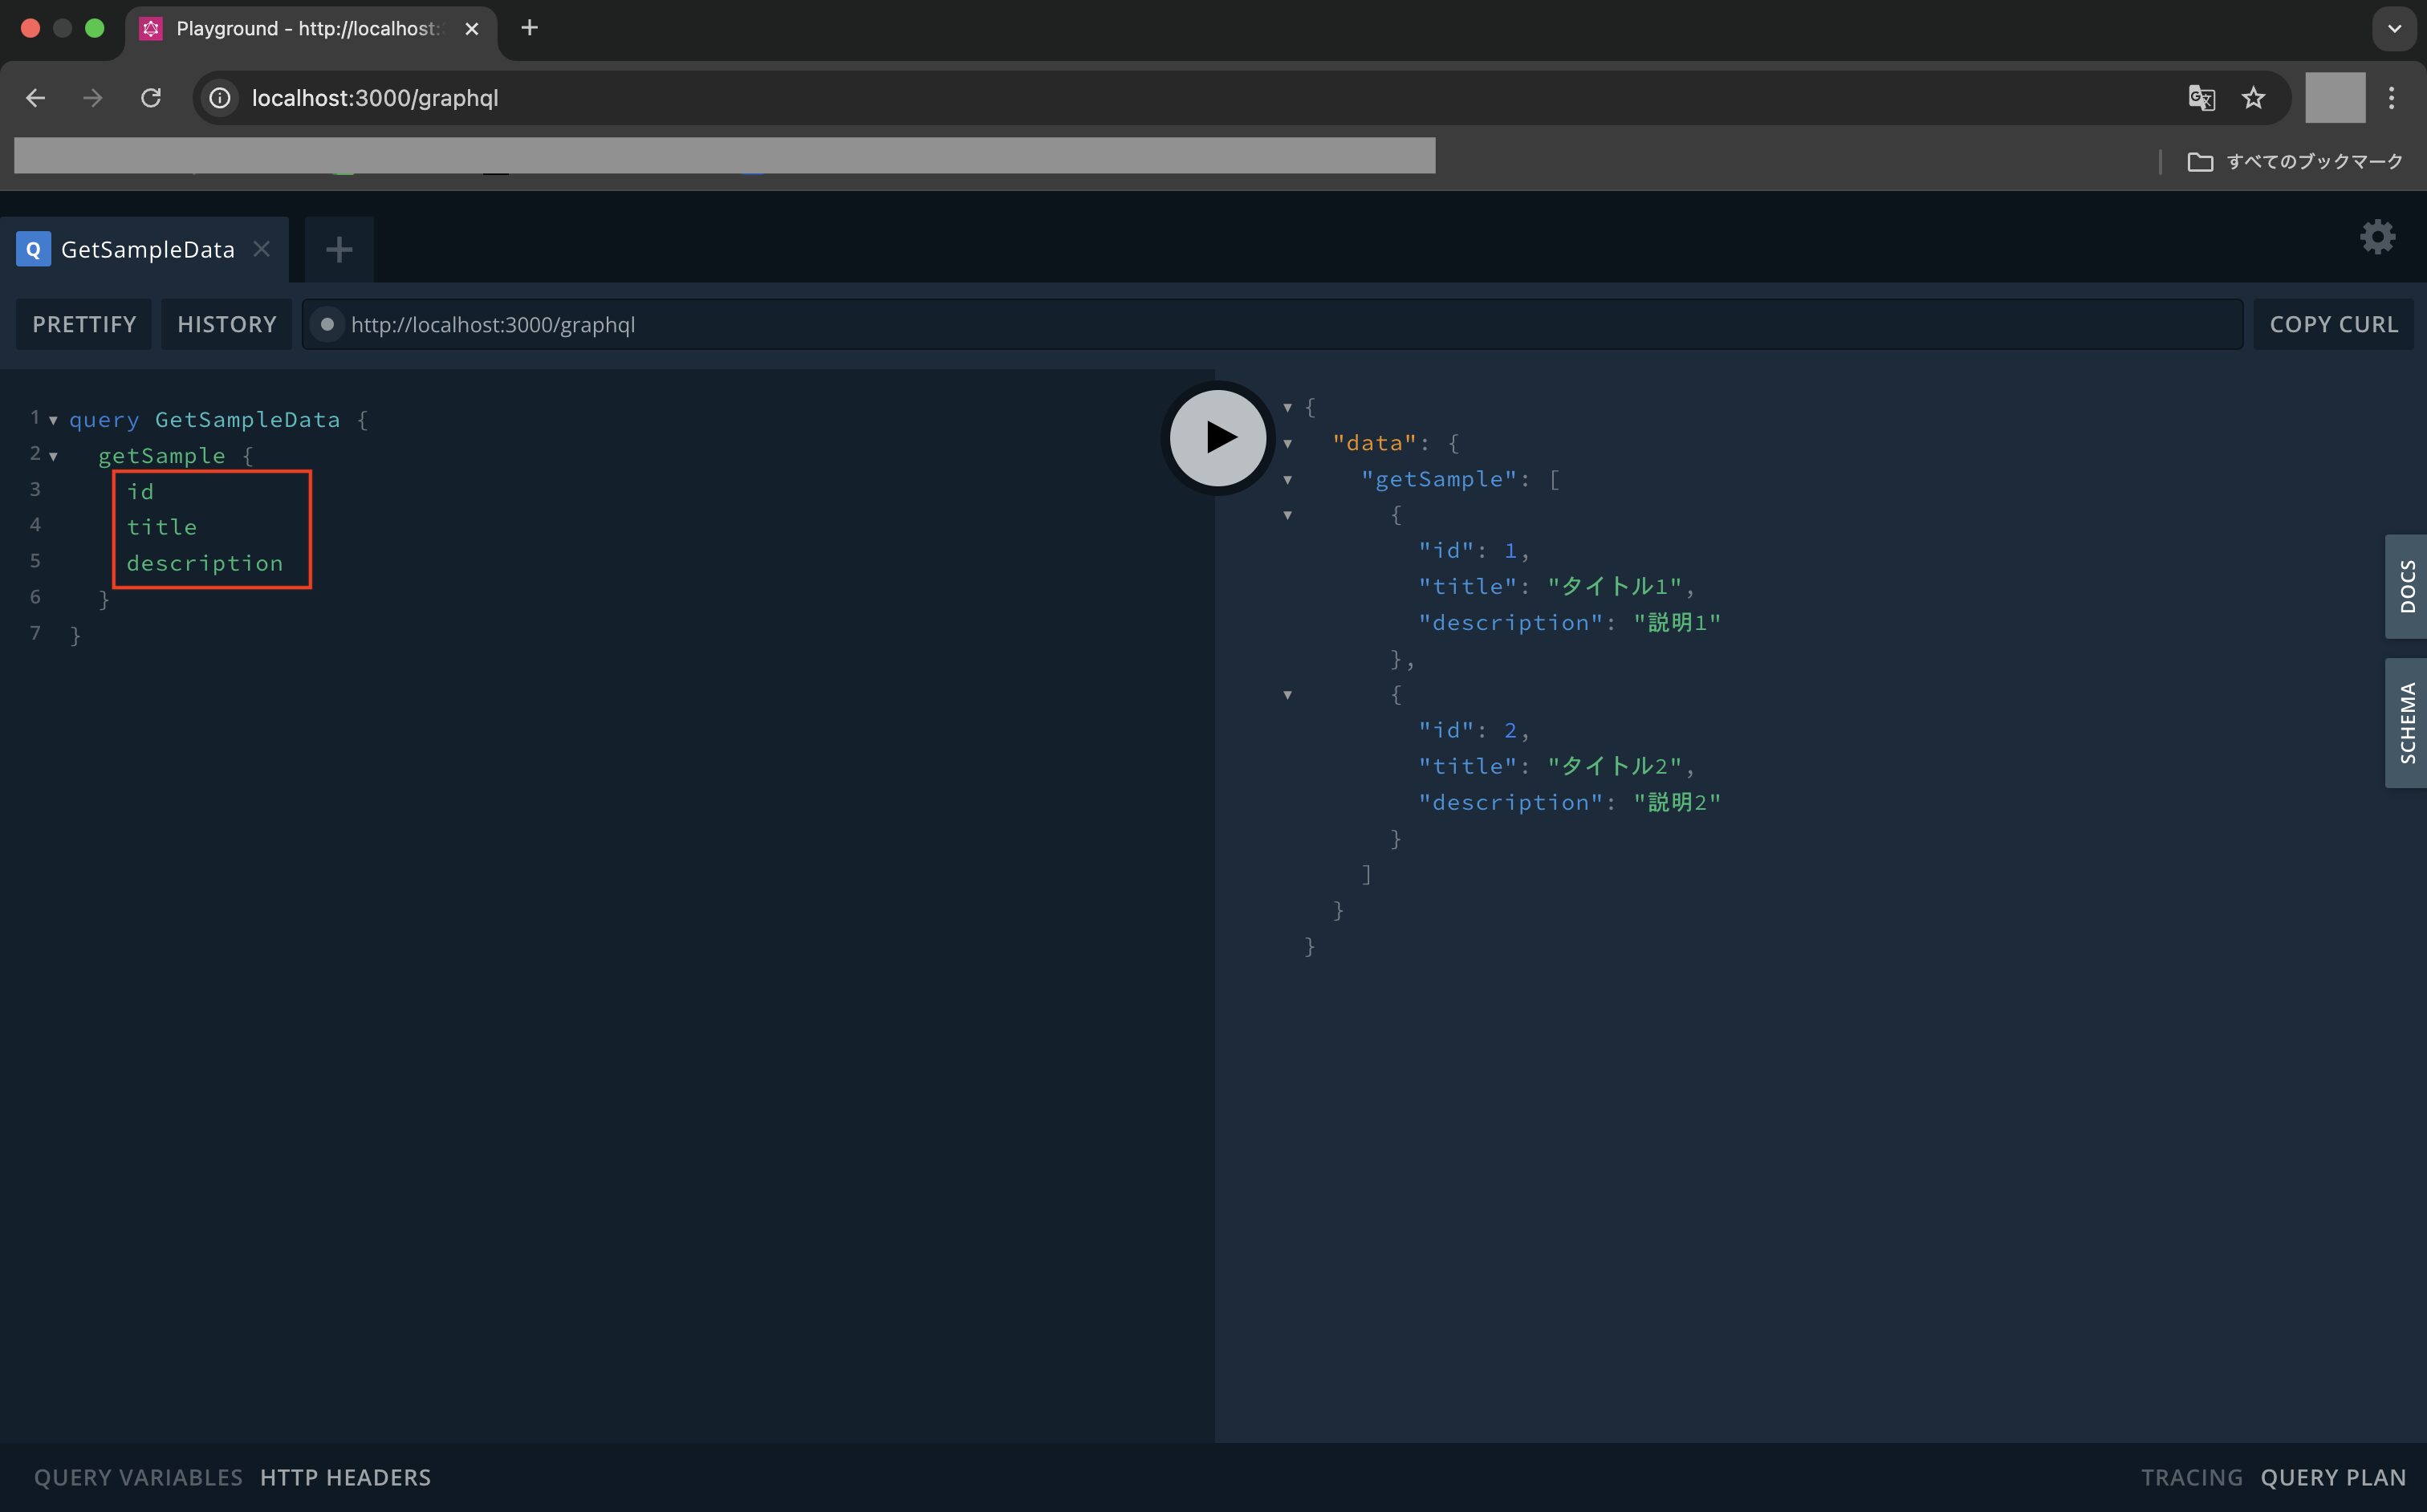
このようにGraphQLを使えば必要なフィールドのみレスポンス結果として返すことが容易になります。
最後に
今回はNest.jsの使い方について解説しました。
Nest.jsはREST APIもGraphQLもどちらも対応することができるフレームワークになっているので、TypeScript(JavaScript)でバックエンドAPIを作るのにおすすめです。
そしてBFFを開発するならGraphQLで開発していくのがいいとは思いますが、GraphQLは学習コストが高い(知見が無いメンバーが多いと開発コストが高くなる)というデメリットもあるため、どちらを使うかはプロジェクト規模などに応じてしっかり検討するようにして下さい。
ということで、これからNest.jsを試したい方はぜひ参考にしてみて下さい。
各種SNSなど、チャンネル登録やフォローをしていただけると励みになるので、よければぜひお願いします!


コメントを残す